
In this post we would like to elaborate the steps of setting up Kuberrnetes cluster using virtual box and Ubuntu 22.04.2 LTS.
1. Configuring Virtual Box VMs
The configuration step of Virtual Box are as follow:
- Installing a VM
k8susing Ubuntu Linux 22.04.2 LTS as a VM reference. - Copying disk of the VM as
k8s-master.vdi,k8s-worker1.vdi,k8s-worker2.vdi. - Using Windows Command Prompt, change the hardisk UUID of each hdd on step
1.2with the following commandcd C:\Program Files\Oracle\VirtualBox C:\..\VirtualBox>VBoxManage.exe internalcommands sethduuid "D:\VMs\disk\k8s-master.vdi" UUID changed to: 91ebaec7-c113-4bb0-bc12-baa557f0574e -
Applying the step
1.3for thek8s-worker1.vdi,k8s-worker2.vdi. -
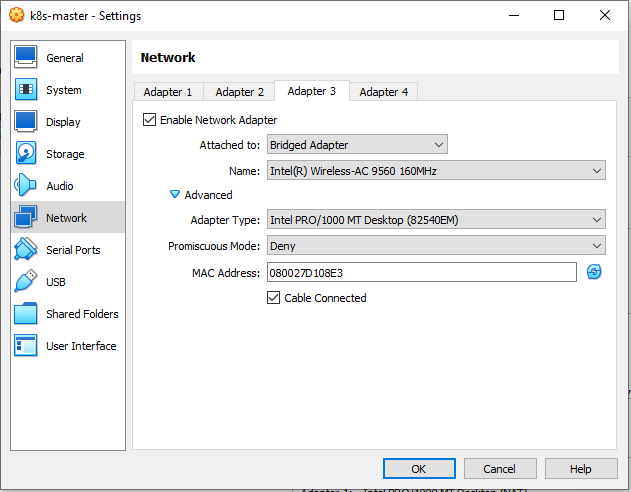
Configuring Network Adapter.
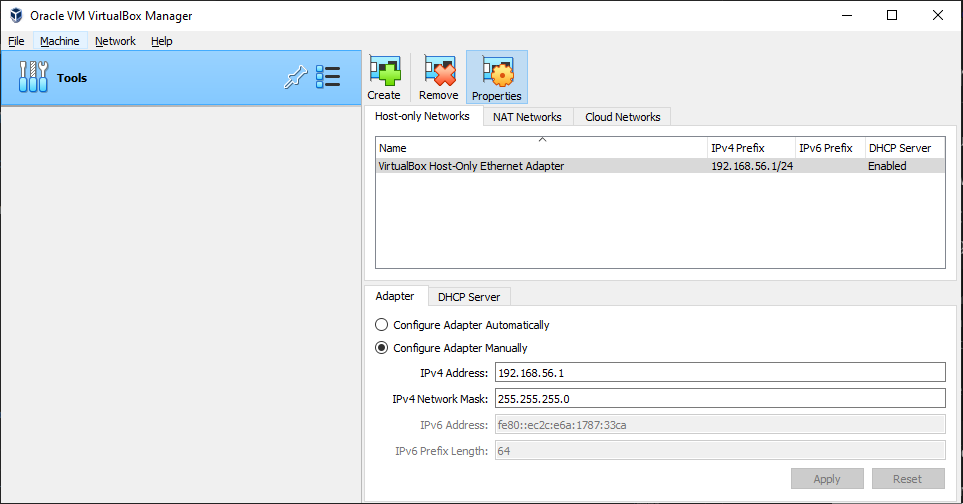
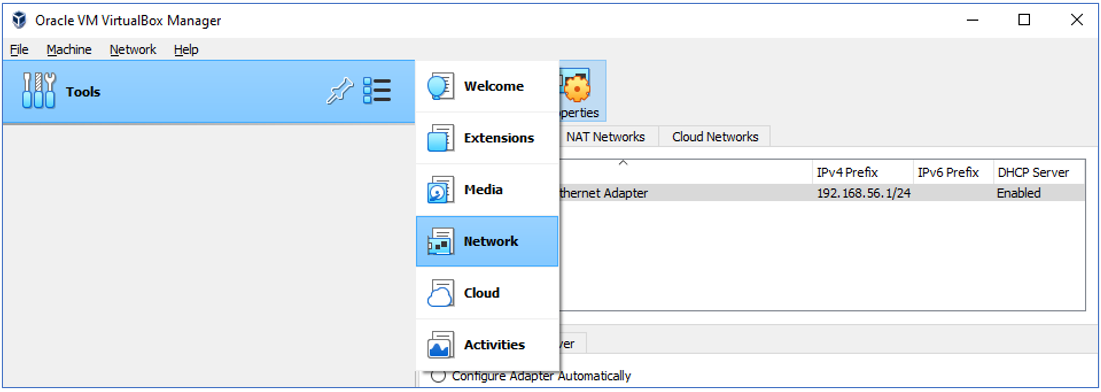 The Host Only Adapter network configuration as follow
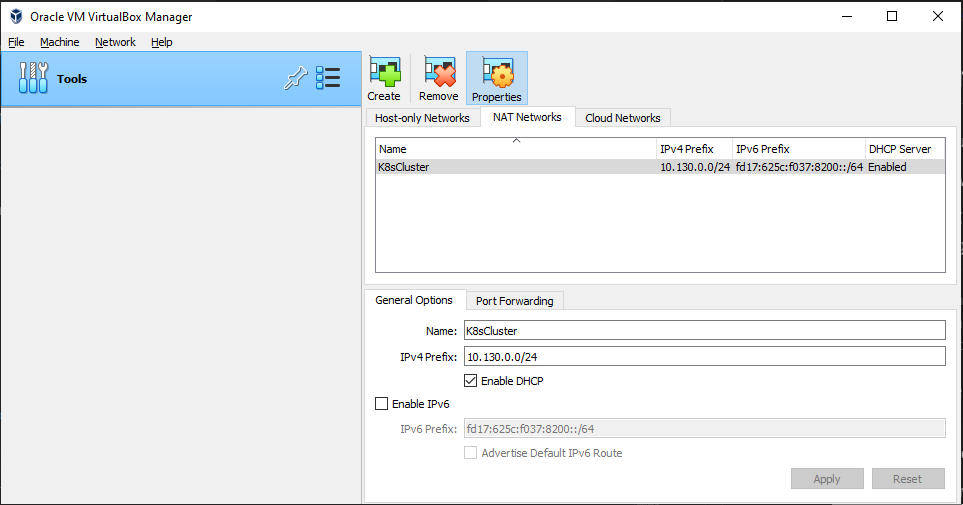
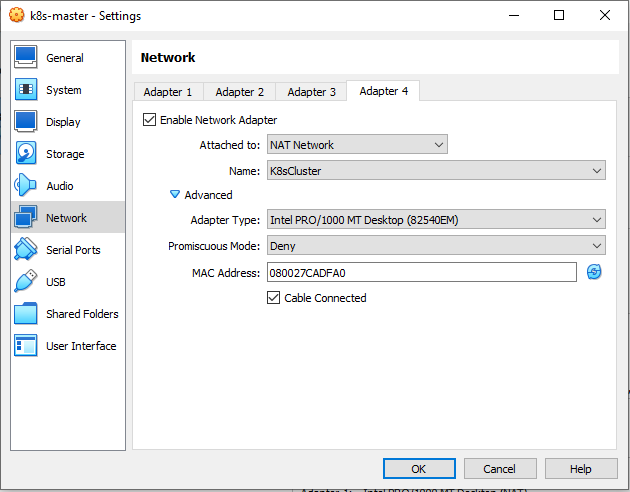
 In the NAT Adapter network configuration, create a NAT Network named K8sCluster
-
Creating three VMs
k8s-master,k8s-worker1,k8s-worker2using the existing disks namelyk8s-master.vdi,k8s-worker1.vdi,k8s-worker2.vdi. Makesure the network of NAT, Host Only Adapter, Bridge and NAT Network enabled.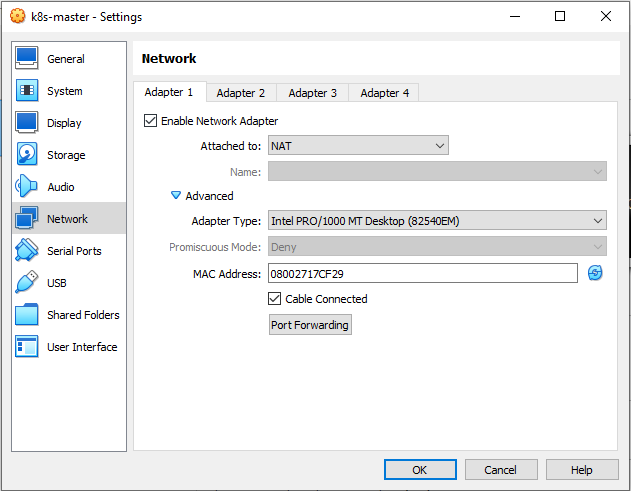

Don’t forget to refresh the MAC address on each adapter.
- To ensure the network adapter work well, check using ip check
ip addrTable 1: Node, IP and Hostname
Node IP Host Only Host Name master 192.168.56.110 master.neutro.io worker1 192.168.56.111 worker-node-1.neutro.io worker2 192.168.56.112 worker-node-2.neutro.io Set the ip of host only adapter of master according Table 1 by editing the
/etc/netplan/00-installer-config.yamlvi /etc/netplan/00-installer-config.yaml# This is the network config written by 'subiquity' network: ethernets: enp0s10: dhcp4: true enp0s3: dhcp4: true enp0s8: dhcp4: false addresses: - 192.168.56.110/24 enp0s9: dhcp4: true version: 2sudo netplan apply # check ip #ip addr ip --brief addr showSet the hostname for master with the following command.
# host name for master
sudo hostnamectl set-hostname master.neutro.io
exec bash
Apply the same things to the
worker1 nodeandworker2 nodeby refering to the Table 1.
2. Tool installation
Updating the apt package index and installing the followingpackages that are needed in Kubernates and container installation.
sudo -i
apt-get update && apt-get upgrade -y
apt-get install -y vim git curl wget apt-transport-https gnupg gnupg2 software-properties-common ca-certificates lsb-release

exit
Repeat on all the other nodes.
3. Docker Installation
The Docker installation steps are as follow:
-
Installing Docker
# https://docs.docker.com/engine/install/ubuntu/ # 1. Adding Docker official GPG key sudo mkdir -m 0755 -p /etc/apt/keyrings curl -fsSL https://download.docker.com/linux/ubuntu/gpg | sudo gpg --dearmor -o /etc/apt/keyrings/docker.gpg # 2. Setting up the repository echo \ "deb [arch=$(dpkg --print-architecture) signed-by=/etc/apt/keyrings/docker.gpg] https://download.docker.com/linux/ubuntu \ $(lsb_release -cs) stable" | sudo tee /etc/apt/sources.list.d/docker.list > /dev/null # 3. Updating package apt package index sudo apt-get update # NOTE: if receiving a GPG error when running apt-get update? sudo chmod a+r /etc/apt/keyrings/docker.gpg sudo apt-get update # 4. Installing Docker Engine, containerd, and Docker Compose. sudo apt-get install docker-ce docker-ce-cli containerd.io docker-buildx-plugin docker-compose-plugin - Checking the docker version
docker version - Enabling and starting docker
sudo systemctl enable docker
# sudo systemctl start docker
sudo systemctl daemon-reload
sudo systemctl restart docker
Verifying the docker status
sudo systemctl status dockerRepeat on all the other nodes.
4. Kubernates Installation
The Kubernates installation steps are described in the following steps:
-
Adding
kubernatesrepositorysudo -i sudo curl -s https://packages.cloud.google.com/apt/doc/apt-key.gpg | apt-key add sudo apt-add-repository "deb http://apt.kubernetes.io/ kubernetes-xenial main" exit - Installing
kubeadm, kubelet, kubectlsudo apt install -y kubeadm kubelet kubectl sudo apt-mark hold kubeadm kubelet kubectlVerifying the installation
kubectl version --output=yaml kubeadm version -
Disabling the swap memory
Turn off swap
sudo sed -i '/ swap / s/^\(.*\)$/#\1/g' /etc/fstabTo ensure we disable Linux swap space permanently, edit the
/etc/fstabthen remark theswapline by adding # (hashtag/comment) sign in front of the line.sudo vim /etc/fstab # remark the following line #/swap.img none swap sw 0 0To confirm the setting is correct, run the following command.
# swapoff disables swapping on the specified devices and files. # -a flag is given, swapping is disabled on all known swap devices and files (as found in /proc/swaps or /etc/fstab) sudo swapoff -a sudo mount -a free -h - Enabling kernel modules and configuring sysctl.
# Enable kernel modules
sudo modprobe overlay
sudo modprobe br_netfilter

# Add some settings to sysctl
sudo vim /etc/sysctl.d/kubernetes.conf

net.bridge.bridge-nf-call-ip6tables = 1
net.bridge.bridge-nf-call-iptables = 1
net.ipv4.ip_forward = 1

# Reload sysctl
sudo sysctl --system
Repeat steps 4.1 - 4.4 on each server node.
5. Kubernetes Cluster Configuration
For building Kubernetes cluster, in this lab we use kubeadm. The steps are:
- Configuring container runtime (Docker CE runtime)
# Create required directories sudo mkdir -p /etc/systemd/system/docker.service.d # Create daemon json config file sudo vim /etc/docker/daemon.json { "exec-opts":["native.cgroupdriver=systemd"], "log-driver":"json-file", "log-opts":{ "max-size":"100m" }, "storage-driver":"overlay2" } # Start and enable Services sudo systemctl daemon-reload sudo systemctl restart docker sudo systemctl enable docker -
Installing Mirantis cri-dockerd as Docker Engine shim for Kubernetes
For Docker Engine you need a shim interface. The Mirantis cri-dockerd CRI socket file path is
/run/cri-dockerd.sock. This is what will be used when configuring Kubernetes cluster.VER=$(curl -s https://api.github.com/repos/Mirantis/cri-dockerd/releases/latest|grep tag_name | cut -d '"' -f 4|sed 's/v//g') echo $VER ### For Intel 64-bit CPU ### wget https://github.com/Mirantis/cri-dockerd/releases/download/v${VER}/cri-dockerd-${VER}.amd64.tgz tar xvf cri-dockerd-${VER}.amd64.tgz ### For ARM 64-bit CPU ### wget https://github.com/Mirantis/cri-dockerd/releases/download/v${VER}/cri-dockerd-${VER}.arm64.tgz cri-dockerd-${VER}.arm64.tgz tar xvf cri-dockerd-${VER}.arm64.tgzMove the
cri-dockerdbinary package to/usr/local/bindirectorysudo mv cri-dockerd/cri-dockerd /usr/local/bin/To validate the successful installation, check the
cri-dockerdversion.cri-dockerd --versionThe next step is configuring systemd units for cri-dockerd
wget https://raw.githubusercontent.com/Mirantis/cri-dockerd/master/packaging/systemd/cri-docker.service
wget https://raw.githubusercontent.com/Mirantis/cri-dockerd/master/packaging/systemd/cri-docker.socket

sudo mv cri-docker.socket cri-docker.service /etc/systemd/system/
sudo sed -i -e 's,/usr/bin/cri-dockerd,/usr/local/bin/cri-dockerd,' /etc/systemd/system/cri-docker.service
Reload and enable the services
sudo systemctl daemon-reload
sudo systemctl enable cri-docker.service
sudo systemctl enable --now cri-docker.socket
To ensure the service is running, check the status of
cri-dockersystemctl status cri-docker.socket -
Initializing master node
In the master node, make sure that the
br_netfiltermodule is loaded:lsmod | grep br_netfilterEnable kubelet service.
sudo systemctl enable kubeletWe now want to initialize the machine that will run the control plane components which includes etcd (the cluster database) and the API Server.
# sudo kubeadm config images pull
sudo kubeadm config images pull --cri-socket /run/cri-dockerd.sock
Repeat steps 5.1 - 5.3 on each server node.
-
Initializing Clustering
On master node, run the following command to initialize cluster.
# without specifing control plane IP
sudo kubeadm init --cri-socket /run/cri-dockerd.sock --pod-network-cidr=10.244.0.0/16 --ignore-preflight-errors=NumCPU

# init with specific ip of control plane IP
sudo kubeadm init --cri-socket /run/cri-dockerd.sock --control-plane-endpoint=192.168.56.110 --apiserver-advertise-address=192.168.56.110 --pod-network-cidr=10.244.0.0/16 --ignore-preflight-errors=NumCPU
Node IP Host Only --cri-socketuse if have more than one container runtime to set runtime socket path --control-plane-endpointset the shared endpoint for all control-plane nodes. Can be DNS/IP --apiserver-advertise-addressset advertise address for this particular control-plane node’s API server --pod-network-cidrset a Pod network add-on CIDR In the log of
kubeadm init, we see an instruction to add kube configuration in home directory.mkdir -p $HOME/.kube sudo cp -i /etc/kubernetes/admin.conf $HOME/.kube/config sudo chown $(id -u):$(id -g) $HOME/.kube/configInstall flunnel as Kubernates network add on
curl -LO https://github.com/flannel-io/flannel/releases/latest/download/kube-flannel.yml
vi kube-flannel.yml
Makesure IP in the
kube-flannel.ymlis the same as--pod-network-cidrkubectl apply -f kube-flannel.ymlCheck the all pods running or not
kubectl get pods --all-namespaces
Finally we can check the master node is ready or not using the following command.
kubectl get nodes -o wide
6. Joining Worker Node to The Cluster
- On the master node, generate joined token to join to the cluster
sudo kubeadm token create --print-join-command -
On each worker node, run the following command to join to the cluster
sudo kubeadm join 192.168.56.110:6443 --token 4bz2jr.r7a0fhemw4rrx9uz \
     --discovery-token-ca-cert-hash sha256:493dd20563876610d54a27f959ca31520c7a6cc4d24529bc03b5202d2d9c29ea \
     --cri-socket unix:///var/run/cri-dockerd.sock
we can also generate the token
- On the master node, check the nodes which join to the cluster
kubectl get nodes -o wide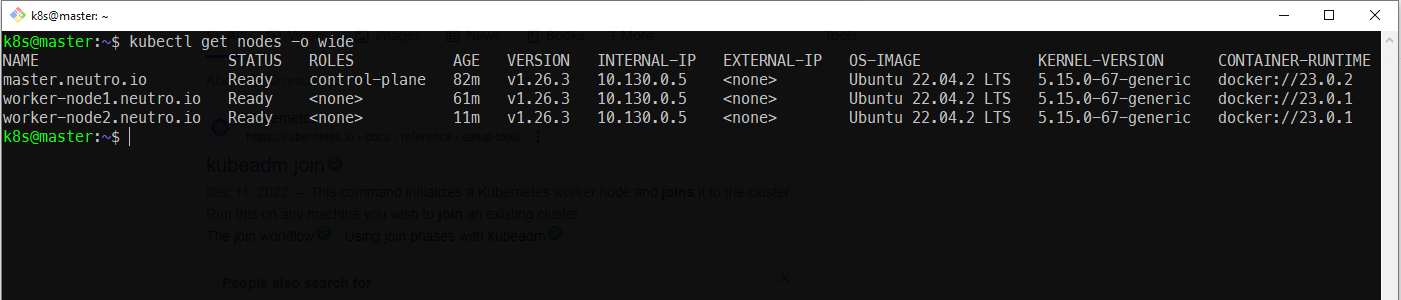
References
- Creating Cluster Kubeadm
- Cluster administration
- Tigera - getting started kubernetes
- Installing Kubernetes Cluster Ubuntu Jammy
- Deploy Kubernetes Cluster on Ubuntu with Kubeadm
- Install Mirantis CRI Dockerd as Docker Engine Shim for Kubernetes
- Kubernetes Setup on Ubuntu 22.04 LTS jammy-jellyfish
- How to Install kubernetes k8s and docker on ubuntu 20.04
- Kubernetes on Ubuntu on Virtualbox
- Standard k8s Installation Failed on Centos7
- Deploy Kubernetes with Specific Public IP Address for Control Plane Endpoint
- Virtualbox cannot Register the hard disk
- Connection refused when setting up kubernetes
- Coredns in pending state in kubernetes cluster
- Kubernetes api server bind address vs advertise address