21 Nov 2017
•
macos
One day I need to connect my macOS to a network of client of the company I work for via Point-to-Point Tunneling Protocol (PPTP) VPN. Unfortunately Apple removed PPTP support on macOS Sierra, so I had to find an alternative for that. Some of them I found are third parties application that need a one time buying or annual subscription. In fact, Apple just remove the user interface option for PPTP VPN, meanwhile the libraries of it are still available on Sierre.
Since the libraries of PPTP are still available on Sierra, theoritically we should be able to call the libraries via terminal. Finally I found 3 blogs that write about PPTP protocol on macos and I put them in a reference section in this blog. Basically the three of them use the same technique that’s write a script contains configuration of PPTP that’s put in /etc/ppp/peers/ and call it via pppd command via terminal.
First of all create a file called /etc/ppp/peers/pptpvpn-client1
$ sudo /etc/ppp/peers/pptpvpn-client1
Fill the pptpvpn-client1 that contains configuration that pppd daemon will refer to connect.
plugin PPTP.ppp
noauth
# logfile /tmp/ppp.log
remoteaddress "xxx.xxx.xxx.xxx"
user "xxxxxx"
password "xxxxxxxx"
redialcount 1
redialtimer 5
idle 1800
# mru 1368
# mtu 1368
receive-all
novj 0:0
ipcp-accept-local
ipcp-accept-remote
# noauth
refuse-eap
refuse-pap
refuse-chap-md5
hide-password
mppe-stateless
mppe-128
# require-mppe-128
looplocal
nodetach
# ms-dns 8.8.8.8
usepeerdns
# ipparam gwvpn
defaultroute
debug
Then open terminal and call
$ sudo pppd call pptpvpn-client1
If you cannot connect with the configuration code I use, you can check the error messages displayed in terminal. May be some configuration items do not match with the vpn server setting you connect to.
If the you got no any error messages and connection established with your VPN network you can open a new tab on the terminal and try to ping to an ip address in the VPN local network.
References
- https://smallhacks.wordpress.com/2016/12/20/pptp-on-osx-sierra/
- https://malucelli.net/2017/05/16/pptp-vpn-on-macos-sierra/
- https://www.cts-llc.net/2017/02/21/pptp-on-osx-just-one-last-time.html
14 Sep 2017
•
cpp
•
visual studio
•
windows

while visiting clients of the company I work on, sometime I still found some applications especially desktop application build on unmanaged code (such as Delphi, Visual Basic 6, C++, etc). Even though at the time of this blog post, many application build on .NET (managed code) on Windows platform. There are various reasons why they do not migrate to managed code which has some advantages over unmanaged code (such as the application still run well with the version of OS they use, rewrite app will need extra cost, etc). This means unmanaged code application is not dead at all for LOB app, even though the percentage is much lower than the managed one.
Maybe this topic seems out of date topic in the .NET era, but at least this post as a note for my self in case I need it on the other day.
While developing an application, usually we want to share some of our code with other application. Dynamic Link Library (DLL) is Microsoft’s implementation of the shared library concept in the Microsoft Windows. The term DLL in this post will refer to unmanaged code and only focus to the one build with Visual C++ compiler on Windows environment.
When we create a DLL, we also create a .lib file that contains information of exported class or functions. When we build an executable that calls the DLL, the linker uses the exported symbols in the .lib file to store this information for the loader. When the loader loads a DLL, the DLL is mapped into the memory space of the executable.
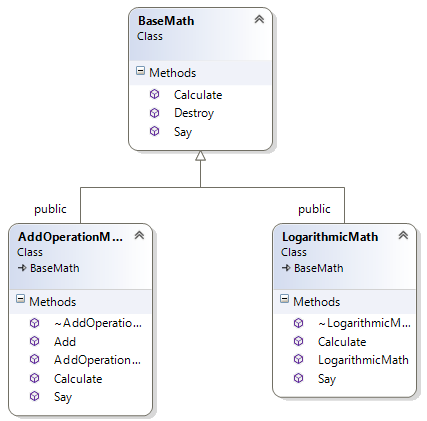
An executable file links to (or loads) a DLL in one of two ways, implicit or explicit linking. In this post will create simple sample both of them how C++ class exported in the two ways. The samples in this post created using IDE Microsoft Visual Studio 2013 Ultimate. To simplify the code, I just created a single solution contains a Win32 DLL project and a console application client. The DLL project contains classes for both sample implicit and explicit linking. Either the console application contains sample code for implicit and explicit linking caller. Here is the classes I use in this sample.

More …
10 May 2017
•
git
•
macos
•
windows
 On software development while working with source control, it’s inevitable sometime we get our code conflicts with other, since we work in a team. There are many diff and merge tools out there and some of them can be integrated with with Git. In this post I just want to note what I did in my development machine (Windows 7 and macOS Sierra)
DiffMerge on macOS
For my macOS development machine I use DiffMerge. Actually DiffMerge is not only available for macOS, but also for Windows and Linux. So we can use it as Git diff merge tool as well on Windows and Linux. To configure Git to use DiffMerge can be done by running the following command via terminal.
$ git config --global mergetool.prompt false
$ git config --global mergetool.keepBackup false
$ git config --global mergetool.keepTemporaries false

$ git config --global diff.tool diffmerge
$ git config --global difftool.diffmerge.cmd 'diffmerge "$LOCAL" "$REMOTE"'

$ git config --global merge.tool diffmerge
$ git config --global mergetool.diffmerge.cmd 'diffmerge --merge --result="$MERGED" "$LOCAL" "$(if test -f "$BASE"; then echo "$BASE"; else echo "$LOCAL"; fi)" "$REMOTE"'
$ git config --global mergetool.diffmerge.trustExitCode true
The command will add the following config code in global .gitconfig
[mergetool]
  prompt = false
  keepBackup = false
  keepTemporaries = false

[diff]
	tool = diffmerge

[difftool "diffmerge"]
	cmd = diffmerge \"$LOCAL\" \"$REMOTE\"

[merge]
	tool = diffmerge

[mergetool "diffmerge"]
	cmd = "diffmerge --merge --result=\"$MERGED\" \"$LOCAL\" \"$(if test -f \"$BASE\"; then echo \"$BASE\"; else echo \"$LOCAL\"; fi)\" \"$REMOTE\""
	trustExitCode = true
We can also directly edit the .gitconfig and manually add the config code.
More …
04 May 2017
•
arduino
•
c

Couple days ayo, I met a friend of mine when I was at university. He plays extensively with Arduino, Raspberry Pi, Orange Pi and other IoT stuff. He showed me how interesting IoT is, include wiring modules, and surely its programming. I remember that a few months ago, I got Arduino kit with GPS module from another friend of mine. The items were idle since I have other things to do in my work. Yesterday, I just have a free time to play with the Arduino kit. And I never play or explore Arduino before.
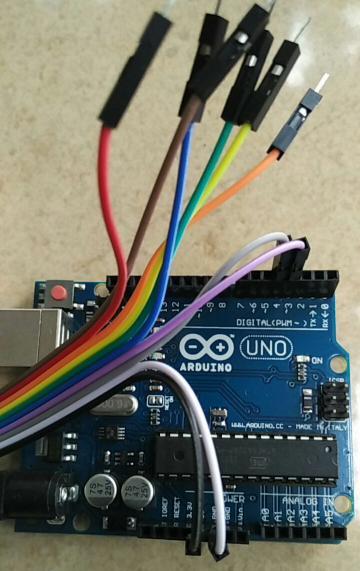
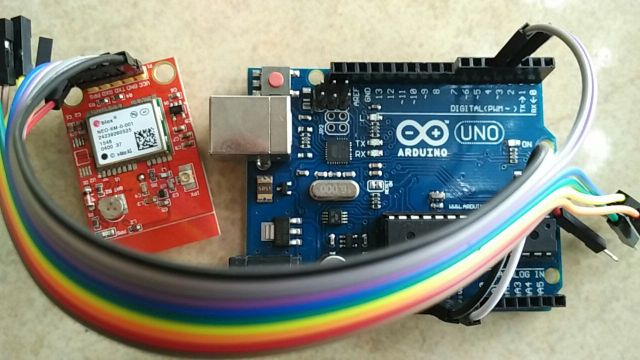
On the first time exploring Arduino, the hardware I use are :
- Arduino Uno
- GPS Module NEO-6M-0-001
To get working Arduino with GPS module, I use TinyGPS library. TinyGPS is designed to provide most of the NMEA GPS functionality. The detail description about TinyGPS can found here. TinyGPS is additional library for Arduino. So we need to install it before include it to our project. The steps of installation additional Arduino libraries can be found here
The table below shows wiring between Arduino and NEO-6M-0-001 GPS module
| NEO-6M-0-001 GPS |
Arduino Uno |
Cable |
| Vcc |
Power 3.3 Volt |
Black |
| GND |
GND |
White |
| TXD |
RX pin 4 |
Gray |
| RXD |
TX pin 3 |
Magenta |


To simplify our testing, I grab sample source code provided by TinyGPS. On This sample, I Set the data rate in bits per second (baud) for serial data transmission to 9600.
More …
17 Apr 2017
•
git

While working with git, we may need to import source code from an existing git repository to our working copy. Merging it and pushing to origin master.
The scenario that I had was :
- I have a project template that I store on a git repository. Let say the url is
http://server/git/template.git

-
I have another git repository with url
http://server/git/project1.git

What I need from the two repositories are importing all contents (libraries, sources, etc) from template repository into my project1 working copy. Since I don’t want to coding from zero. To get into what I need, here are the steps.
# git clone project1
$ git clone http://server/git/project1.git
$ cd project1

# add remote url named REMOTE.TEMPLATE
$ git remote add REMOTE.TEMPLATE http://server/git/template.git

# fetch from REMOTE.TEMPLATE remote url
$ git fetch REMOTE.TEMPLATE

# checkout REMOTE.TEMPLATE/master and create a new branch called TEMPLATE
$ git checkout -b TEMPLATE REMOTE.TEMPLATE/master

#switch back to master branch
$ git checkout master

# merge TEMPLATE brach to master branch
$ git merge TEMPLATE

# commit changes
$ git commit
The next step is checking the merge result on our working copy of master branch.
If what we have been imported already there, now we can remove the remote URL of REMOTE.TEMPLATE
and TEMPLATE branch to get rid of the extra branch before pushing.
# remove REMOTE.TEMPLATE remote address
$ git remote rm REMOTE.TEMPLATE

# remove template branch. It is useful to get rid of the extra branch before pushing
$ git branch -d TEMPLATE

# push to remote origin/master
$ git push
References
- http://stackoverflow.com/questions/1683531/how-to-import-existing-git-repository-into-another


 On software development while working with source control, it’s inevitable sometime we get our code conflicts with other, since we work in a team. There are many diff and merge tools out there and some of them can be integrated with with Git. In this post I just want to note what I did in my development machine (Windows 7 and macOS Sierra)


