18 May 2024
•
microservice
•
pattern
What is Microservice
Based on definition on wikipedia, a microservice architecture is a variant of the service-oriented architecture structural style. It is an architectural pattern that arranges an application as a collection of loosely coupled, fine-grained services, communicating through lightweight protocols. One of its goals is that teams can develop and deploy their services independently of others.
In general, microservice has some characteristics
- Microservices achitecture decomposes an application into small independent services
- Microservices are small, independent, and loosely coupled services that can work together
- Each service has a separate codebase which can be managed by a small development team
- Microservices communicate each other using well defined APIs
- Microservices can be deployed independently and autonomously
- Microservices may have their own technology stack, can work with many different technology stacks.
- Microservices has its own database that is not shared with other services
- Microservices are organized by business capability, with the bounded contexts.
- Following Single Responsibility Principle that referring separating responsibilities as per services.
Each microservice may has its own design pattern implemented in. The design pattern implemented on each microservice may different one another on the cluster. Since each microservice is idenpendent each others. The following picture ilustrated how it can be.
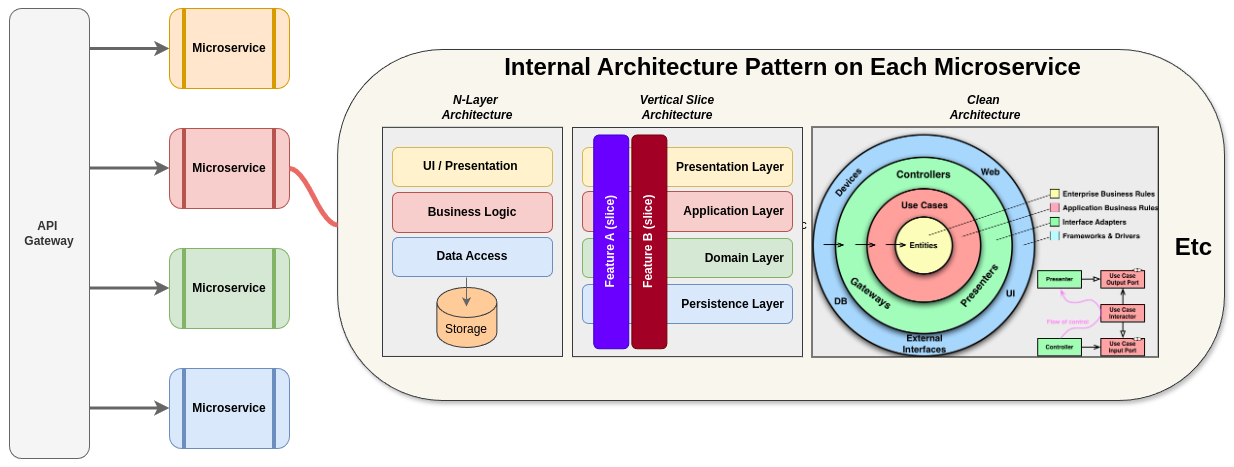
The choosing of what design pattern that is suitable applied on each microservice depends on the aim of the microservice itself. Each pattern has pros and cons. So we should be wise on choosing which the best fit to the business need.
Benefit of Microservices
-
Agility, Innovation and Time-to-market
Microservices architectures make applications easier to scale and faster to develop, enabling innovation and accelerating time-to-market for new features.
-
Flexible Scalability
Microservices can be scaled independently, so you scale out sub-services that require less resources, without scaling out the entire application.
-
Small, focused teams
Microservices should be small enough that a single feature team can build, test, and deploy it.
-
Small and separated code base
Microservices are not sharing code or data stores with other services, it minimizes dependencies, and that makes easier to adding new features
-
Easy Deployment
Microservices enable continuous integration and continuous delivery, making it easy to try out new ideas and to roll back if something doesn’t work.
-
Technology agnostic, Right tool for the job
Small teams can pick the technology that best fits their microservice and using a mix of technology stacks on their services.
-
Resilience and Fault isolation
Microservices are fault toleranced and handle faults correctly for example by implementing retry and circuit breaking patterns.
-
Data isolation
Databases are separated with each other according to microservices design. Easier to perform schema updates, because only a single database is affected.
Challenges of Microservices Architecture
-
Complexity
Each service is simpler, but the entire system is more complex. Deployments and Communications can be complicated for hundreds of microservices.
-
Network problems and latency
Microservice communicate with inter-service communication, we should manage network problems. Chain of services increase latency problems and become chatty API calls.
-
Development and testing
Hard to develop and testing these E2E processes in microservices architectures if we compare to monolithic ones.
-
Data integrity
Microservice has its own data persistence. Data consistency can be a challenge. Follow eventual consistency where possible.
-
Deployment
Deployments are challenging. Require to invest in quite a lot of devops automation processes and tools. The complexity of microservices becomes overwhelming for human deployment.
-
Logging & Monitoring
Distributed systems are required to centralized logs to bring everything together. Centralized view of the system to monitor sources of problems.
-
Debugging
Debugging through local IDE isn’t an option anymore. It won’t work across dozens or hundreds of services.
When to Use Microservices Architecture
-
Make Sure You Have a “Really Good Reason” for Implementing Microservices
Check if your application can do without microservices. When your application requires agility to time-to-market with zero-down time deployments and updated independently that needs more flexibility.
-
Iterate With Small Changes and Keep the Single-Process Monolith as Your “Default”
Sam Newman and Martin Fowler offers Monolithic-First approach. Single-process monolithic application comes with simple deployment topology. Iterate and refactor with turning a single module from the monolith into a microservices one by one.
-
Required to Independently Deploy New Functionality with Zero Downtime
When an organization needs to make a change to functionality and deploy that functionality without affecting rest of the system.
-
Required to Independently Scale a Portion of Application
Microservice has its own data persistence. Data consistency can be a challenge. Follow eventual consistency where possible.
-
Data Partitioning with different Database Technologies
Microservices are extremely useful when an organization needs to store and scale data with different use cases. Teams can choose the appropriate technology for the services they will develop over time.
-
Autonomous Teams with Organizational Upgrade
Microservices will help to evolve and upgrade your teams and organizations. Organizations need to distribute responsibility into teams, where each team makes decisions and develops software autonomously.
When Not to Use Microservices
-
Don’t do Distributed Monolith
Distributed Monolith is the worst case because you increase complexity of your architecture without getting any benefit of microservices.
Make sure that you decompose your services properly and respecting the decoupling rule like applying bounded context and business capabilities principles.
-
Don’t do microservices without DevOps or cloud services
Microservices are embrace the distributed cloud-native approaches. And you can only maximize benefits of microservices with following these cloud-native principles.
  a. CI/CD pipeline with devops automations
  b. Proper deployment and monitoring tools
  c. Managed cloud services to support your infrastructure
  d. Key enabling technologies and tools like Containers, Docker, and Kubernetes
  e. Following asnyc communications using Messaging and event streaming services
-
Limited Team sizes, Small Teams
If you don’t have a team size that cannot handle the microservice workloads, This will only result in the delay of delivery.
For a small team, a microservice architecture can be hard to justify, because team is required just to handle the deployment and management of the microservices themselves.
-
The Shared Database anti-pattern
Shared database will potentially make each service depends on one onothers. It will break the idea of microservice itself.
Monolithic vs Microservices
| Focus |
Monolithic |
Microservice |
| Application Architecture |
Simple straightforward structure of one undivided unit |
Complex structure that consists of various heterogeneous services and databases |
| Scalability |
Scaling a whole single unit |
can be scaled unevenly |
| Deployment |
Fast and easy deployment of the whole system |
zero-downtime deployment and CI/CD automation. |
| Development team |
No need containerazation knowledge |
Need containarization knowledge |
| Architecture Comparison |
|
|
| Deployment Comparison |
|
|
The Database-per-Service Pattern
-
Core characteristic of the microservices architecture is the loose coupling of services. every service should have its own databases, it can be polyglot persistence among to microservices.
-
The service’s database can’t be accessed directly by other microservices. Each service’s persistent data can only be accessed via Rest APIs.
Benefits of the Database-per-Service Pattern with Polygot Persistence
- Data schema changes made easy without impacting other microservices.
- Each database can be scaled independently.
- Microservices domain data is encapsulated within the service.
- If one of the database server is down, this will not affect to other services.
- Polyglot data persistence gives ability to select the best optimized storage needs per microservices.
References
- https://martinfowler.com/articles/microservices.html
- https://www.freecodecamp.org/news/solid-principles-single-responsibility-principle-explained/
20 Jun 2023
•
java
•
maven
•
spring
In this we would like to add a new Spring Boot Web API module to the previous Maven Multi Modules project. To do that do the following steps.
-
Install Spring Boot Extension Pack on the VSCode plugin central.
-
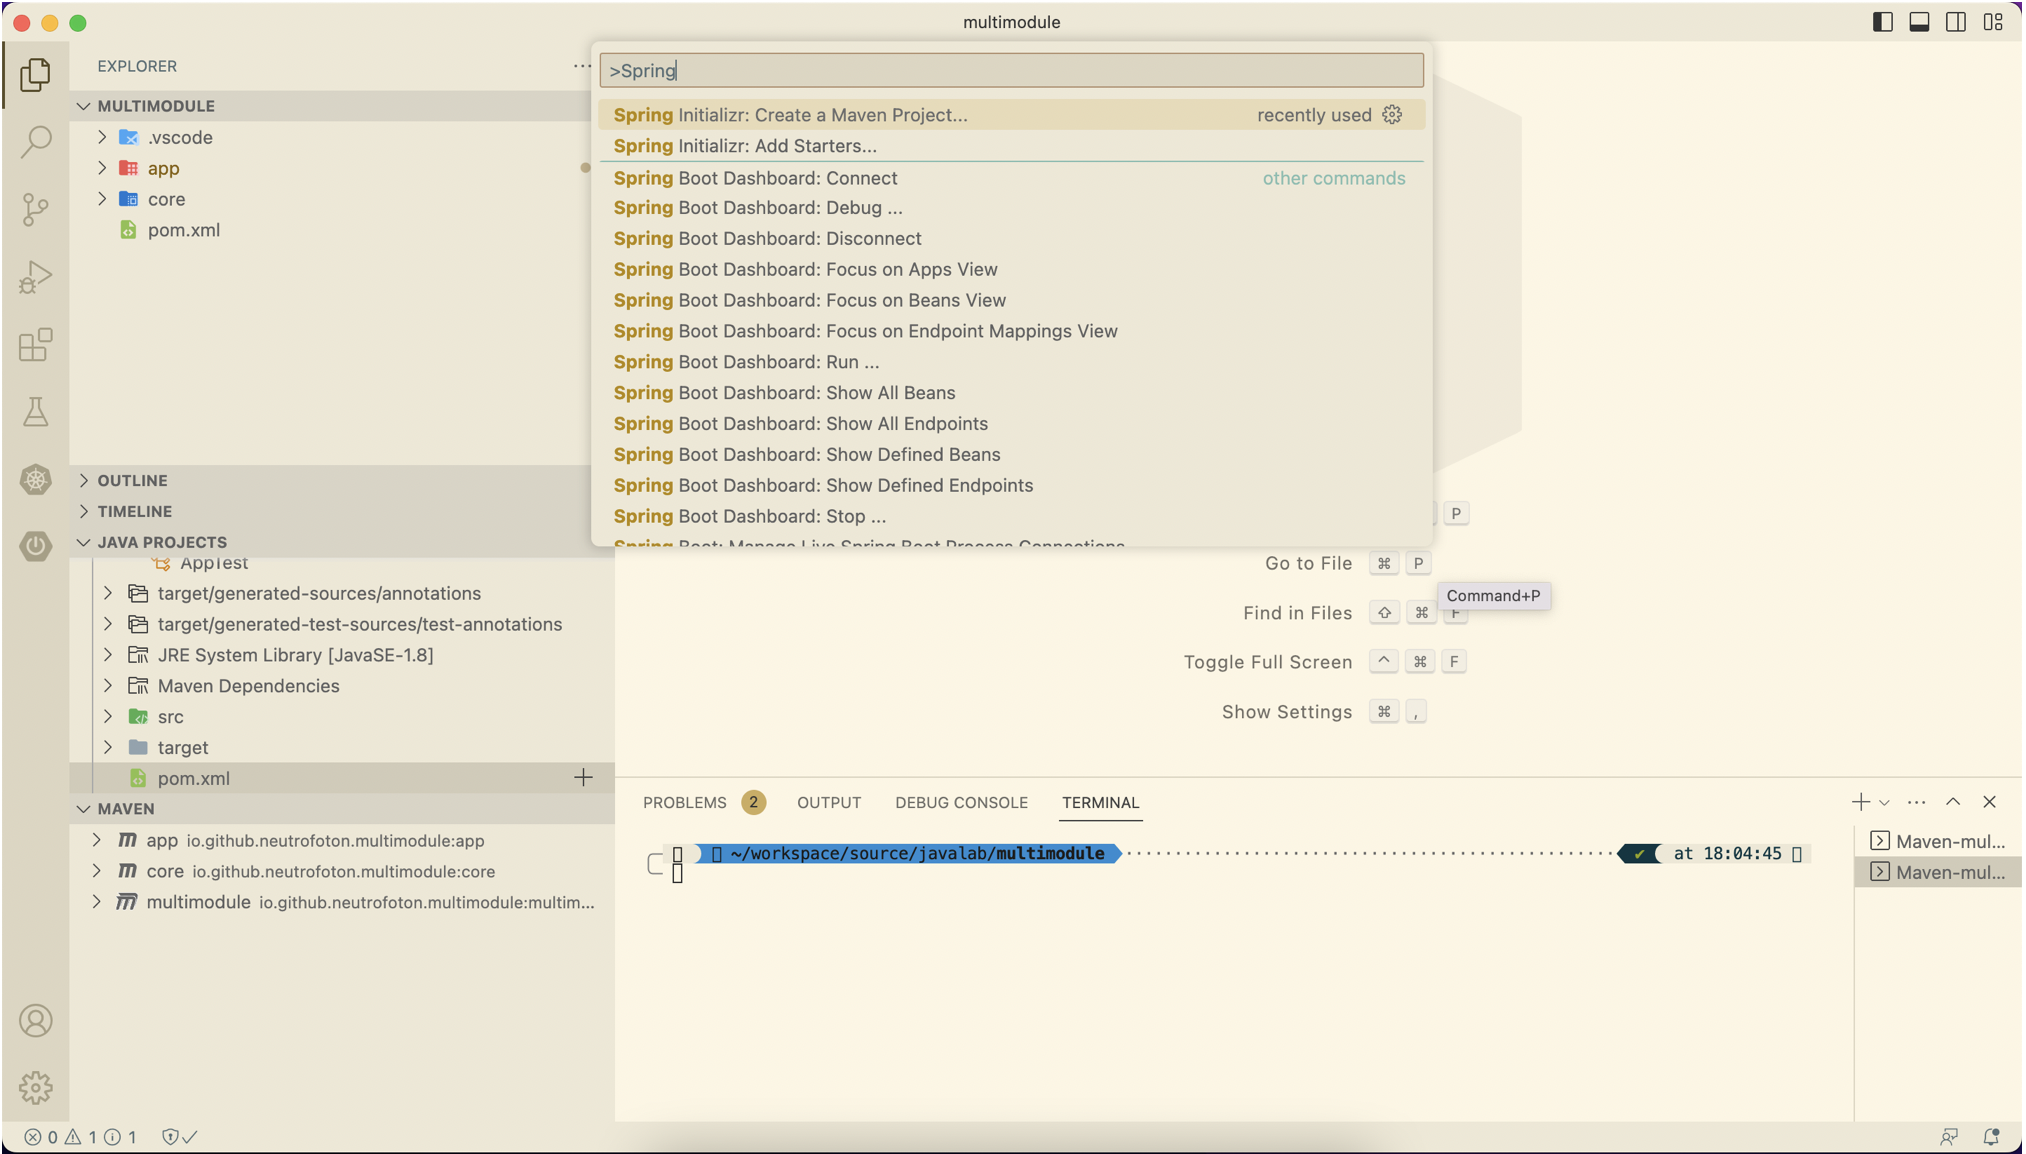
Open the previous project on VSCode and open command palette CMD + SHIFT + P (for MacOS). Then select Spring Initializr: Create a Maven Project
-
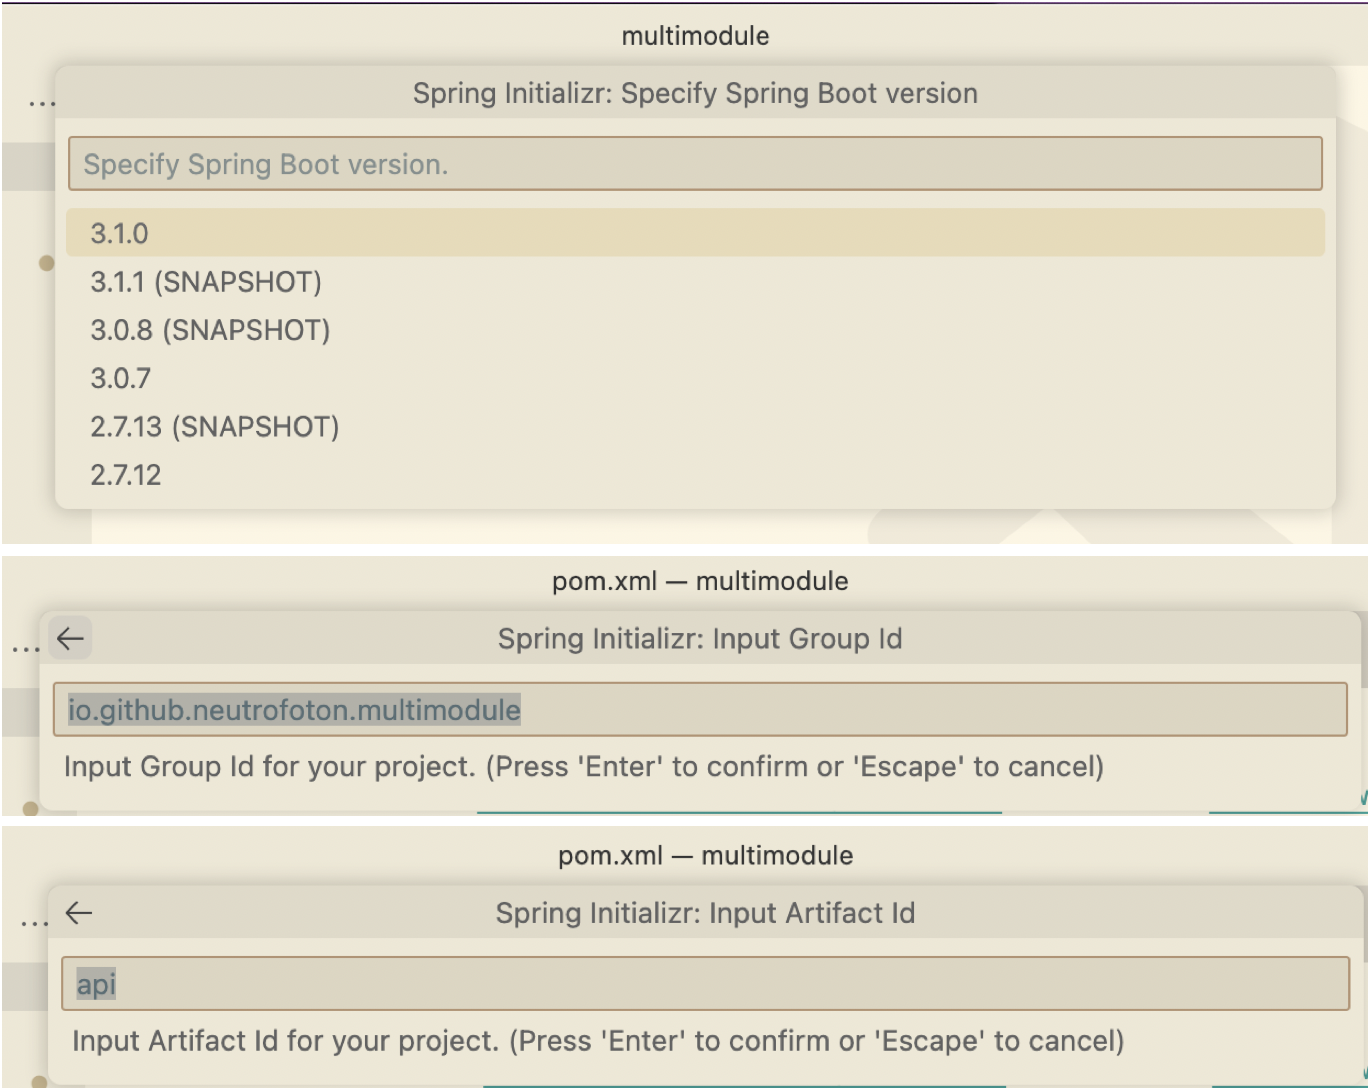
Select the Spring boot version, fill out the group and artifact id
-
Select the packaging and Java version

-
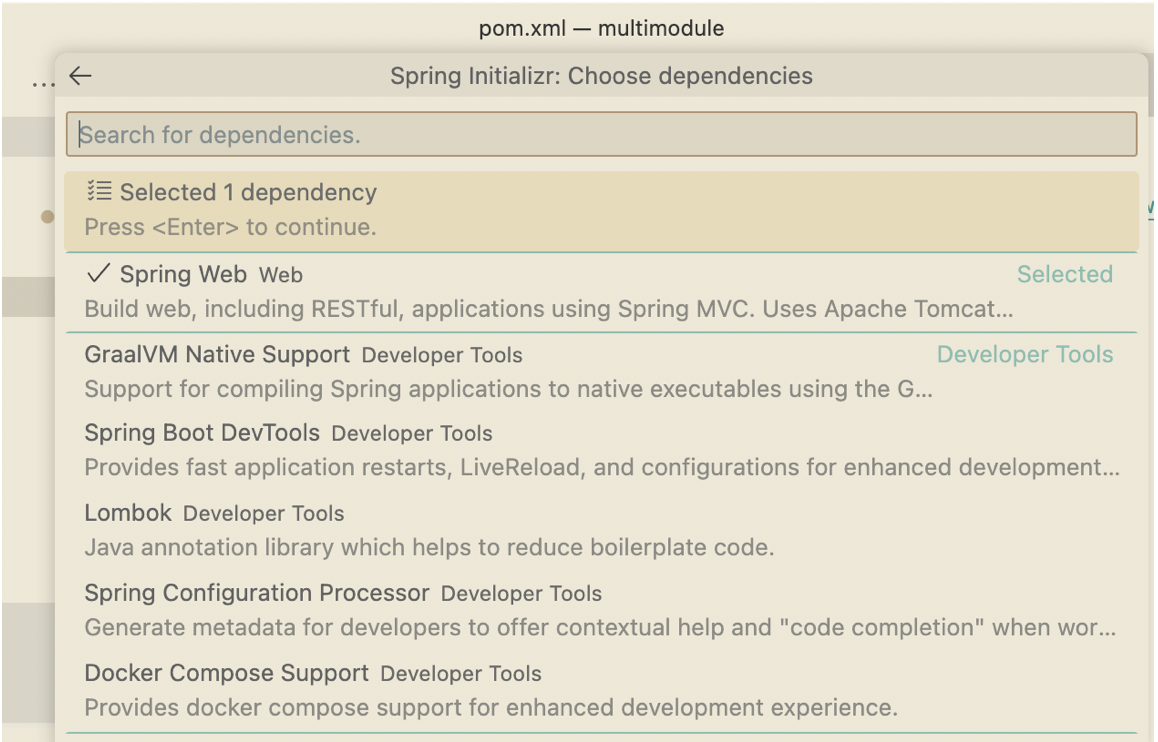
Select dependency of the Spring Boot
-
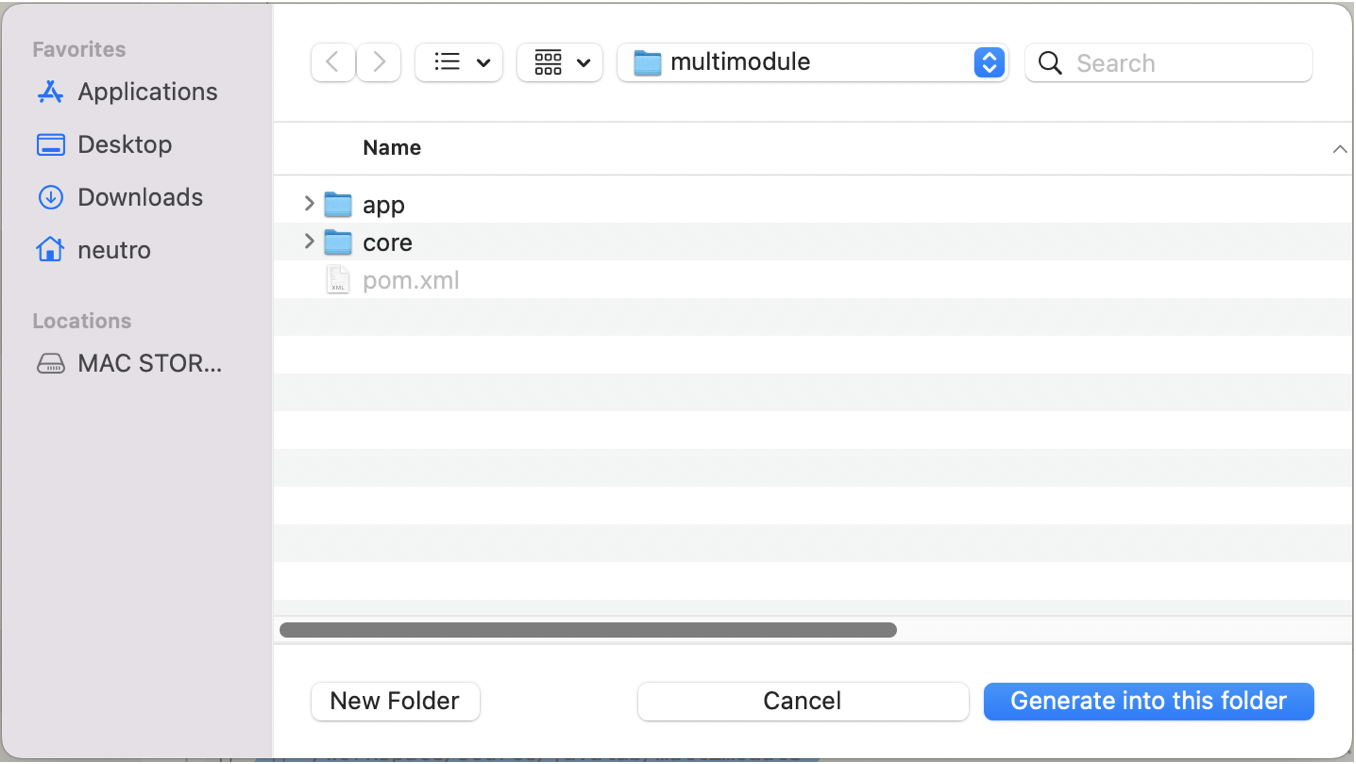
Finally select the module location as we did previously (inside the parent/root project)
-
Update the pom.xml of the Spring Boot project api by changing the parent to the root of the project.
<?xml version="1.0" encoding="UTF-8"?>
<project xmlns="http://maven.apache.org/POM/4.0.0" xmlns:xsi="http://www.w3.org/2001/XMLSchema-instance"
   xsi:schemaLocation="http://maven.apache.org/POM/4.0.0 https://maven.apache.org/xsd/maven-4.0.0.xsd">
   <modelVersion>4.0.0</modelVersion>

   <parent>
      <artifactId>multimodule</artifactId>
      <groupId>io.github.neutrofoton.multimodule</groupId>
      <version>1.0-SNAPSHOT</version>
   </parent>

   <groupId>io.github.neutrofoton.multimodule</groupId>
   <artifactId>api</artifactId>
   <version>0.0.1-SNAPSHOT</version>
   <name>api</name>
   <description>Demo project for Spring Boot</description>

   <dependencies>

      <dependency>
         <groupId>org.springframework.boot</groupId>
         <artifactId>spring-boot-starter-actuator</artifactId>
      </dependency>

      <dependency>
         <groupId>org.springframework.boot</groupId>
         <artifactId>spring-boot-starter-web</artifactId>
      </dependency>

      <dependency>
         <groupId>org.springframework.boot</groupId>
         <artifactId>spring-boot-starter-test</artifactId>
      </dependency>

      <dependency>
         <groupId>io.github.neutrofoton.multimodule</groupId>
         <artifactId>core</artifactId>
         <version>1.0-SNAPSHOT</version>
      </dependency>

      <dependency>
         <groupId>javax</groupId>
         <artifactId>javaee-api</artifactId>
         <version>8.0.1</version>
      </dependency>


   </dependencies>

   <build>
      <plugins>
         <!-- This plugin is optional if you like want to provide feature to let user build individual modules as well-->
         <plugin>
            <groupId>org.springframework.boot</groupId>
            <artifactId>spring-boot-maven-plugin</artifactId>
         </plugin>
      </plugins>
   </build>
   <repositories>
      <repository>
         <id>spring-milestones</id>
         <name>Spring Milestones</name>
         <url>https://repo.spring.io/milestone</url>
         <snapshots>
            <enabled>false</enabled>
         </snapshots>
      </repository>
      <repository>
         <id>spring-snapshots</id>
         <name>Spring Snapshots</name>
         <url>https://repo.spring.io/snapshot</url>
         <releases>
            <enabled>false</enabled>
         </releases>
      </repository>
   </repositories>
   <pluginRepositories>
      <pluginRepository>
         <id>spring-milestones</id>
         <name>Spring Milestones</name>
         <url>https://repo.spring.io/milestone</url>
         <snapshots>
            <enabled>false</enabled>
         </snapshots>
      </pluginRepository>
      <pluginRepository>
         <id>spring-snapshots</id>
         <name>Spring Snapshots</name>
         <url>https://repo.spring.io/snapshot</url>
         <releases>
            <enabled>false</enabled>
         </releases>
      </pluginRepository>
   </pluginRepositories>

</project>
More …
20 Jun 2023
•
java
•
maven
Visual Studio Code has many plugin in supporting various programming languages. One of them is Java. One of pupular plugin of VSCode which supports Java is Extension Pack for Java. In this post will show you how to create Java project using maven by utilizing the VSCode plugin.
Creating Java (Maven) Project on VSCode
- Makesure we have Java SDK and VSCode installed in our system.
-
Install VSCode plugin Extension Pack for Java.
-
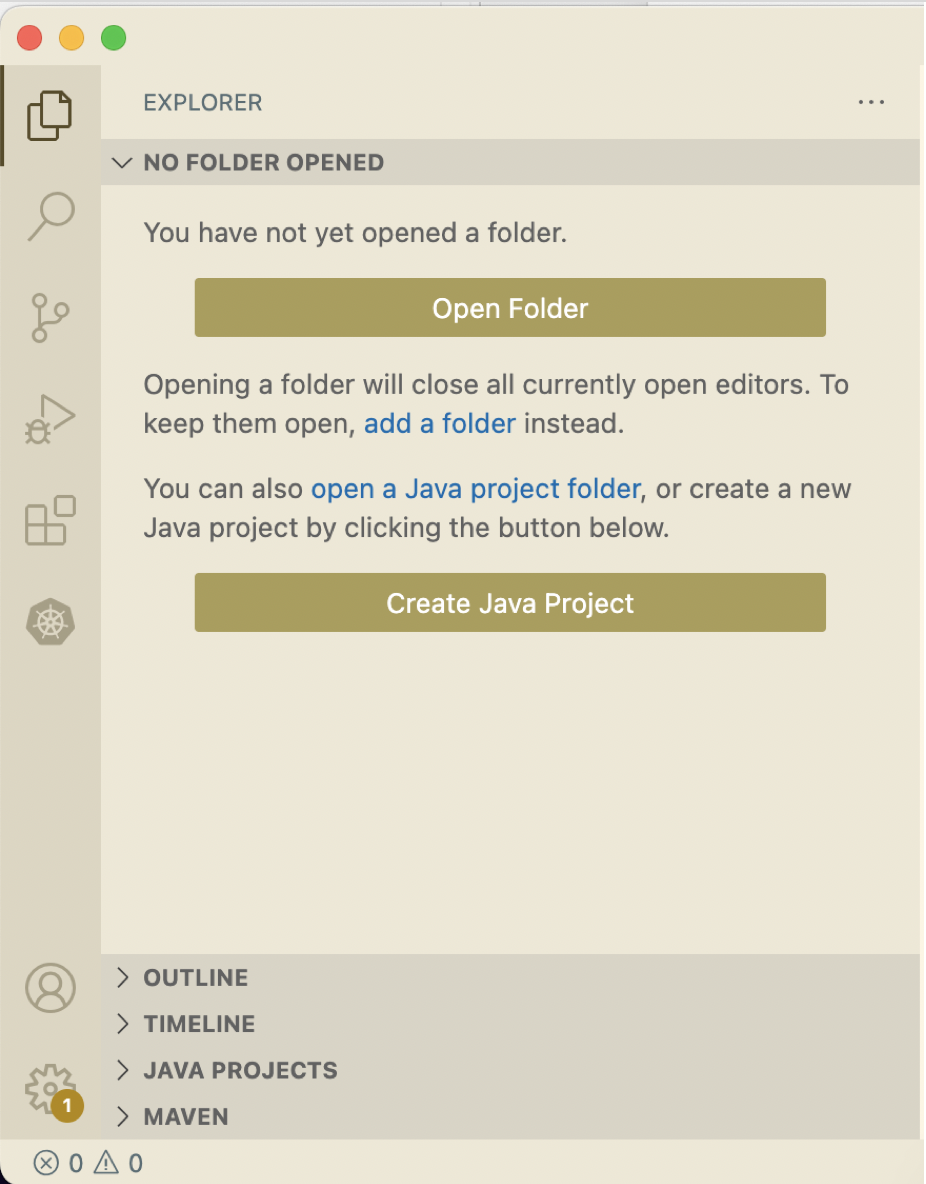
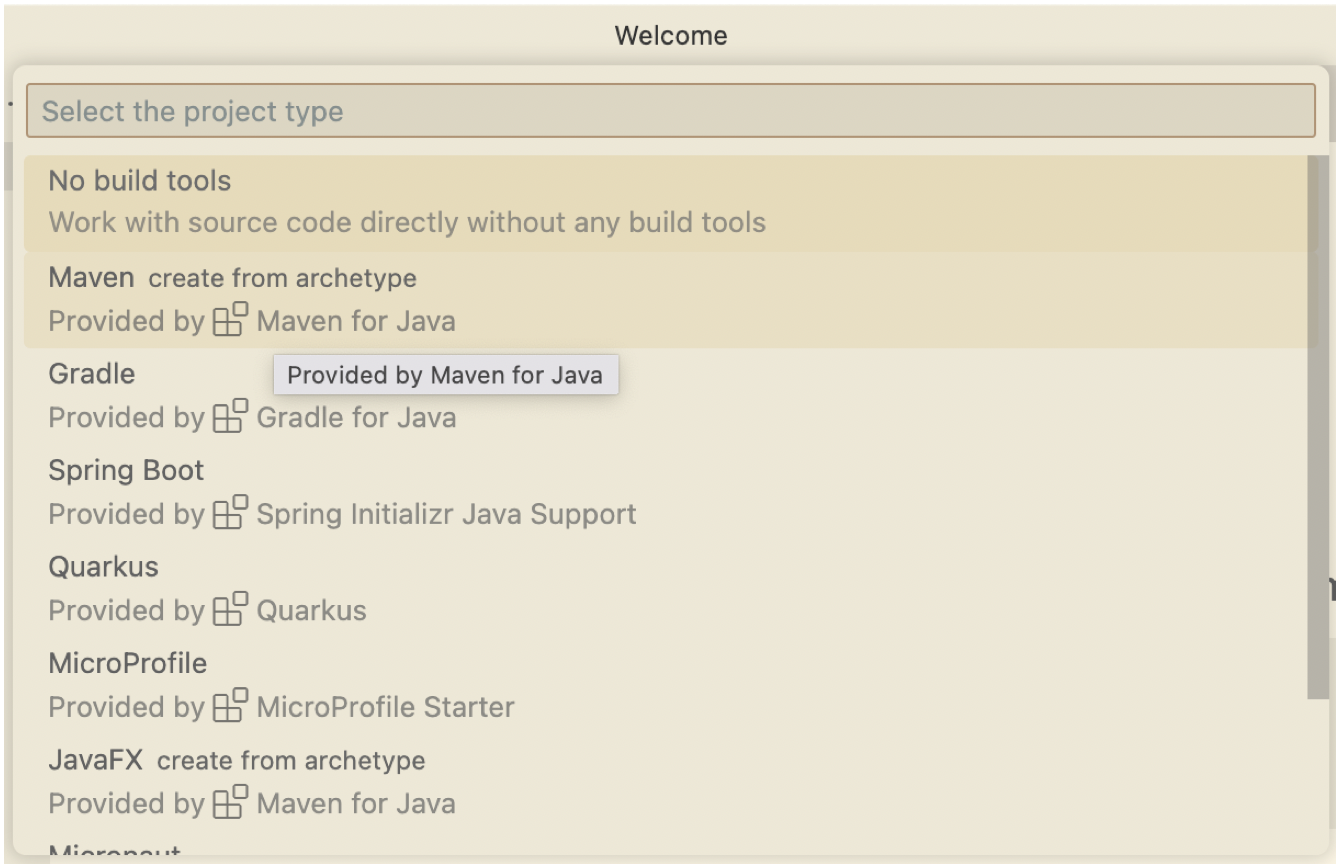
To create new project, select Create Java Project. Then select type of project you want. In this post we will use maven based.
-
Fill out the maven project setting.
-
VSCode will generate a java project for you.
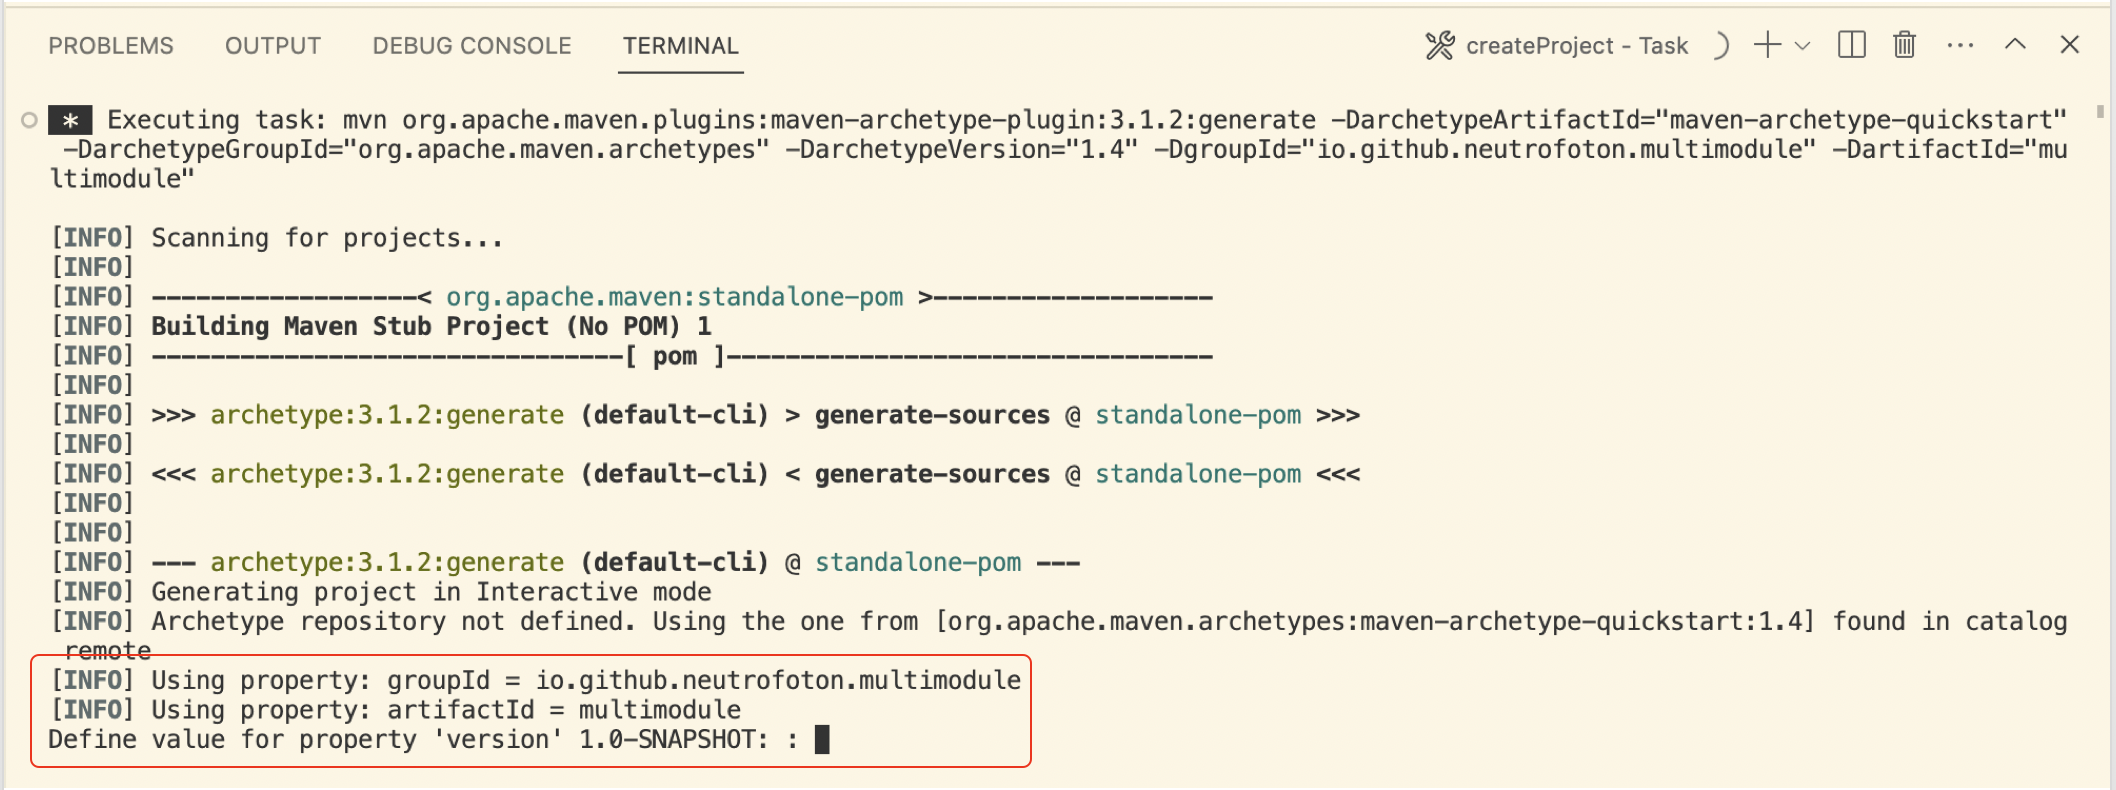
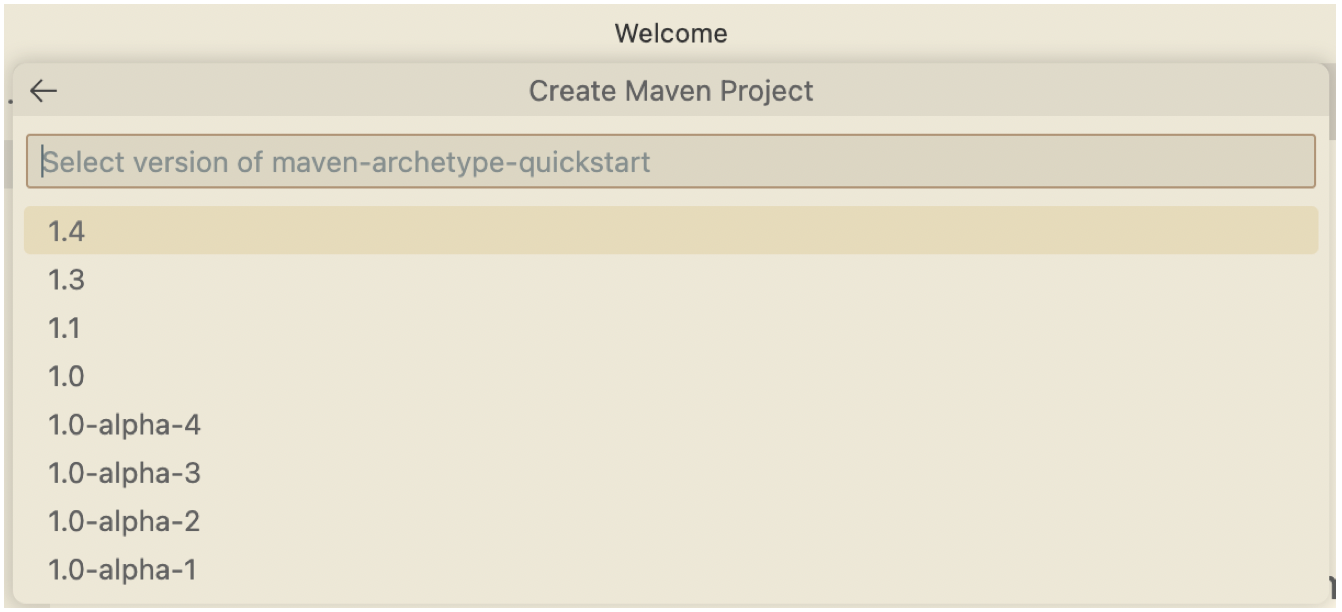
While generating the Java project, we will be asked for the version. If we agree with default version 1.0-SNAPSHOT, we just need to press Enter. Then follow the next question in the terminal tab.
-
Finally the Java project generated and displayed in the File explorer of VSCode.

Setup Maven Multi Modules Projects
To setup the previous Maven project as Maven Multi Modules projects, let’s do the following steps.
-
Delete the src and target folder and their contents on the provious project. Then Edit the root pom.xml as below.
<?xml version="1.0" encoding="UTF-8" standalone="no"?>
<project xmlns="http://maven.apache.org/POM/4.0.0" xmlns:xsi="http://www.w3.org/2001/XMLSchema-instance" xsi:schemaLocation="http://maven.apache.org/POM/4.0.0 http://maven.apache.org/xsd/maven-4.0.0.xsd">


<modelVersion>4.0.0</modelVersion>
<groupId>io.github.neutrofoton.multimodule</groupId>
<artifactId>multimodule</artifactId>
<version>1.0-SNAPSHOT</version>
<packaging>pom</packaging>

</project>
-
Run maven install to ensure the pom.xml is valid.

-
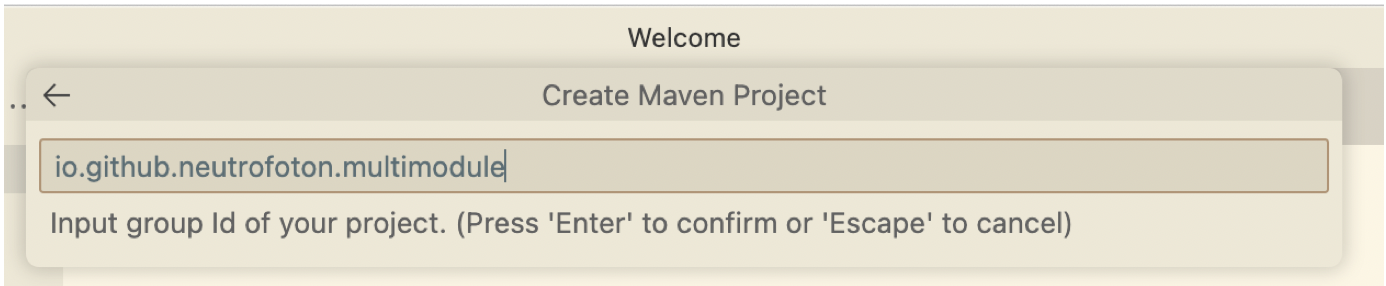
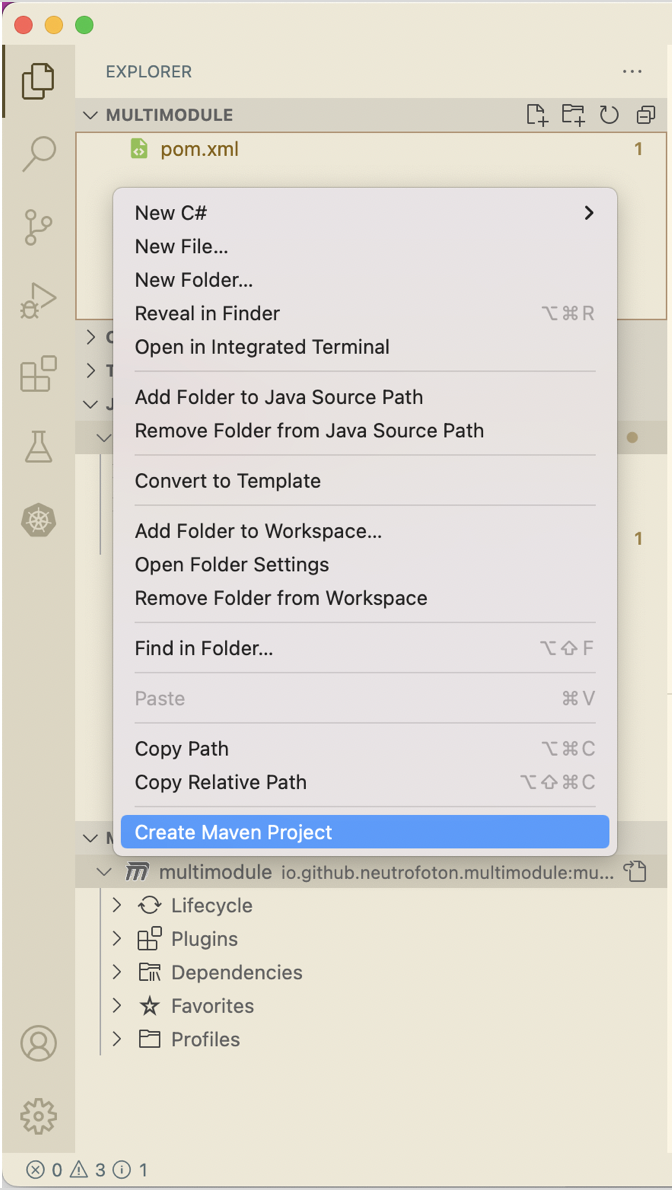
If no error on step #2, then add a new maven project as a new maven module. To do that, right click on the VSCode Explorer > select Create Maven Project.
-
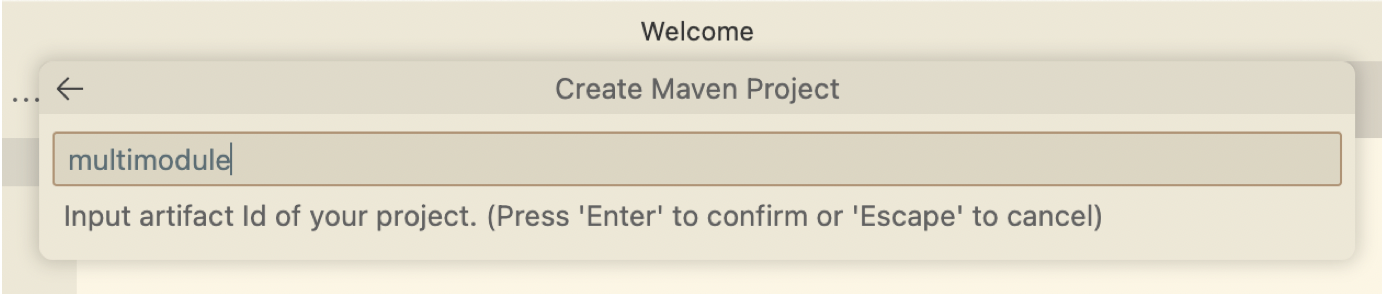
Fill out the group and artifact as we did previously.
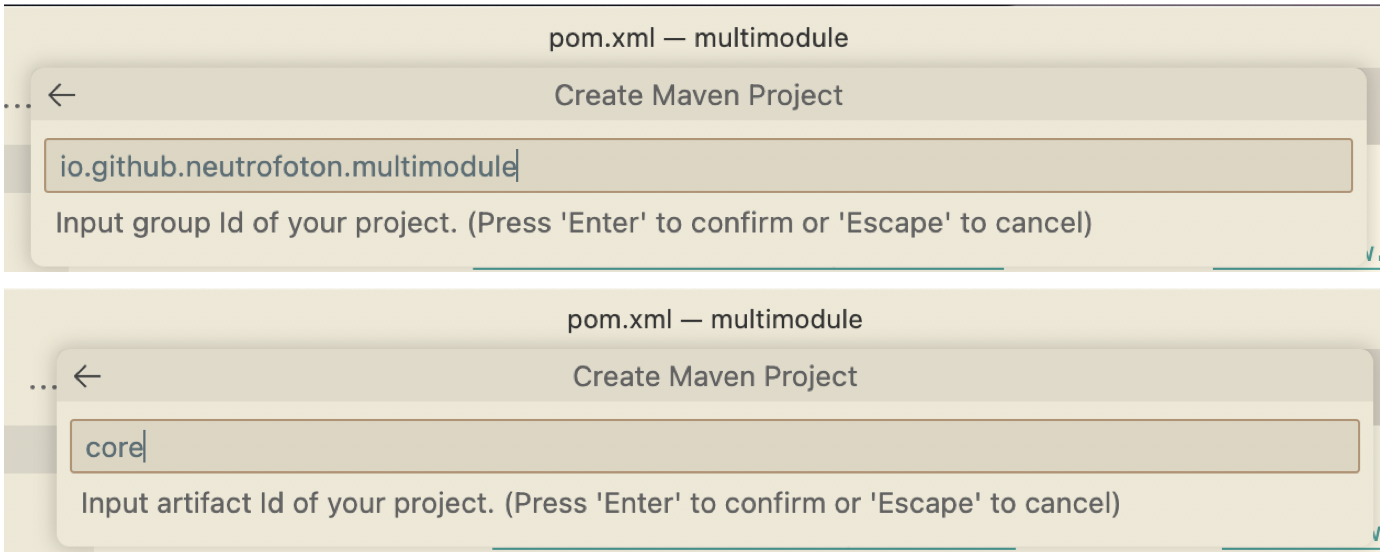
We use the sama group id as parent/root pom.xml. But a new name for artifact, in this case we named it core module.
-
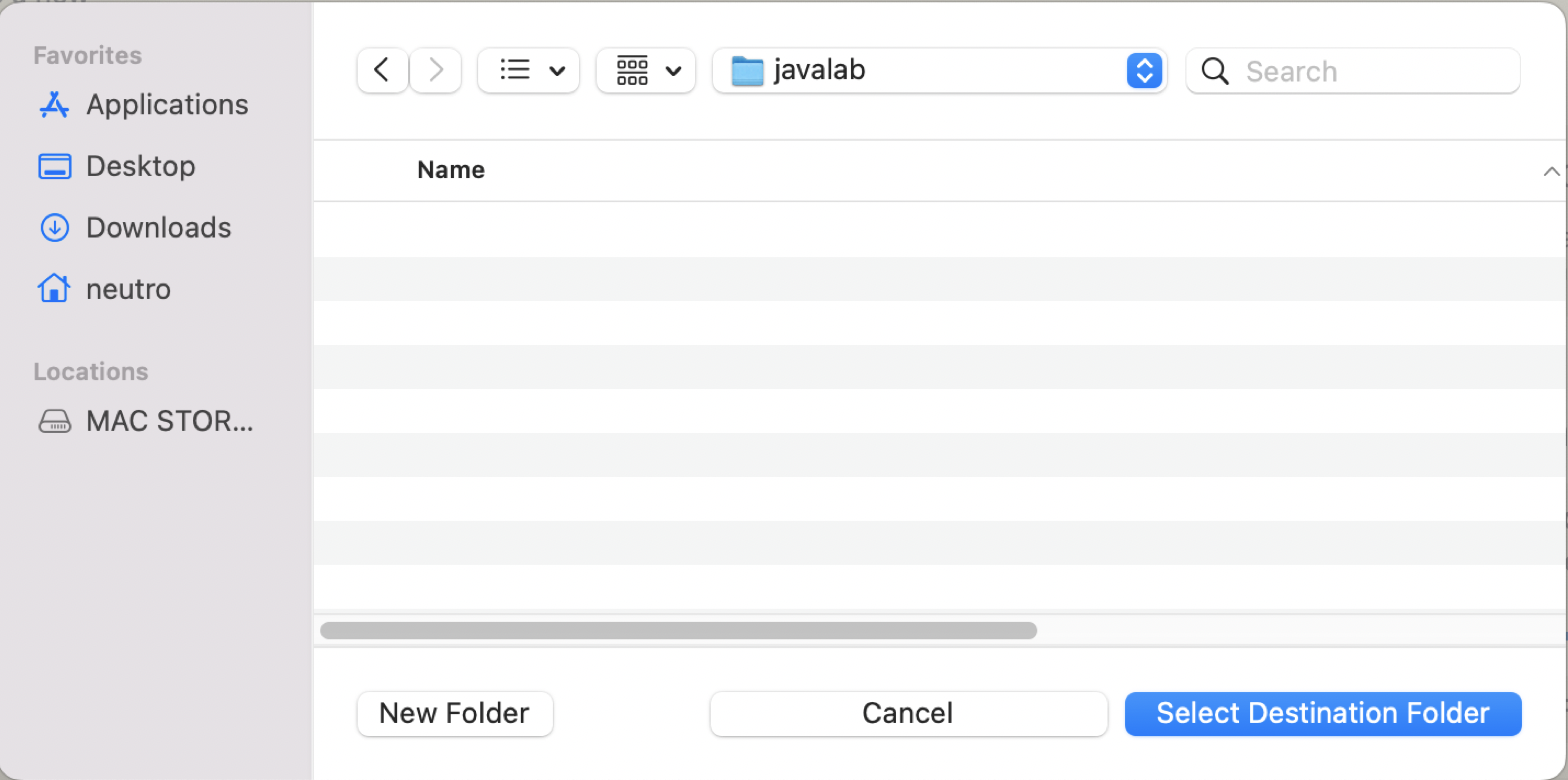
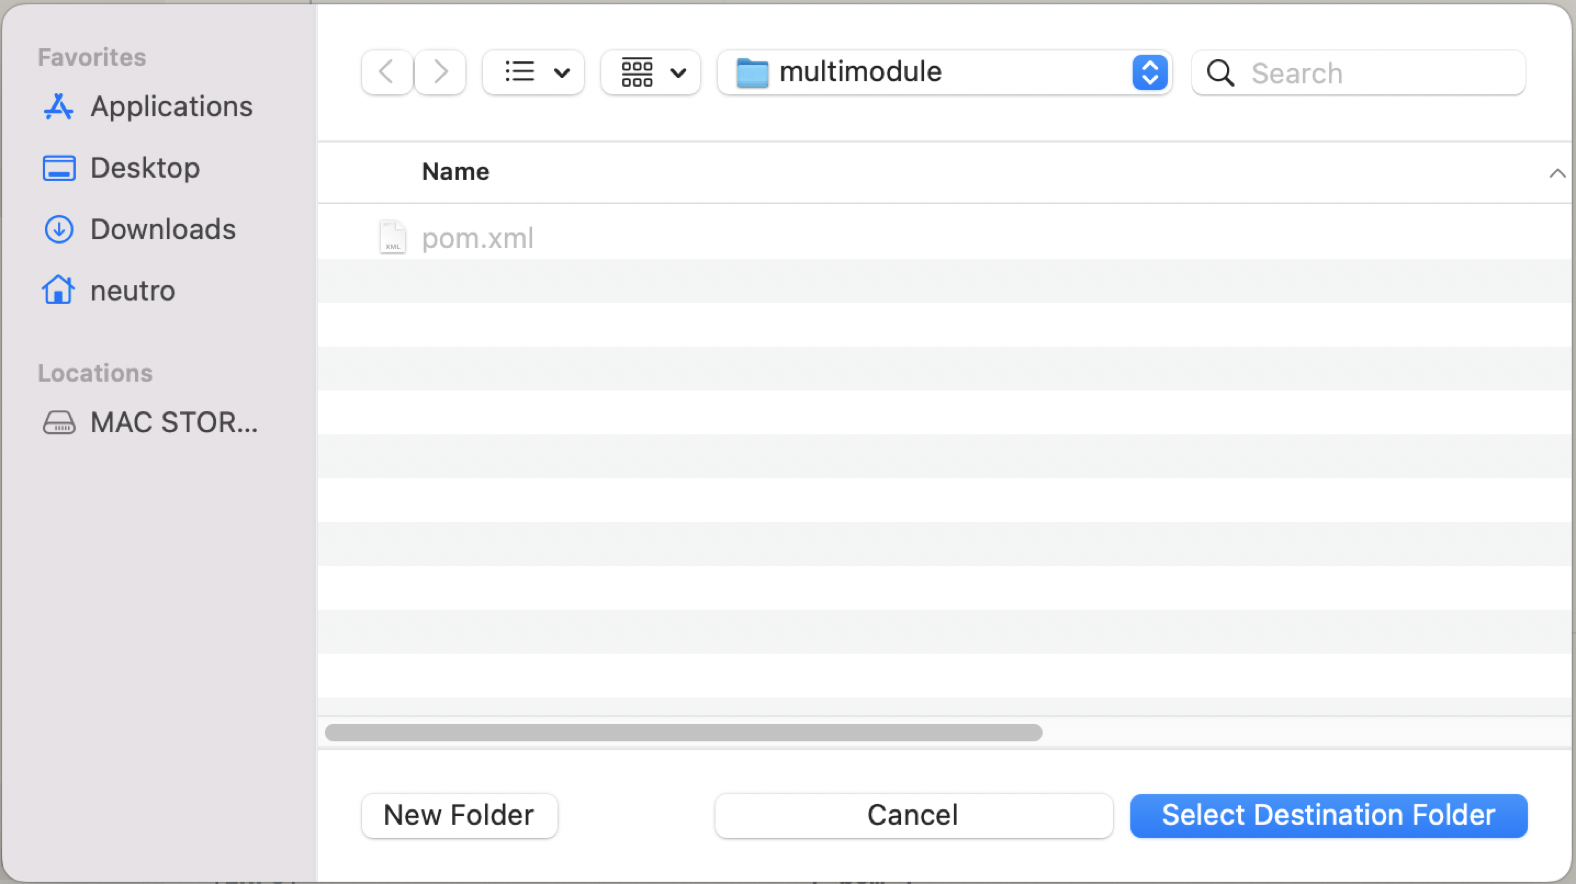
Select the destionation folder of the module iside the root/parent project.
-
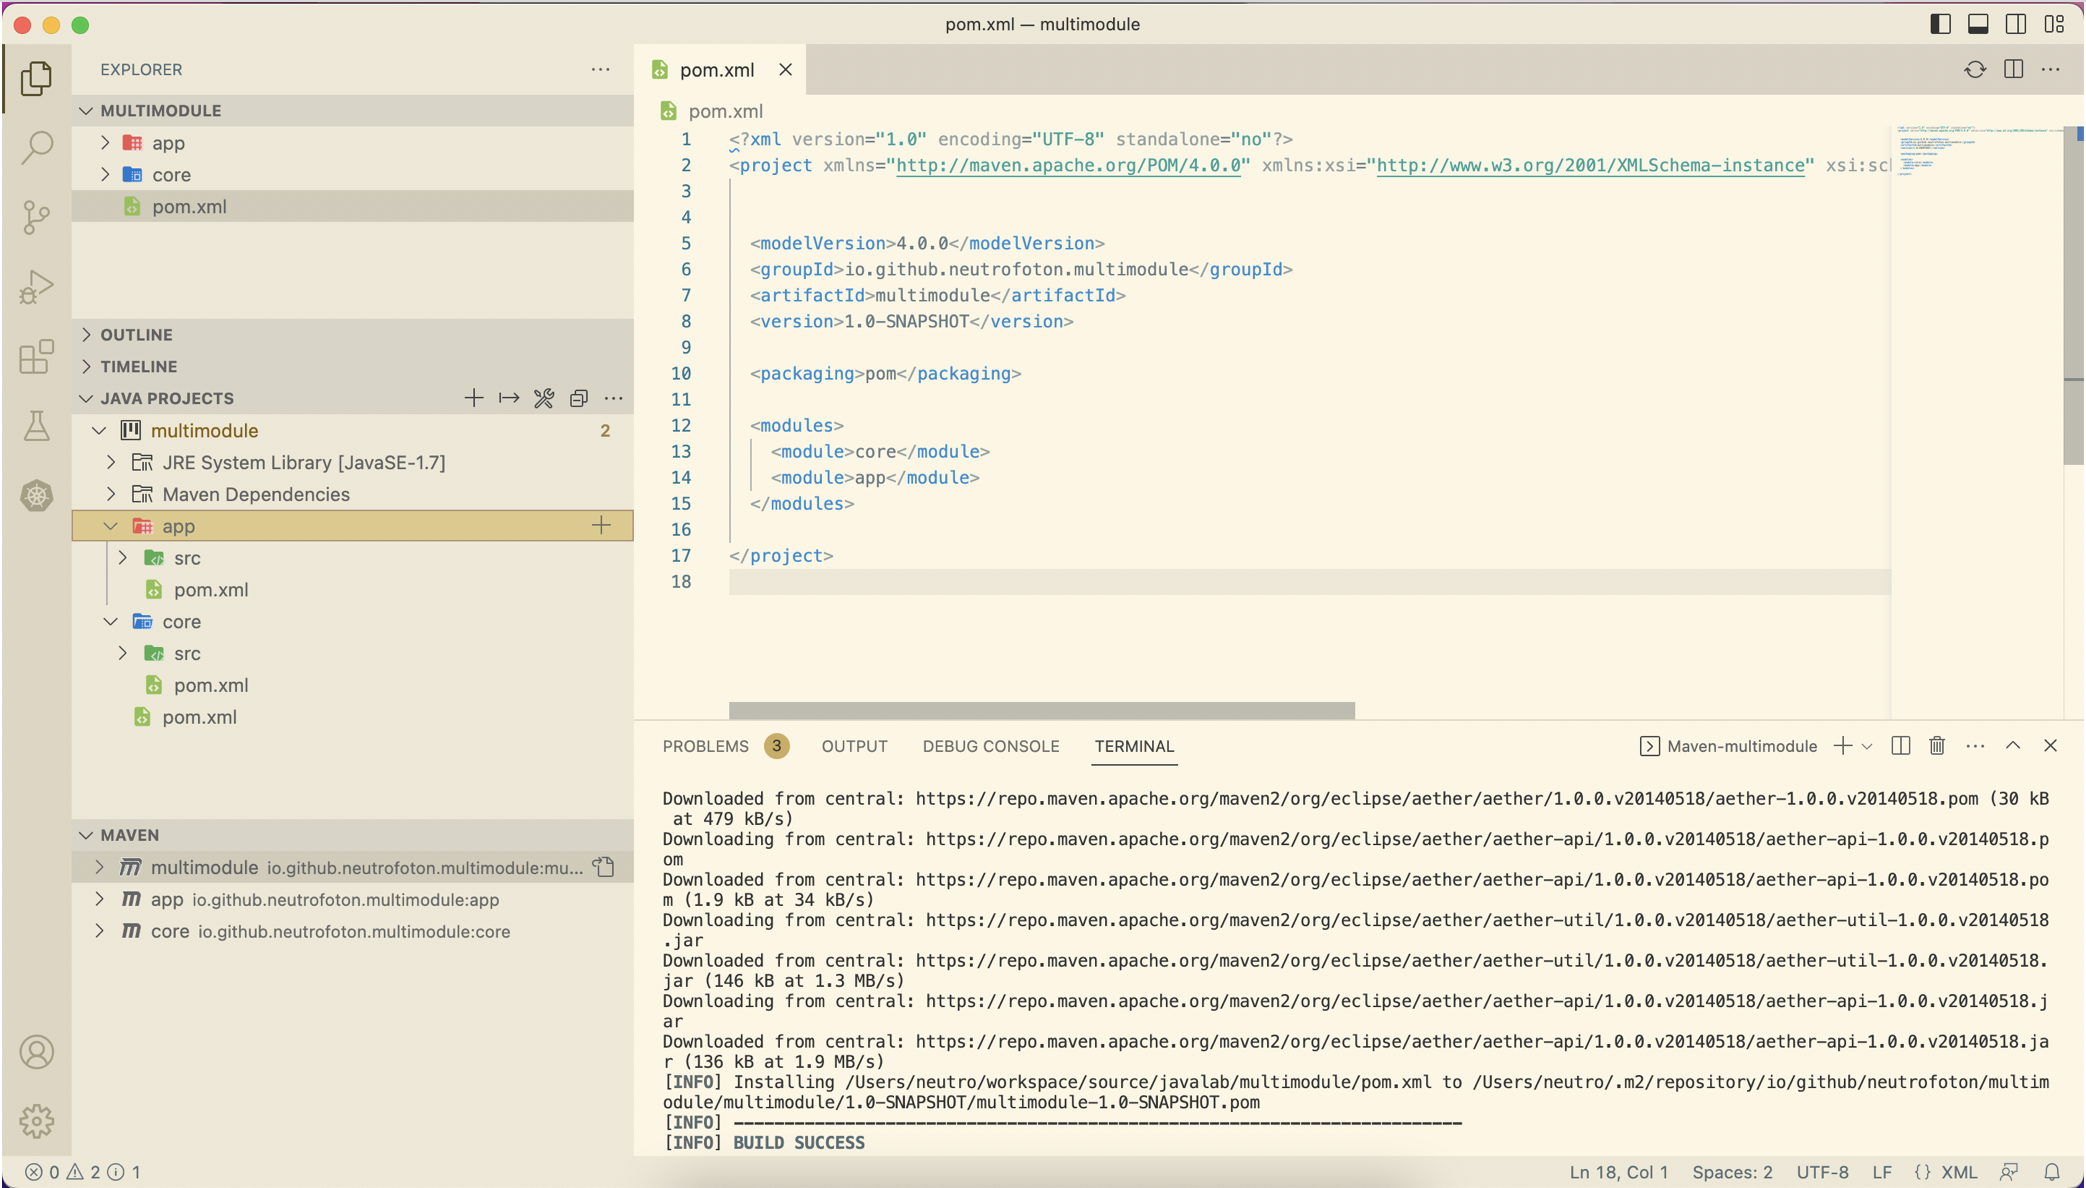
Create another module called app by repeating step #3 to #5.
-
The pom.xml should be updated as follow.
<?xml version="1.0" encoding="UTF-8" standalone="no"?>
<project xmlns="http://maven.apache.org/POM/4.0.0" xmlns:xsi="http://www.w3.org/2001/XMLSchema-instance" xsi:schemaLocation="http://maven.apache.org/POM/4.0.0 http://maven.apache.org/xsd/maven-4.0.0.xsd">

<modelVersion>4.0.0</modelVersion>
<groupId>io.github.neutrofoton.multimodule</groupId>
<artifactId>multimodule</artifactId>
<version>1.0-SNAPSHOT</version>

<packaging>pom</packaging>

<modules>
   <module>core</module>
   <module>app</module>
</modules>

</project>
And the project structure should be like this
-
To ensure the project well defined, we can run maven install on the root pom.xml
Tips
To clear the plugin cache of the Java plugin, we can run
(MacOS) : CMD + Shift + P then type Java: Clean Java language Server Workspace
24 Apr 2023
•
kubernetes
Namespace basically is grouping resource in cluster. Namespace-based scoping is applicable only for namespaced objects (e.g. Deployments, Services, etc) and not for cluster-wide objects (e.g. StorageClass, Nodes, PersistentVolumes, etc).
Resources can communicate each other even on different namespace. To create a namespace can be done with the following yaml.
Creating namespace
apiVersion: v1
kind: Namespace
metadata:
  name: billing
# viewing namespaces
kubectl get namespace
kubectl get ns
Creating Pod inside a namespace
To create a Pod (example nginx.yaml) inside a namespace:
kubectl apply -f nginx.yaml --namespace billing
We can also add namespace information in the nginx.yam
apiVersion: v1
kind: Pod
metadata:
  name: nginx
  namespace: billing
  labels:
    name: nginx
spec:
  containers:
  - name: nginx
    image: nginx
kubectl get all --namespace=billing
Deleting namespace
# delete namespace
kubectl delete namespace {NAME_OF_NAMESPACE}
kubectl delete ns {NAME_OF_NAMESPACE}
Deleting a namespace will delete all the resource inside it.
23 Apr 2023
•
kubernetes
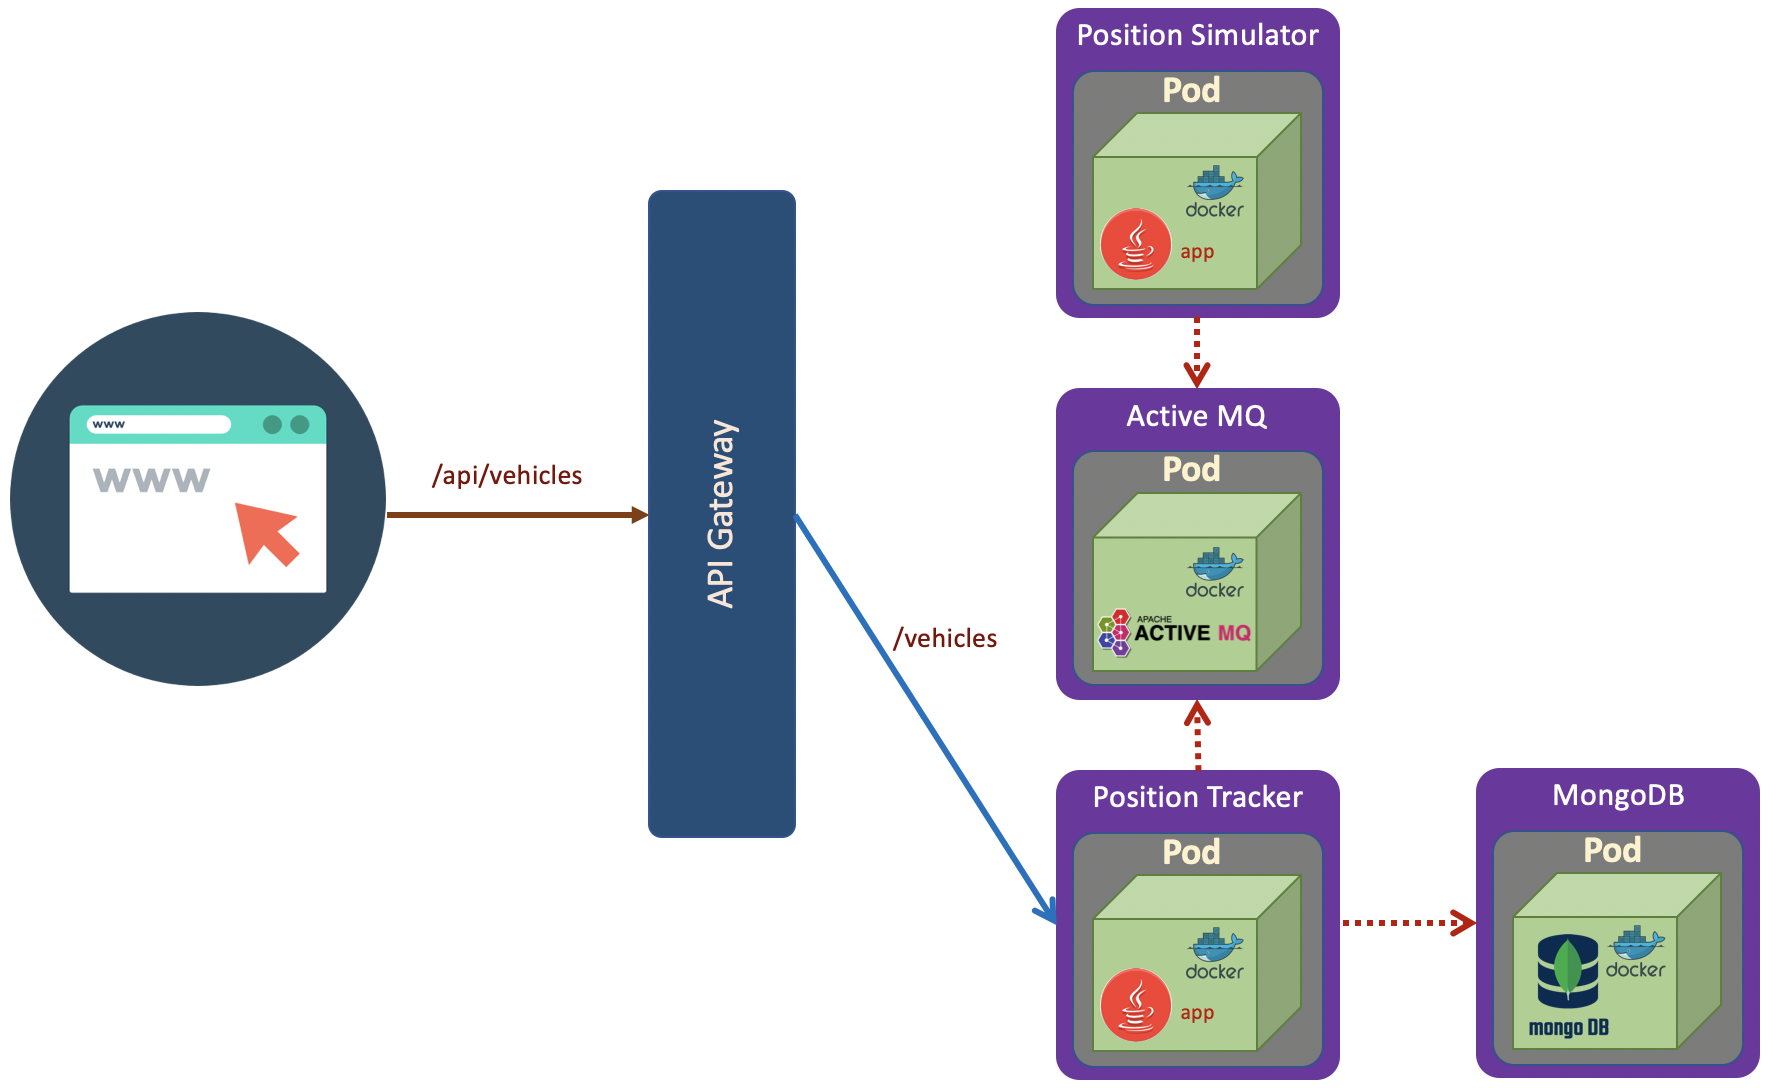
Persistence with MongoDB
Previous microservices example has no data persistence. In this sectio we will add MongoDB as data persistence which stores historical position of trucks.
MongoDB Microservice
We will deploy MongoDB with the following specification.
apiVersion: apps/v1
kind: Deployment
metadata:
  name: mongodb
spec:
  selector:
    matchLabels:
      app: mongodb
  replicas: 1
  template: # template for the pods
    metadata:
      labels:
        app: mongodb
    spec:
      containers:
      - name: mongodb
        image: mongo:3.6.5-jessie

---
kind: Service
apiVersion: v1
metadata:
  name: fleetman-mongodb
spec:
  selector:
    app: mongodb
  ports:
    - name: mongoport
      port: 27017
  type: ClusterIP
Updating Container Images
In this lab we will use example provided by of DickChesterwood. In the position tracker API, we can see the MongoDB configuration in the application-production-microservice.properties. The address of MongoDB is fully qualified domain name **fleetman-mongodb**.default.svc.cluster.local
spring.activemq.broker-url=tcp://fleetman-queue.default.svc.cluster.local:61616
fleetman.position.queue=positionQueue

# We'll use the default port 8080 for all microservices in production cluster.

# TODO but this is reasonable guess! This may change when we scale it out...
spring.data.mongodb.host=fleetman-mongodb.default.svc.cluster.local
Before demonstrating the persistence with MongoDB, we will update several images used in previous section and apply them in Kubernetes cluster.
List of updated pod image
| Pod |
Image |
| Queue (ActiveMQ) |
richardchesterwood/k8s-fleetman-queue:release2 |
| Position Tracker |
richardchesterwood/k8s-fleetman-position-tracker:release3 |
| Position Simulator |
richardchesterwood/k8s-fleetman-position-simulator:release2 |
| API Gateway |
richardchesterwood/k8s-fleetman-api-gateway:release2 |
| WebApp |
richardchesterwood/k8s-fleetman-webapp-angular:release2 |
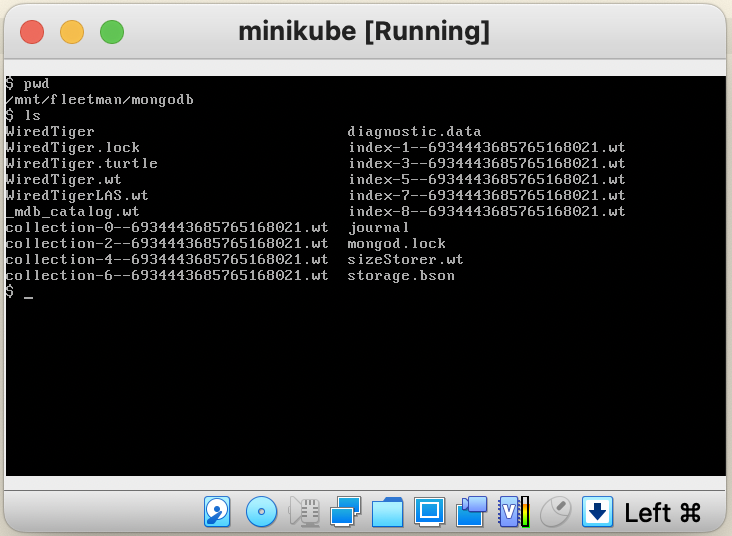
Storing MongoDB Database Outside Container (Host)
Volumes
Volumes allows us to store data outside a pod. In the following example we will store data at the host of node.
Thus, when the Pod crashes, the data will not lost.
apiVersion: apps/v1
kind: Deployment
metadata:
  name: mongodb
spec:
  selector:
    matchLabels:
      app: mongodb
  replicas: 1
  template: # template for the pods
    metadata:
      labels:
        app: mongodb
    spec:
      containers:
      - name: mongodb
        image: mongo:3.6.5-jessie
        volumeMounts:
          - name: mongo-persistent-storage
            mountPath: /data/db # MongoDB store data inside the container
      volumes:
        - name: mongo-persistent-storage
          # This AWS EBS volume must already exist.
          #awsElasticBlockStore:
          #....

          # This is Azure data storage
          #azureDisk
          #.....

          # This is local disk of node (host)
          hostPath:
             path: /mnt/fleetman/mongodb
             type: DirectoryOrCreate
---
kind: Service
apiVersion: v1
metadata:
  name: fleetman-mongodb
spec:
  selector:
    app: mongodb
  ports:
    - name: mongoport
      port: 27017
  type: ClusterIP
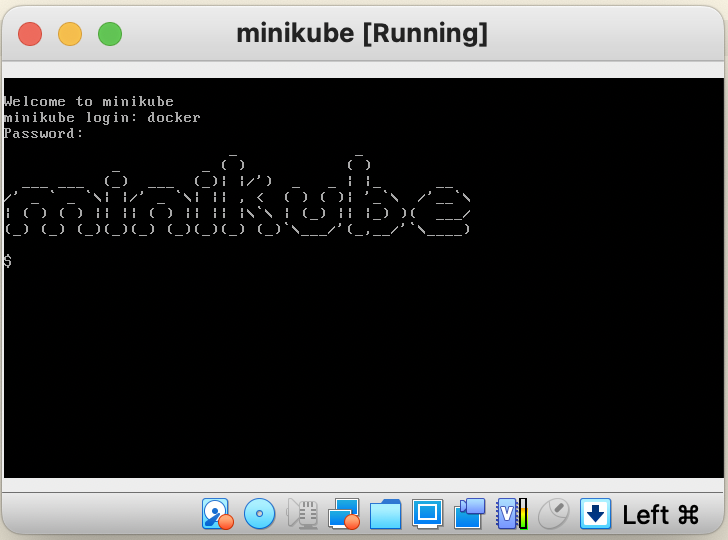
Open VirtualBox, the double clik minikube VM which is currently running. It will pop up a windows and prompt login to minikube.
We can login to the minikube host using
username : docker
password : tcuser
PersistentVolume
To make persistent configuration of Pod more clean, we can separated the volume persistent configuration outside the Pod configuration. The Pod just refers to the peristent volume configuration. Our pod yaml does not have to be changed when we move from one cloud provider to another. We just change the persistent config which is referenced by the Pod. Ideally it cound be in separated yaml file.
A PersistentVolume (PV) is a piece of storage in the cluster that has been provisioned by an administrator or dynamically provisioned using Storage Classes. It is a resource in the cluster just like a node is a cluster resource. PVs are volume plugins like Volumes, but have a lifecycle independent of any individual Pod that uses the PV. This API object captures the details of the implementation of the storage, be that NFS, iSCSI, or a cloud-provider-specific storage system.
Let’s modified the Mongo Pod definition using the PersistentVolume.
apiVersion: apps/v1
kind: Deployment
metadata:
  name: mongodb
spec:
  selector:
    matchLabels:
      app: mongodb
  replicas: 1
  template: # template for the pods
    metadata:
      labels:
        app: mongodb
    spec:
      containers:
      - name: mongodb
        image: mongo:3.6.5-jessie
        volumeMounts:
          - name: mongo-persistent-storage
            mountPath: /data/db # MongoDB store data inside the container
      volumes:
        - name: mongo-persistent-storage
          # pointer to the configuration of HOW we want the mount to be implemented
          persistentVolumeClaim:
            claimName: mongo-pvc
---
kind: Service
apiVersion: v1
metadata:
  name: fleetman-mongodb
spec:
  selector:
    app: mongodb
  ports:
    - name: mongoport
      port: 27017
  type: ClusterIP
So the general point of this, the mongodb Pod does not have specific implementation detail. The detail definition of the storage is put outside Pod definition.
In this lab, we use local storage to store mongodb database. To define the specific detail of storage we need to define PersistentVolumeClaim definition. We do that with the following storage.yaml
# Storage specification that's expected
apiVersion: v1
kind: PersistentVolumeClaim
metadata:
  name: mongo-pvc
spec:
  storageClassName: mylocalstorage
  accessModes:
    - ReadWriteOnce
  resources:
    requests:
      storage: 20Gi
---
# storage that will be created to fullfil the storage expectation
apiVersion: v1
kind: PersistentVolume
metadata:
  name: local-storage
spec:
  storageClassName: mylocalstorage
  capacity:
    storage: 20Gi
  accessModes:
    - ReadWriteOnce
  hostPath:
    path: "/mnt/fleetman-new/mongodb"
    type: DirectoryOrCreate
The above yaml shows that to link PersistentVolumeClaim to PersistentVolume is used StorageClassName.
The general linkage are as follow:
Pod -> PersistentVolumeClaim -> PeristentVolume
# apply PersistentVolume
kubectl apply -f storage.yaml
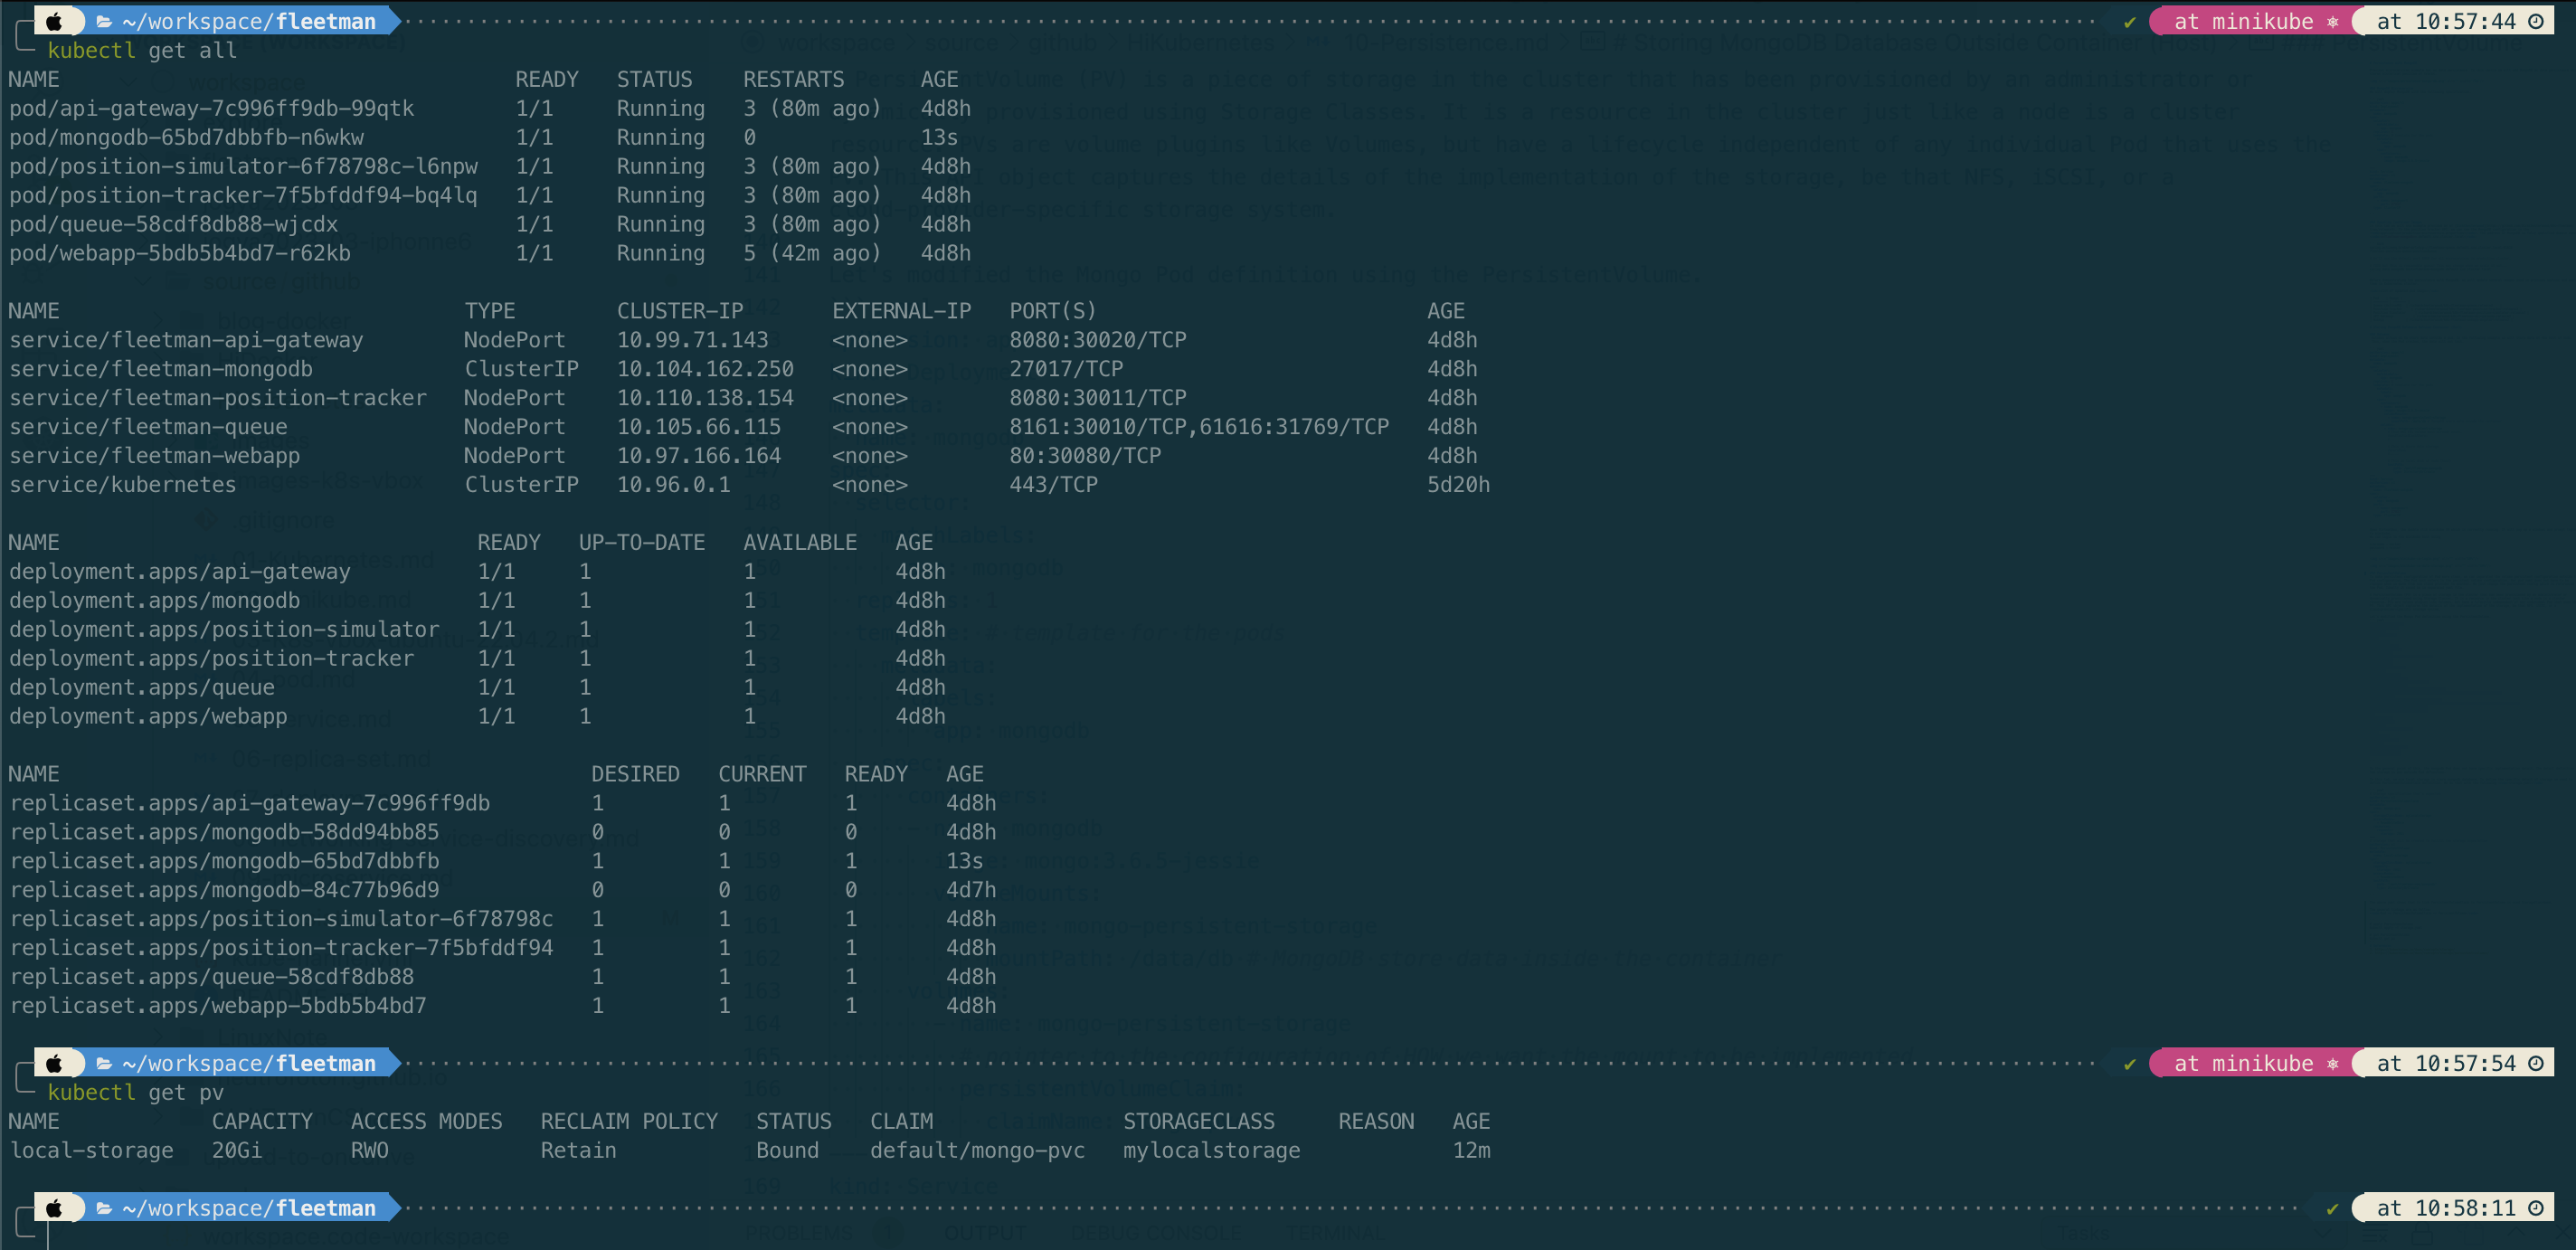
# get PersistentVolume
kubectl get pv
References
- https://kubernetes.io/docs/concepts/storage/
- https://kubernetes.io/docs/concepts/storage/persistent-volumes/