22 Apr 2023
•
kubernetes
Microservice
In this lab, we will use example provided by DickyChesterwood. The docker images are available on Docker Hub
 The scenario as shown in the above diagram. The deployment steps are:
1. Queue (ActiveMQ)
First of all we will create active-mq.yaml
# ActiveMQ Deployment
apiVersion: apps/v1
kind: Deployment
metadata:
  name: queue
spec:
  selector:
    matchLabels:
      app: queue
  replicas: 1
  template:
    metadata:
      labels:
        app: queue
    spec:
      containers:
      - name: queue
        image: richardchesterwood/k8s-fleetman-queue:release1

---
# ActiveMQ Service
apiVersion: v1
kind: Service
metadata:
  name: fleetman-queue

spec:
  # This defines which pods are going to be represented by this Service
  # The service becomes a network endpoint for either other services
  # or maybe external users to connect to (eg browser)
  selector:
    app: queue

  ports:
    - name: http
      port: 8161
      nodePort: 30010

    - name: endpoint
      port: 61616

  type: NodePort
kubectl apply -f active-mq.yaml
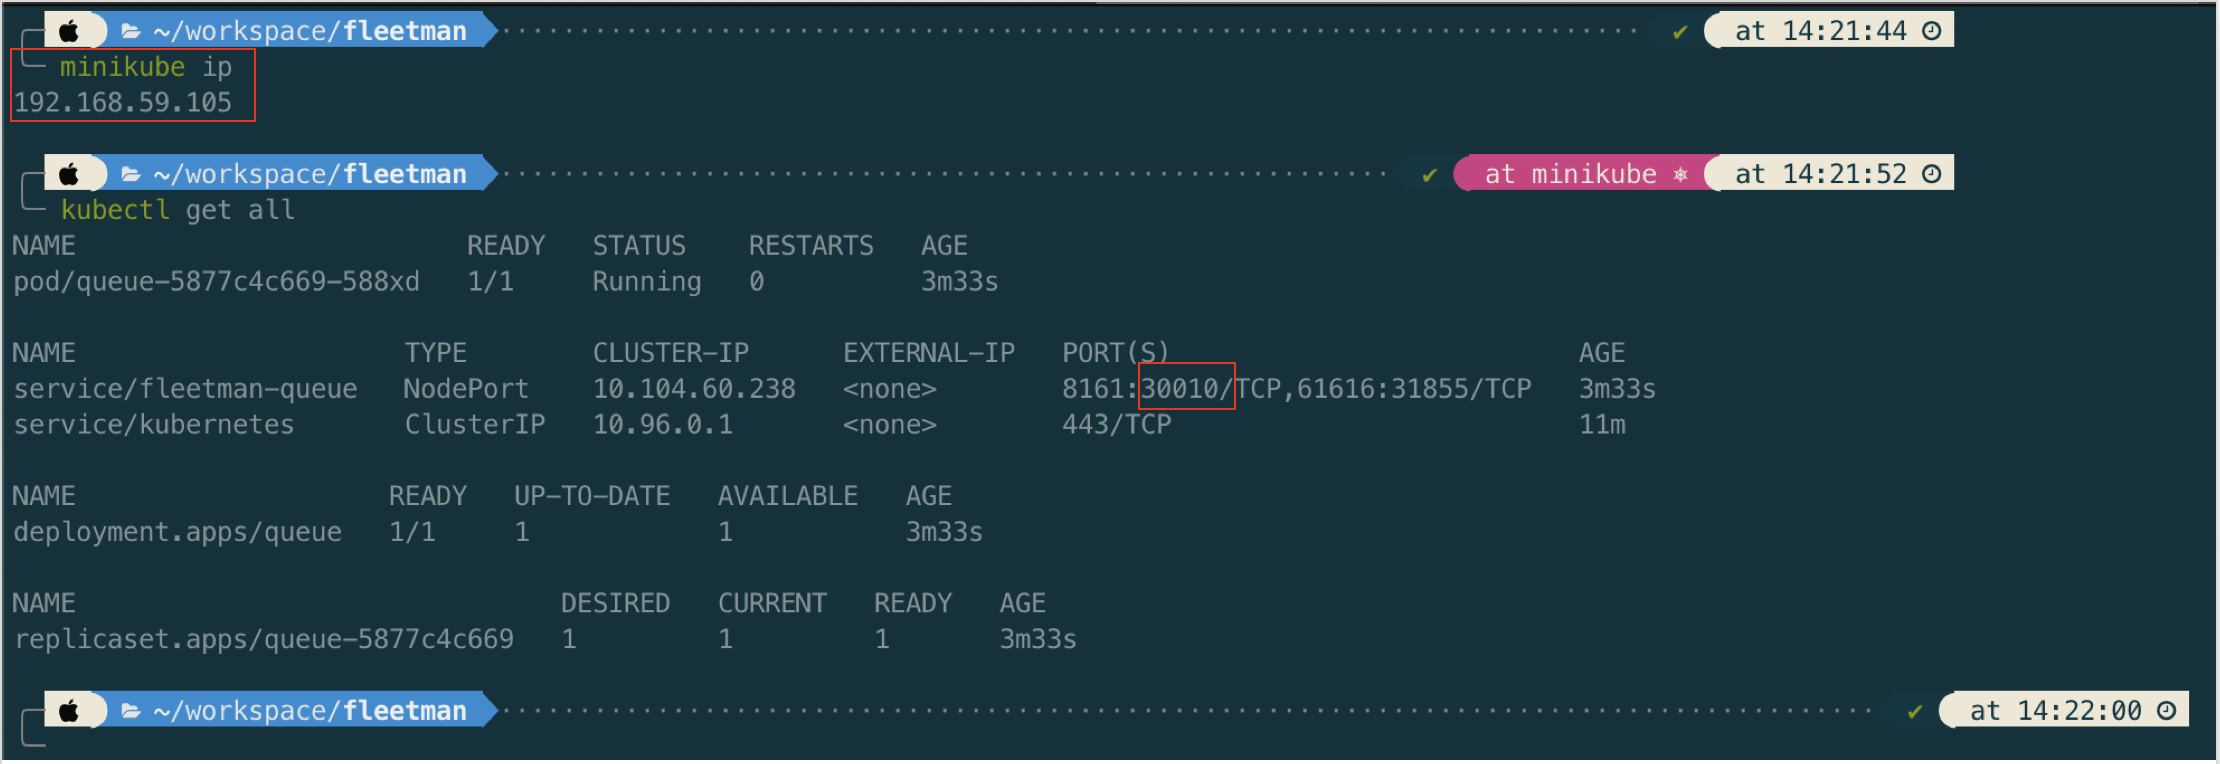
Now open in browser http://192.168.59.105:30010/
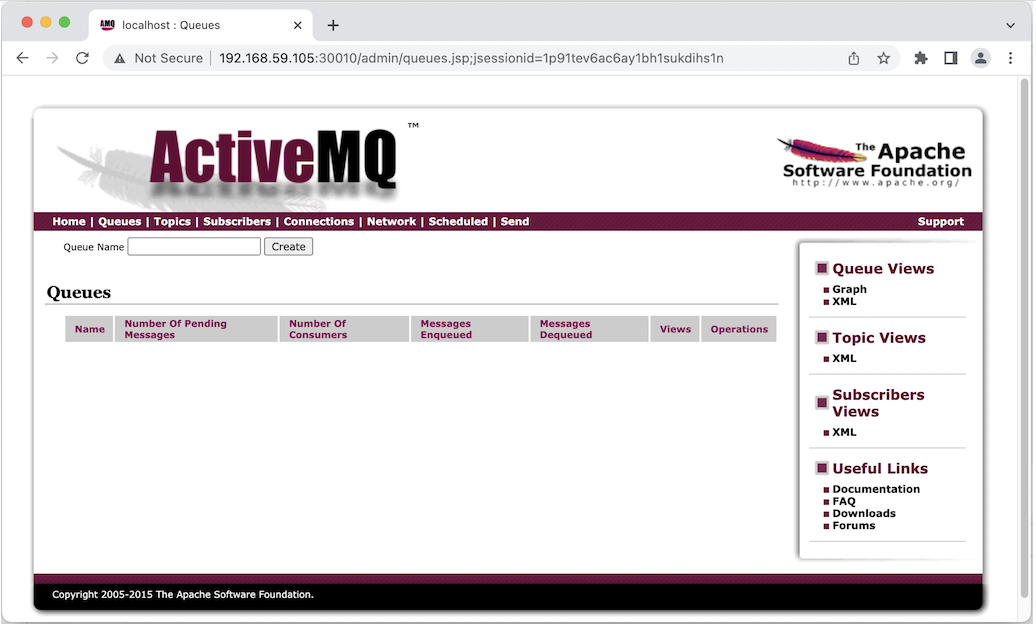
ActiveMQ default username/password is admin/admin
2. Position Tracker
apiVersion: apps/v1
kind: Deployment
metadata:
  name: position-tracker
spec:
  selector:
    matchLabels:
      app: position-tracker
  replicas: 1
  template: # template for the pods
    metadata:
      labels:
        app: position-tracker
    spec:
      containers:
      - name: position-tracker
        image: richardchesterwood/k8s-fleetman-position-tracker:release1
        env:
        - name: SPRING_PROFILES_ACTIVE
          value: production-microservice
---
apiVersion: v1
kind: Service
metadata:
  name: fleetman-position-tracker

spec:
  # This defines which pods are going to be represented by this Service
  # The service becomes a network endpoint for either other services
  # or maybe external users to connect to (eg browser)
  selector:
    app: position-tracker

  ports:
    - name: http
      port: 8080
      nodePort: 30011

  type: NodePort
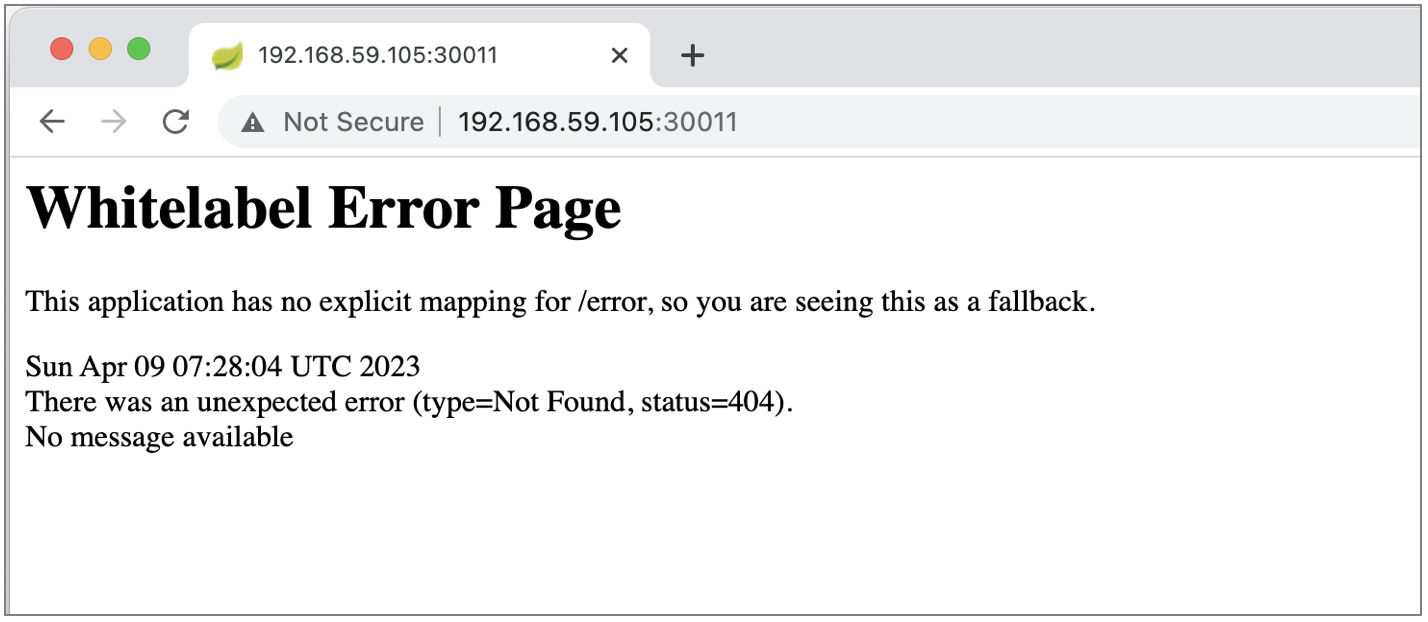
When we hit through browser to http://192.168.59.105:30011/ we get 404 which means that the position tracker service (spring boot app) run well.
For checking purpose we can let the position tracker as NodePort.
For production purpose, we can consider to change the NodePort to ClusterIP since position tracker microservice is not designed to be accessed from ouside cluster.
apiVersion: apps/v1
kind: Deployment
metadata:
  name: position-tracker
spec:
  selector:
    matchLabels:
      app: position-tracker
  replicas: 1
  template: # template for the pods
    metadata:
      labels:
        app: position-tracker
    spec:
      containers:
      - name: position-tracker
        image: richardchesterwood/k8s-fleetman-position-tracker:release1
        env:
        - name: SPRING_PROFILES_ACTIVE
          value: production-microservice
---
apiVersion: v1
kind: Service
metadata:
  name: fleetman-position-tracker

spec:
  # This defines which pods are going to be represented by this Service
  # The service becomes a network endpoint for either other services
  # or maybe external users to connect to (eg browser)
  selector:
    app: position-tracker

  ports:
    - name: http
      port: 8080
      #nodePort: 30011

  #type: NodePort
  type: ClusterIP
3. Position Simulator
In the diagram, the position simulator is not designed to be accessed from outside the cluster. So it should be isolated and no port needed.
# Position Simulator Deployment
apiVersion: apps/v1
kind: Deployment
metadata:
  name: position-simulator
spec:
  selector:
    matchLabels:
      app: position-simulator
  replicas: 1
  template: # template for the pods
    metadata:
      labels:
        app: position-simulator
    spec:
      containers:
      - name: position-simulator
        image: richardchesterwood/k8s-fleetman-position-simulator:release1
        env:
        - name: SPRING_PROFILES_ACTIVE
          value: production-microservice
Save the above yaml as position-simulator.yaml and run apply command.
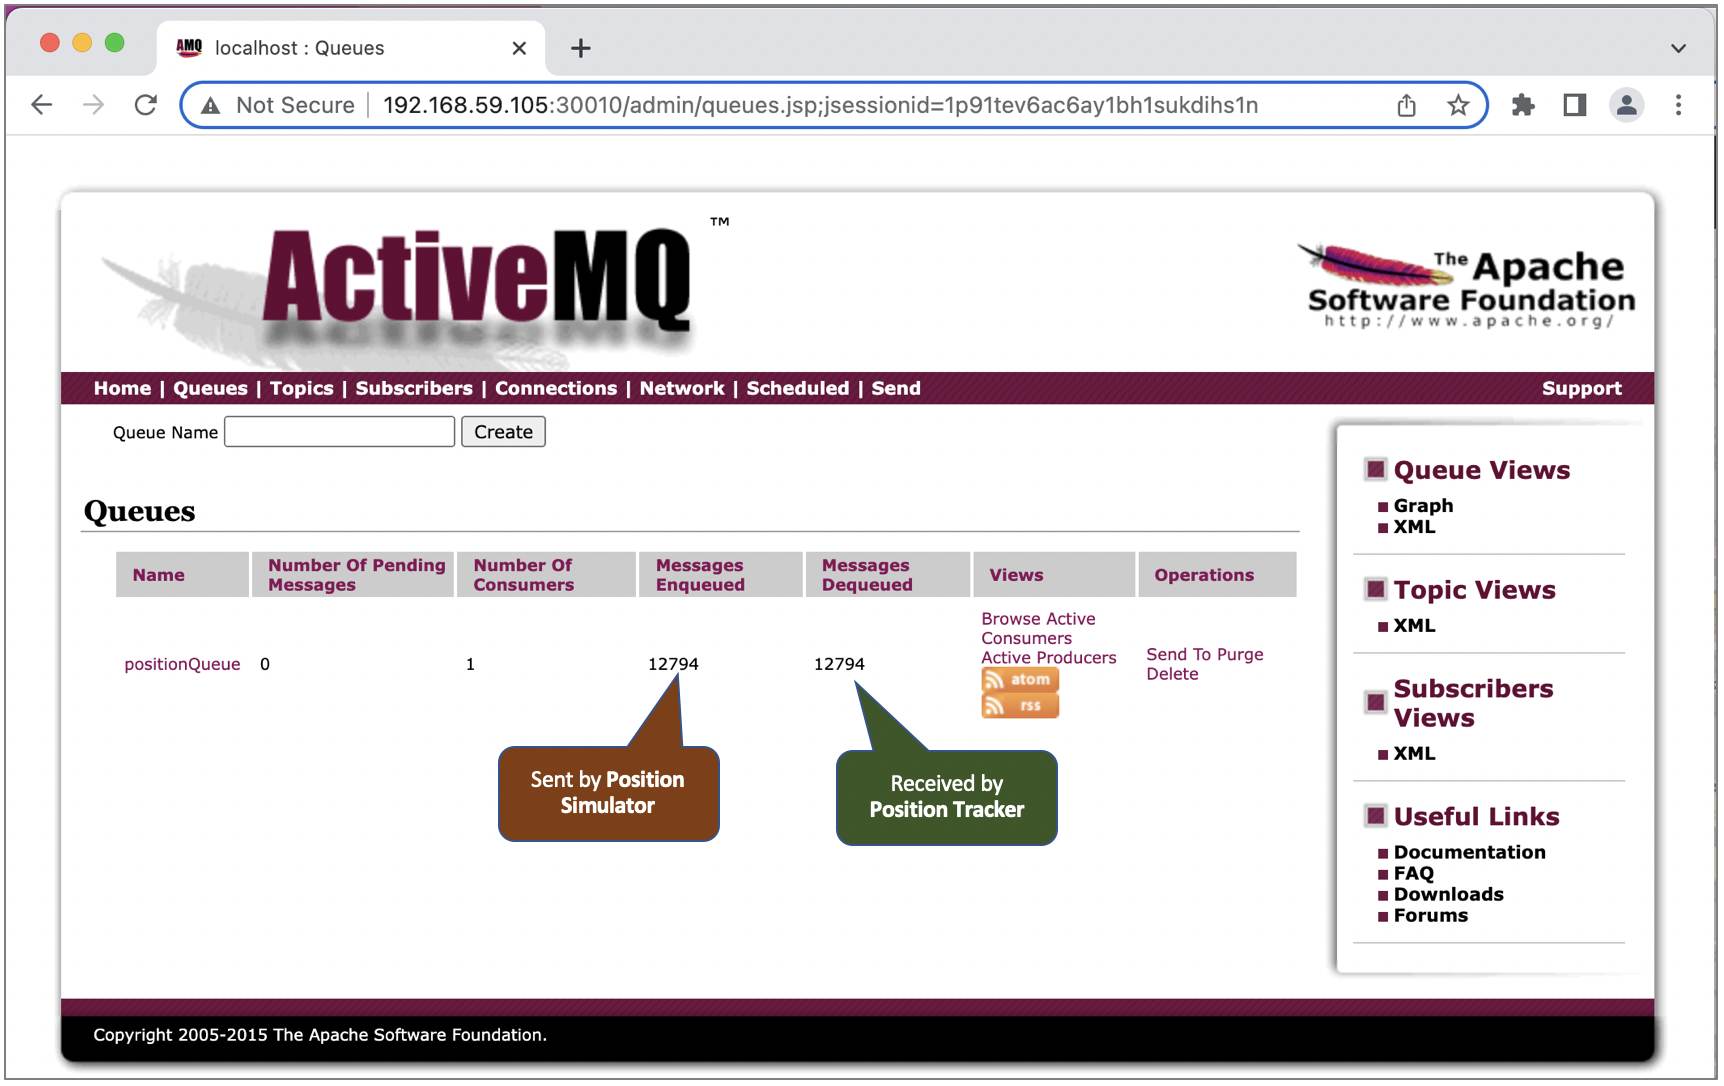
kubectl apply -f position-simulator.yaml
Once the position simulator running, we should see queue record in the ActiveMQ dashboard.
4. API Gateway
apiVersion: apps/v1
kind: Deployment
metadata:
  name: api-gateway
spec:
  selector:
    matchLabels:
      app: api-gateway
  replicas: 1
  template: # template for the pods
    metadata:
      labels:
        app: api-gateway
    spec:
      containers:
      - name: api-gateway
        image: richardchesterwood/k8s-fleetman-api-gateway:release1
        env:
        - name: SPRING_PROFILES_ACTIVE
          value: production-microservice

---
apiVersion: v1
kind: Service
metadata:
  name: fleetman-api-gateway

spec:
  # This defines which pods are going to be represented by this Service
  # The service becomes a network endpoint for either other services
  # or maybe external users to connect to (eg browser)
  selector:
    app: api-gateway

  ports:
    - name: http
      port: 8080
      nodePort: 30020

  type: NodePort
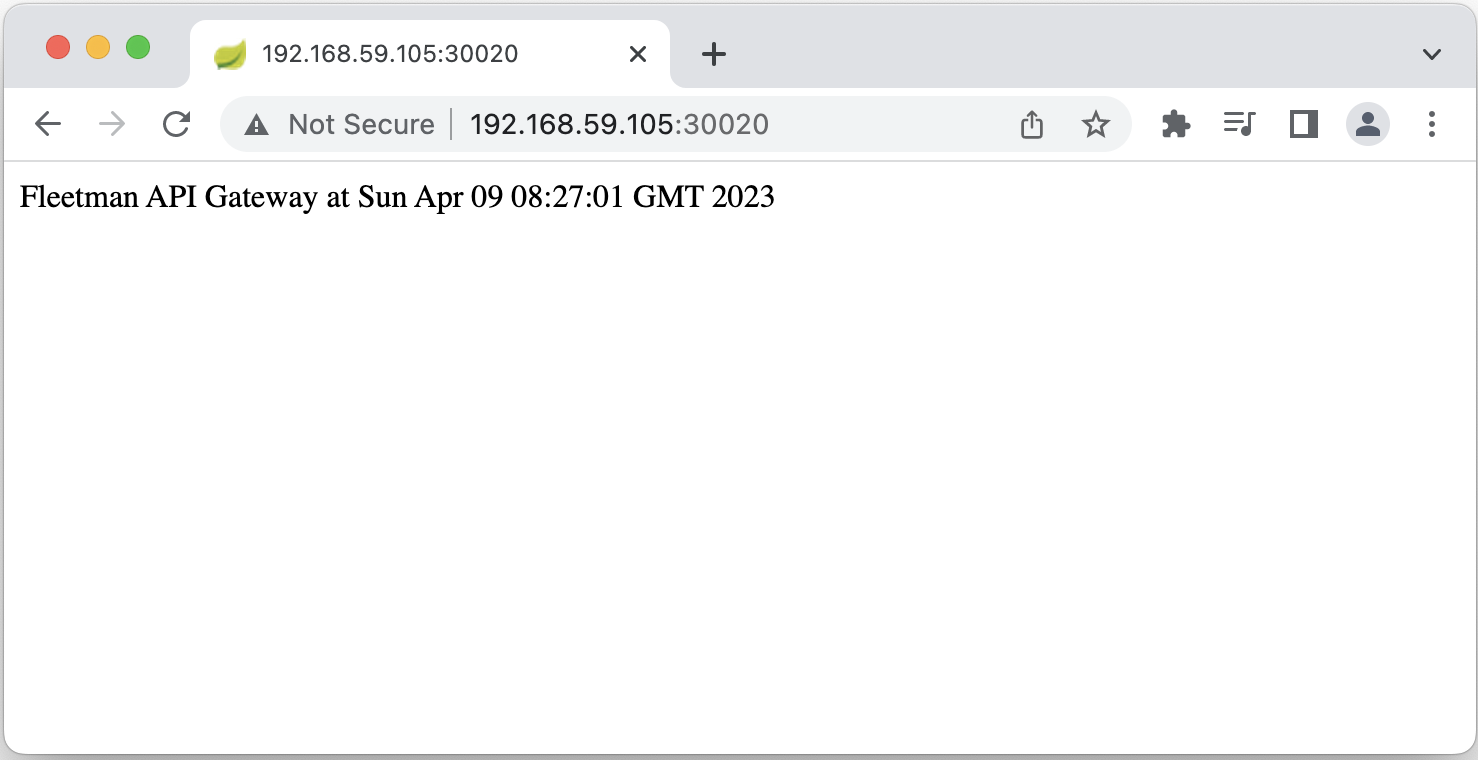
Let’s check the API gateway by open http://192.168.59.105:30020/ in browser.
5. Webapp
apiVersion: apps/v1
kind: Deployment
metadata:
  name: webapp
spec:
  selector:
    matchLabels:
      app: webapp
  replicas: 1
  template: # template for the pods
    metadata:
      labels:
        app: webapp
    spec:
      containers:
      - name: webapp
        image: richardchesterwood/k8s-fleetman-webapp-angular:release1
        env:
        - name: SPRING_PROFILES_ACTIVE
          value: production-microservice

---
apiVersion: v1
kind: Service
metadata:
  name: fleetman-webapp

spec:
  # This defines which pods are going to be represented by this Service
  # The service becomes a network endpoint for either other services
  # or maybe external users to connect to (eg browser)
  selector:
    app: webapp

  ports:
    - name: http
      port: 80
      nodePort: 30080

  type: NodePort
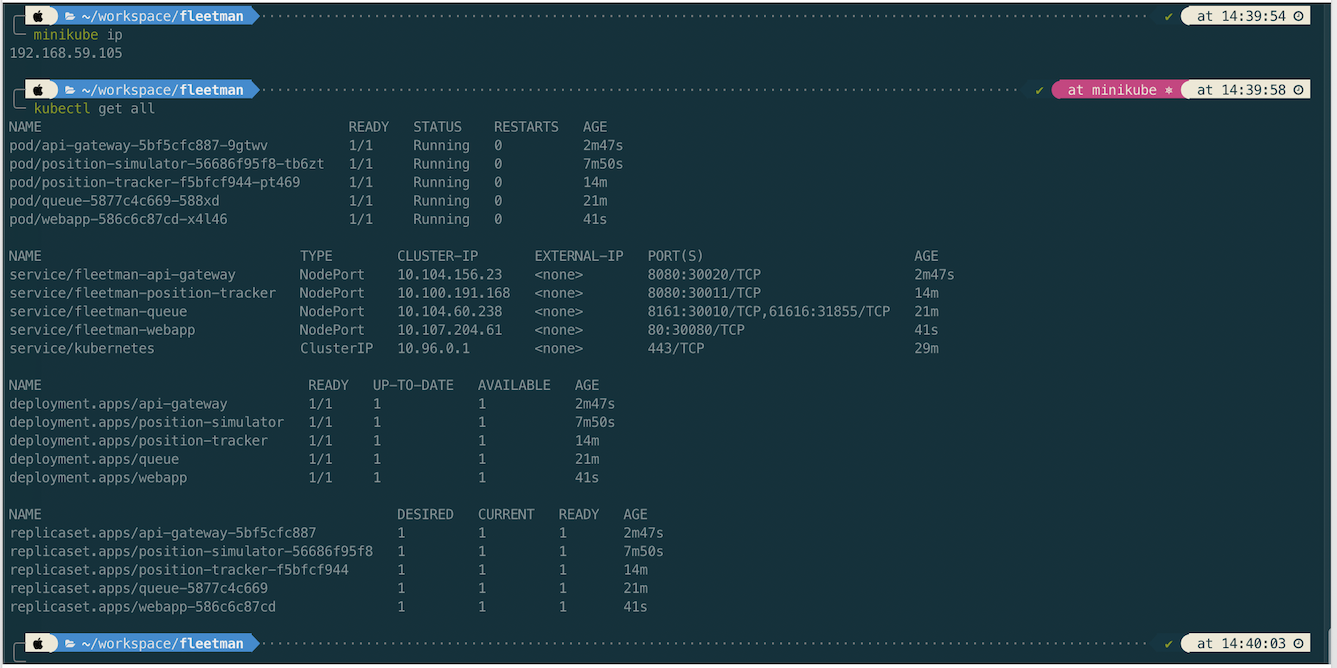
Let’s review all microservice deployments before we open the app.
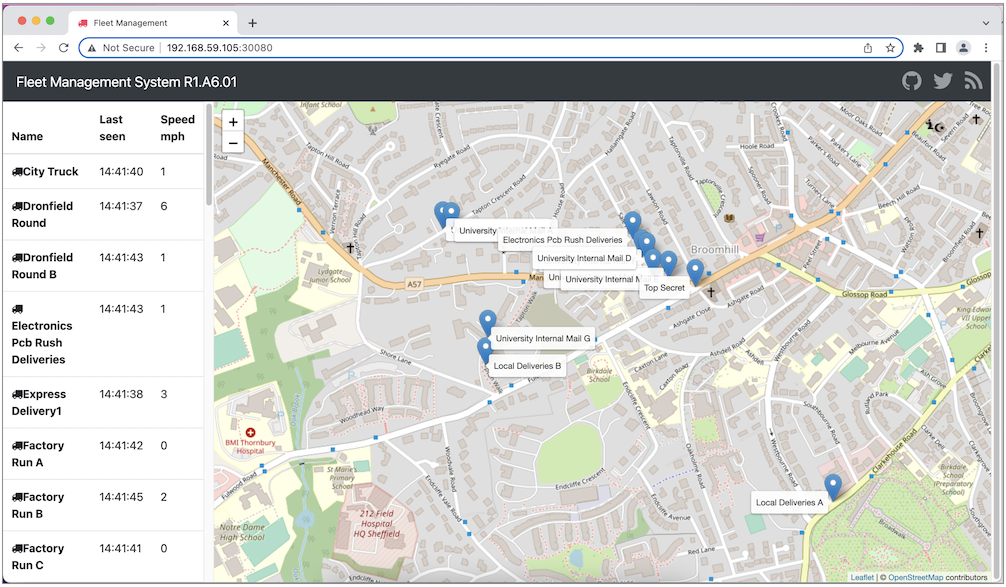
Lastly we can open the app in browser http://192.168.59.105:30080/
Investigating Kubernates Log
If we get an error on resource we can chek
# get pod description including kubernetes message while creating/updating the pod
kubectl describe pod position-simulator-56686f95f8-tb6zt

# get the application log (spring log)
kubectl logs api-gateway-5bf5cfc887-9gtwv
kubectl logs position-simulator-56686f95f8-tb6zt

# get the application log by following the log
kubectl logs -f position-simulator-56686f95f8-tb6zt
References
- https://github.com/DickChesterwood/k8s-fleetman/tree/release0-reconstruction-branch
- https://www.nginx.com/blog/microservices-at-netflix-architectural-best-practices/
21 Apr 2023
•
kubernetes
How Network Container Work
Let’s assume we have an app which stores data in MySql database. It is not a good idea to incorporate the app and database (MySql) in a single container. Docker container is designed to handle a single service. Eventhough it is possible a single container handling multiple service (app and database), but it is not a good design and not recommended.
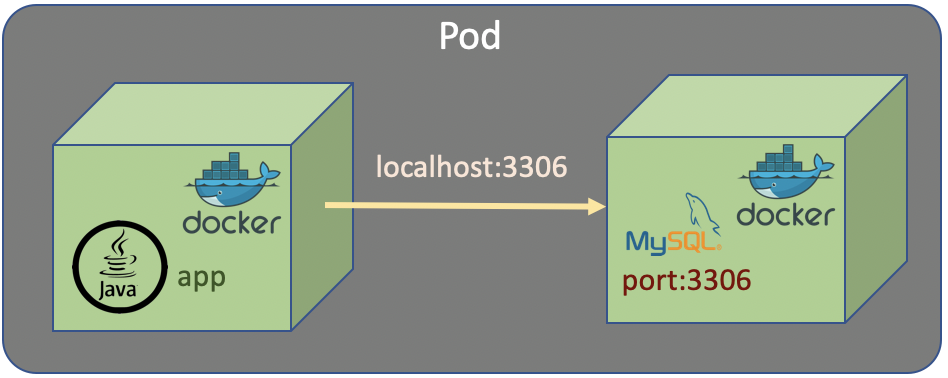
In Kubernetes it is also possible to put multiple container in a single Pod. If we do that with the case of app and database, the app access the database as localhost with a specific port exposed by database container.
Eventhough designing multiple container in a single pod is acceptable and make the network simple, but it is not a good design and it’s not recommended.
Having an app and a database in a single Pod would make the Pod much more complicated to manage. If the Pod fails, then we are going to have to find out if it’s failed because of the database container or the app container. Generally, it just makes things more complicated.
The recommended thing is the app and database should have seperated containers and also seperated Pods.
In previous section we know that the functionality of Pods are exposed as Services. Each of the Services has it’s own private IP address. And the IP is just visible inside the Kubernetes cluster. If we want to communicate from the app Pod to the database Pod, we just refer to the IP address of the database Service. The IP address of the Services are allocated dynamically by Kubernetes.
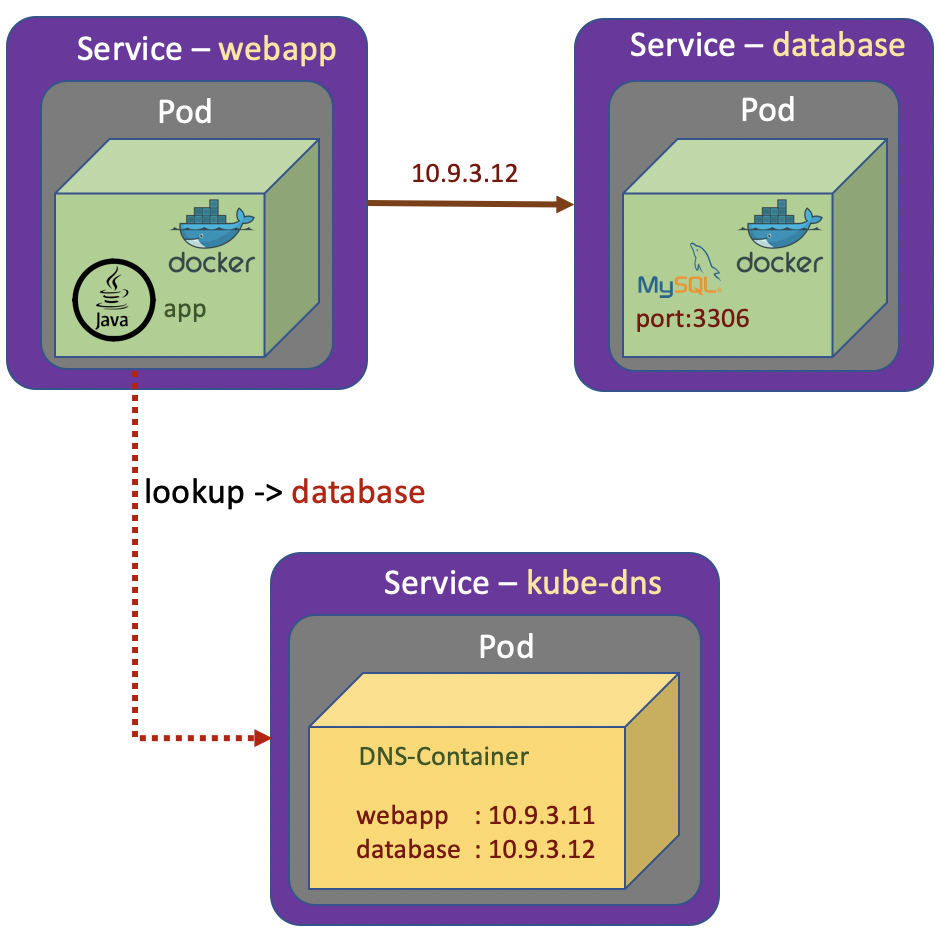
The next time we run the Kubernetes cluster, we may get different IP addresses allocated to the services. The solution is the Kubernetes maintains its own private DNS service. The DNS Service basically is a database containing a set of key value pairs. The keys are just label name of Kubernetes services and the values are the IP addresses of those Services. And Kubernetes takes full responsibility in maintaining this DNS system. The Kubernetes service which does the job is called kube-dns
Namespace
Namespace basically is partioning resources in Kubernetes.
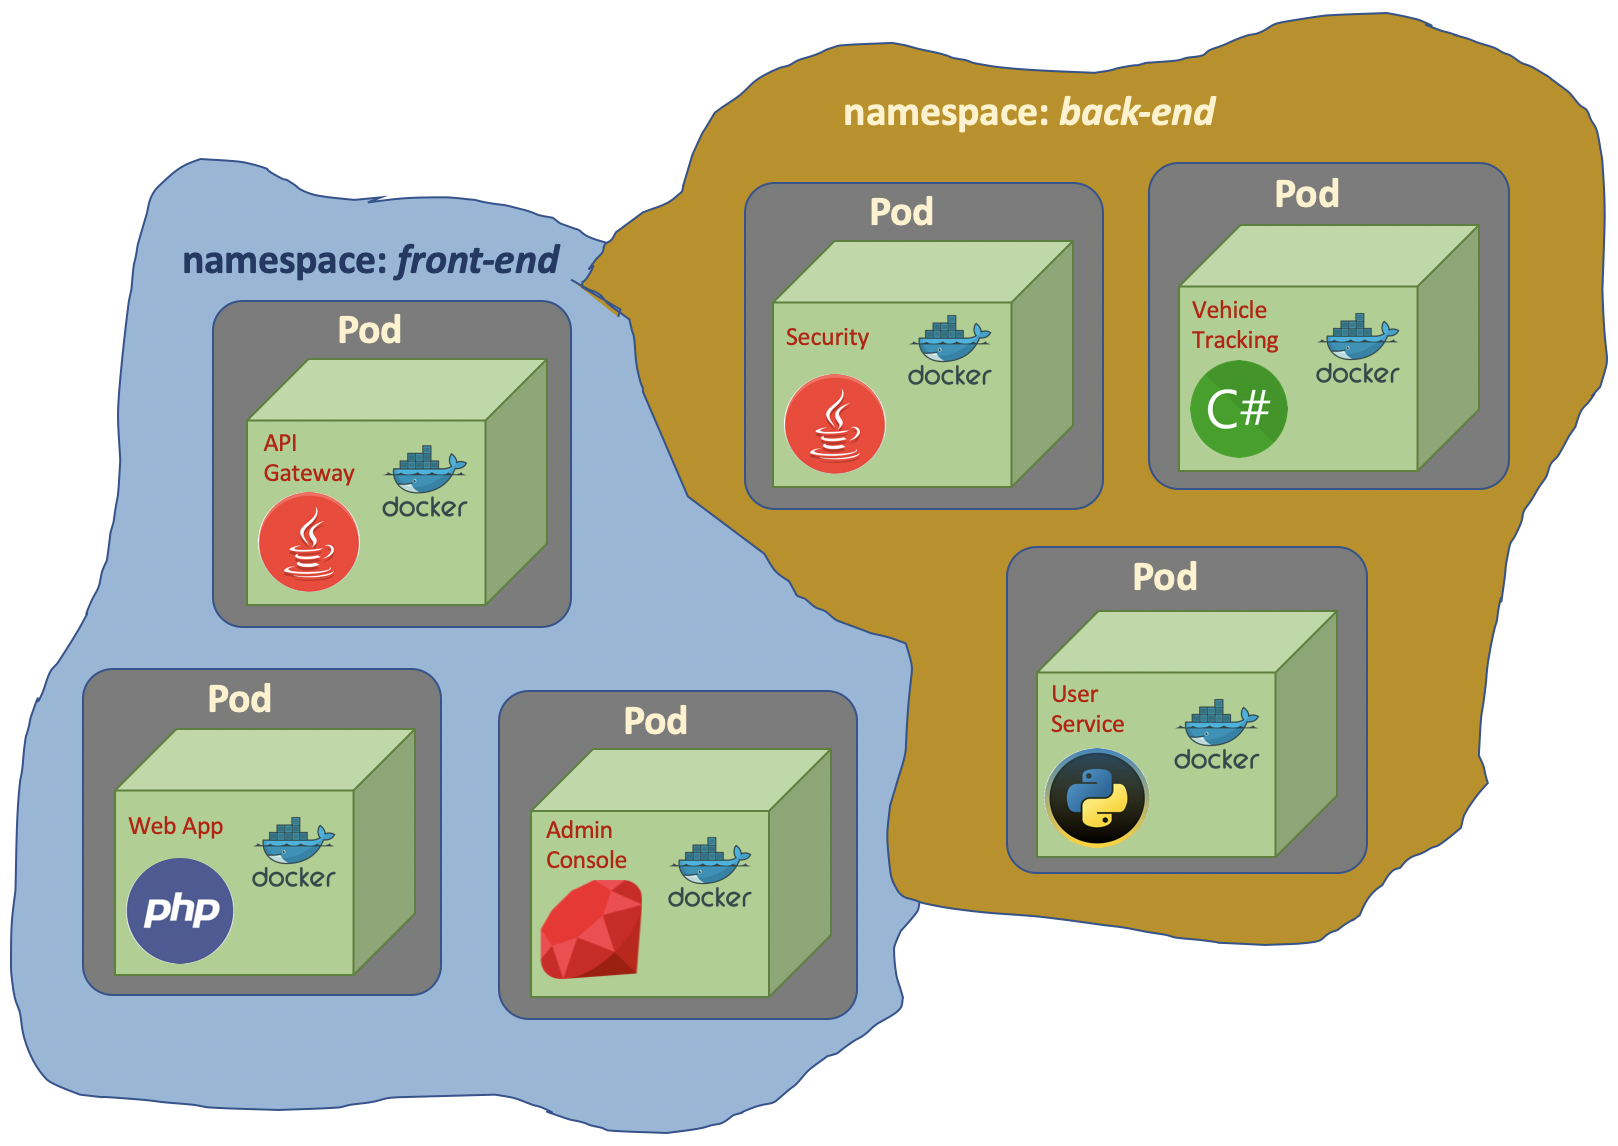
In Kubernetes, if we don’t specify namespace, it will be default namespace.
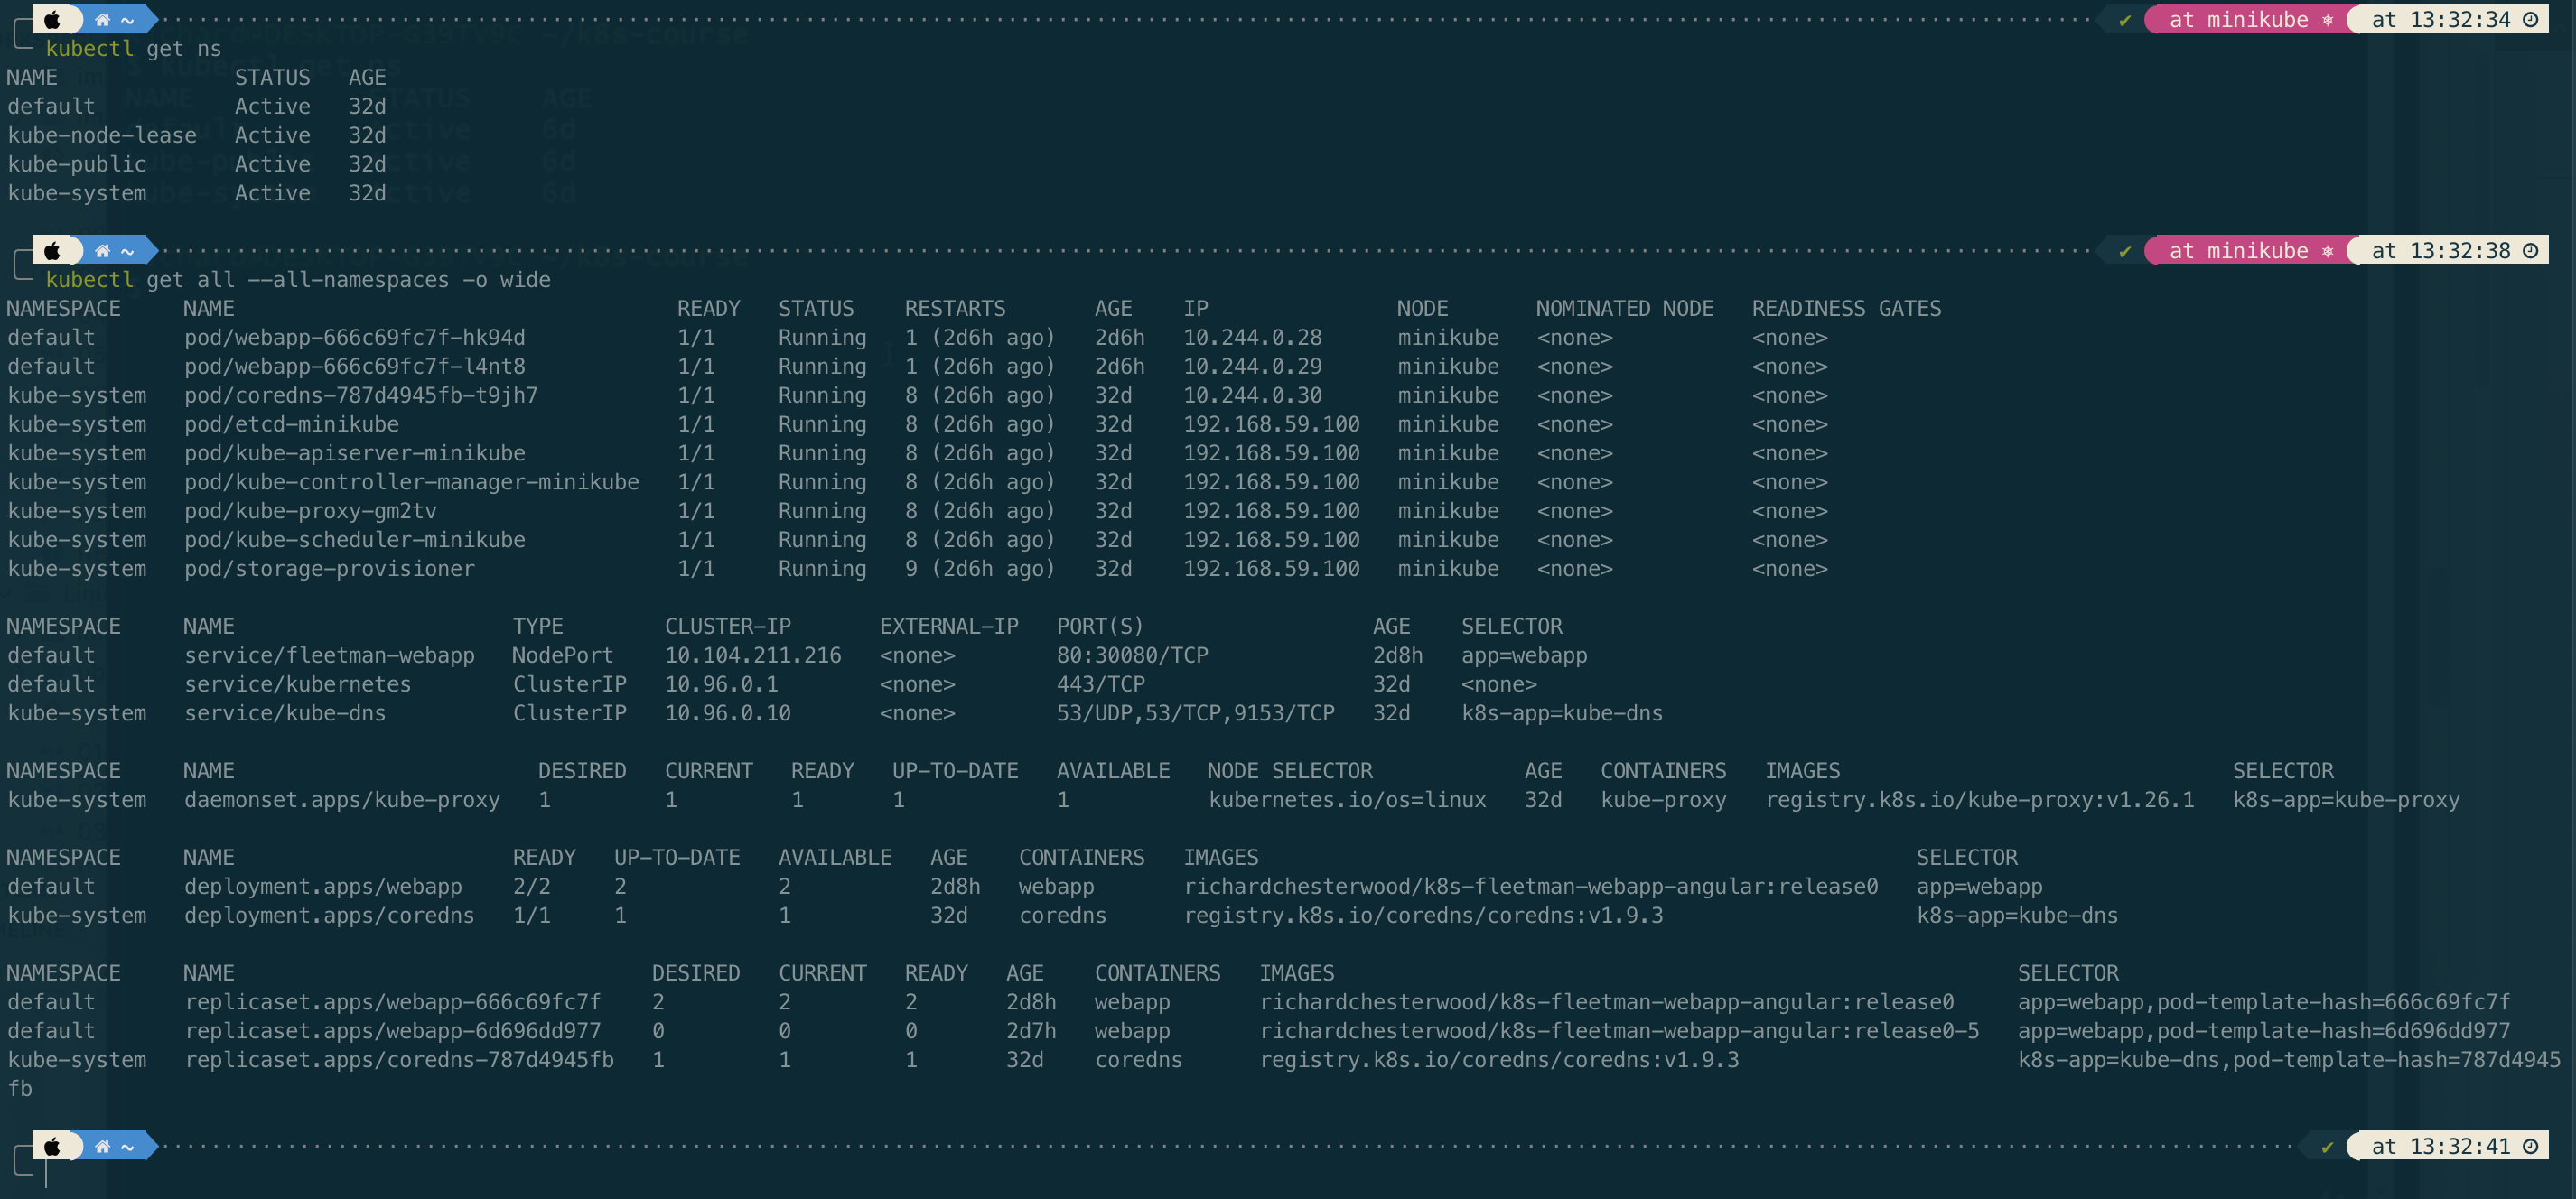
To get list of namespace we check with command
# long command
kubectl get namespaces

# short command
kubectl get ns
We also can get resources by adding flag --all-namespaces for all namespaces and -n for specific namespace
# get pods in kube-system namespace
kubectl get po -n kube-system

# get all resources in kube-system namespace
kubectl get all -n kube-system
If we are in different namespace, we should specify the namespace
kubectl describe svc kube-dns -n kube-system
Working with Custom Namespace
# creating a namespace
kubectl create ns demo

# run image inside a specific namespace
kubectl run busybox -t -i --image busybox --namespace demo
Service Discovery
To demonstrate service dicovery, let’s create a Pod and Service (mysql.yaml) for a MySQL database. Then we will try to connect to the database from the previous web app Pod.
apiVersion: v1
kind: Pod
metadata:
  name: mysql
  labels:
    app: mysql
spec:
  containers:
   - name: mysql
     image: mysql:5
     env:
      # Use secret in real implementation
      - name: MYSQL_ROOT_PASSWORD
        value: password
      - name: MYSQL_DATABASE
        value: fleetman
---
kind: Service
apiVersion: v1
metadata:
  name: database
spec:
  selector:
    app: mysql
  ports:
  - port: 3306
  type: ClusterIP
kubectl apply -f mysql.yaml
How does the web app Pod know how to find the dns Service? The answer is Kubernetes will automatically do some management of the containers and it automatically configures the DNS system. We can verify it by viewing the file in the /etc/resolve.conf
# get into the Pod shell
kubectl exec -it webapp-666c69fc7f-hk94d sh
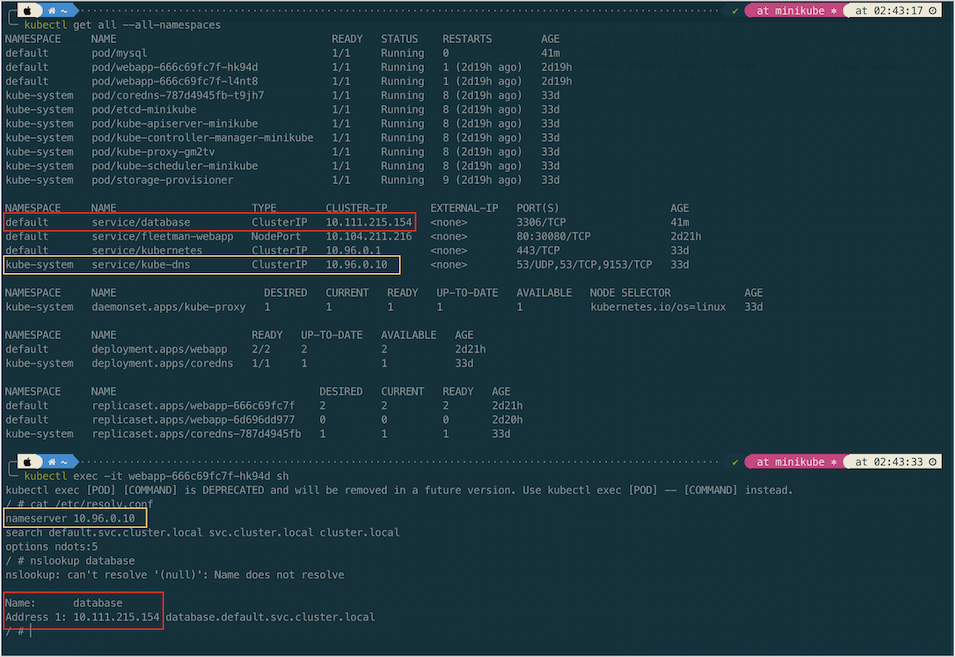
From the above screenshot we can see that the corresponding DNS entry for the database is database.default.svc.cluster.local. In short the general format of fully qualified domain name of service is \<service-name\>.\<namespace-name\>.svc.cluster.local
Let try to connect the MySql Pod from the web app Pod. Before doing that, we will install mysql client in the web app Pod.
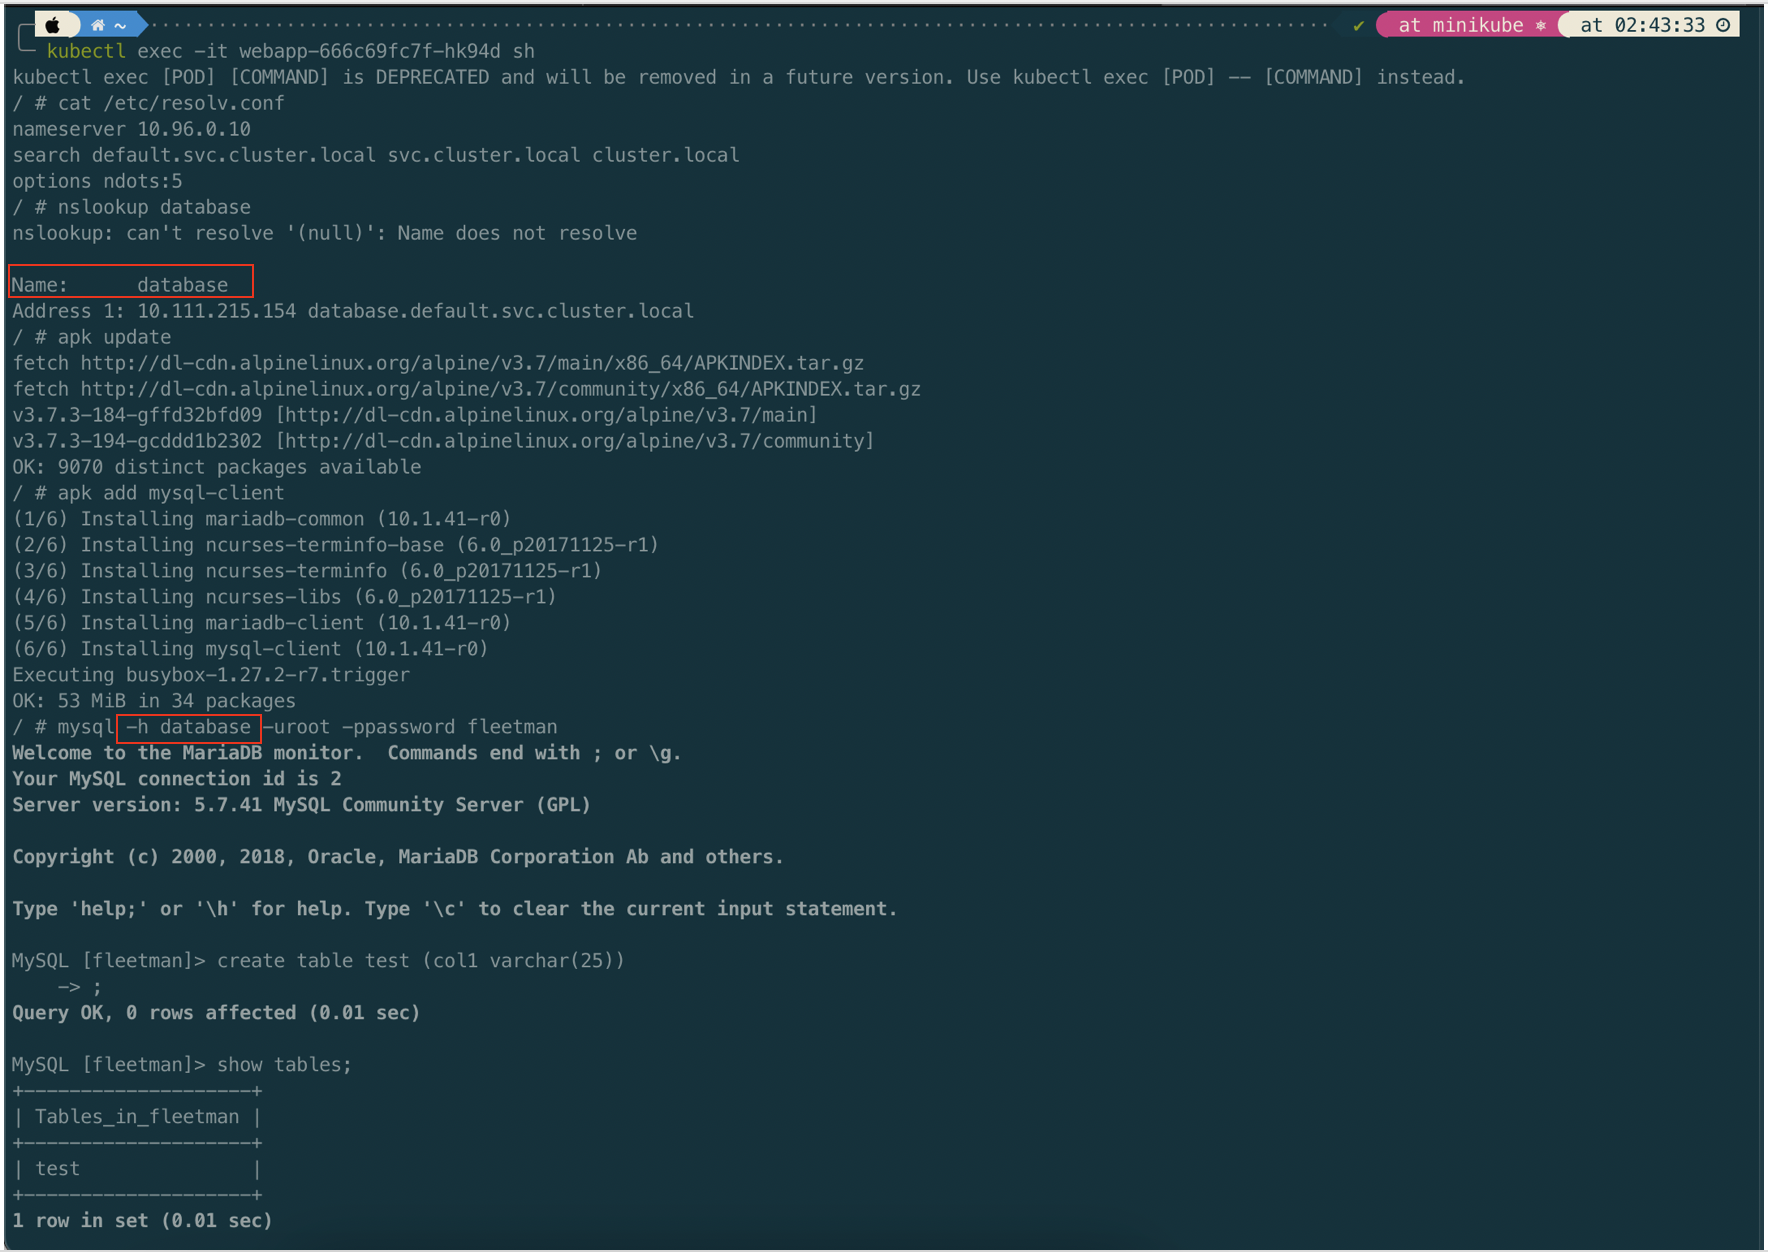
The important thing we have established here is that we can find the IP address of a service just by its name. That is called service discovery.
Reference
20 Apr 2023
•
kubernetes
About Deployment
In most cases we don’t want to work with Pods directly. As well as ReplicaSet, we might want to work with Deployment instead. A Deployment provides declarative updates for Pods and ReplicaSets.
Basically it’s a more sophisticated form of ReplicaSet. It is a ReplicaSet with an additional feature. With a Deployment, we get automatic rolling updates with zero downtime.
In the previous section of Service, we did a rolling deployment by changing the labels of selector in the service. The rolling updates was zero downtime. But with Deployment we have more elegant way without have to manual change the selector label. We could also do rollback if something goes wrong.
Note:
Do not manage ReplicaSets owned by a Deployment.
Creating Deployment
The yaml structure of Deployment is similar with ReplicaSet. To demonstrate the Deployment creation, let’s delete the previous ReplicaSet and Service.
kubectl delete rs webapp
kubectl delete svc fleetman-webapp
In creating a Deployment we can copy the previous ReplicaSet yaml and modify the kind element. To make it more closer to real condition, we will remove the release in the Pod label and Service selector. Since we should not tightly to any specific version.
The first deployment, we will use release0 tag of the docker image. We also make slightly increase the number of replica to 2.
apiVersion: apps/v1
kind: Deployment
metadata:
  name: webapp
spec:
  replicas: 2
  selector:
    matchLabels:
      app: webapp
  template: # template for the pod
    metadata:
      labels:
        app: webapp
    spec:
      containers:
      - name: webapp
        image: richardchesterwood/k8s-fleetman-webapp-angular:release0

---
apiVersion: v1
kind: Service
metadata:
  name: fleetman-webapp
  namespace: default
spec:
  # This defines which pods are going to be represented by this service
  # The service becomes a network endpoint for either other services
  # or maybe external users to connect to (browser)
  selector:
    app: webapp # can be any selector according to the label defined in pod ex: myapp:webapp
  ports:
  - name: http
    port: 80
    # the nodeport should be greater than 30000
    nodePort: 30080
  type: NodePort
The next steps are saving the above yaml as deployment.yaml and executing it to create deployment.
kubectl -f apply deployment.yaml
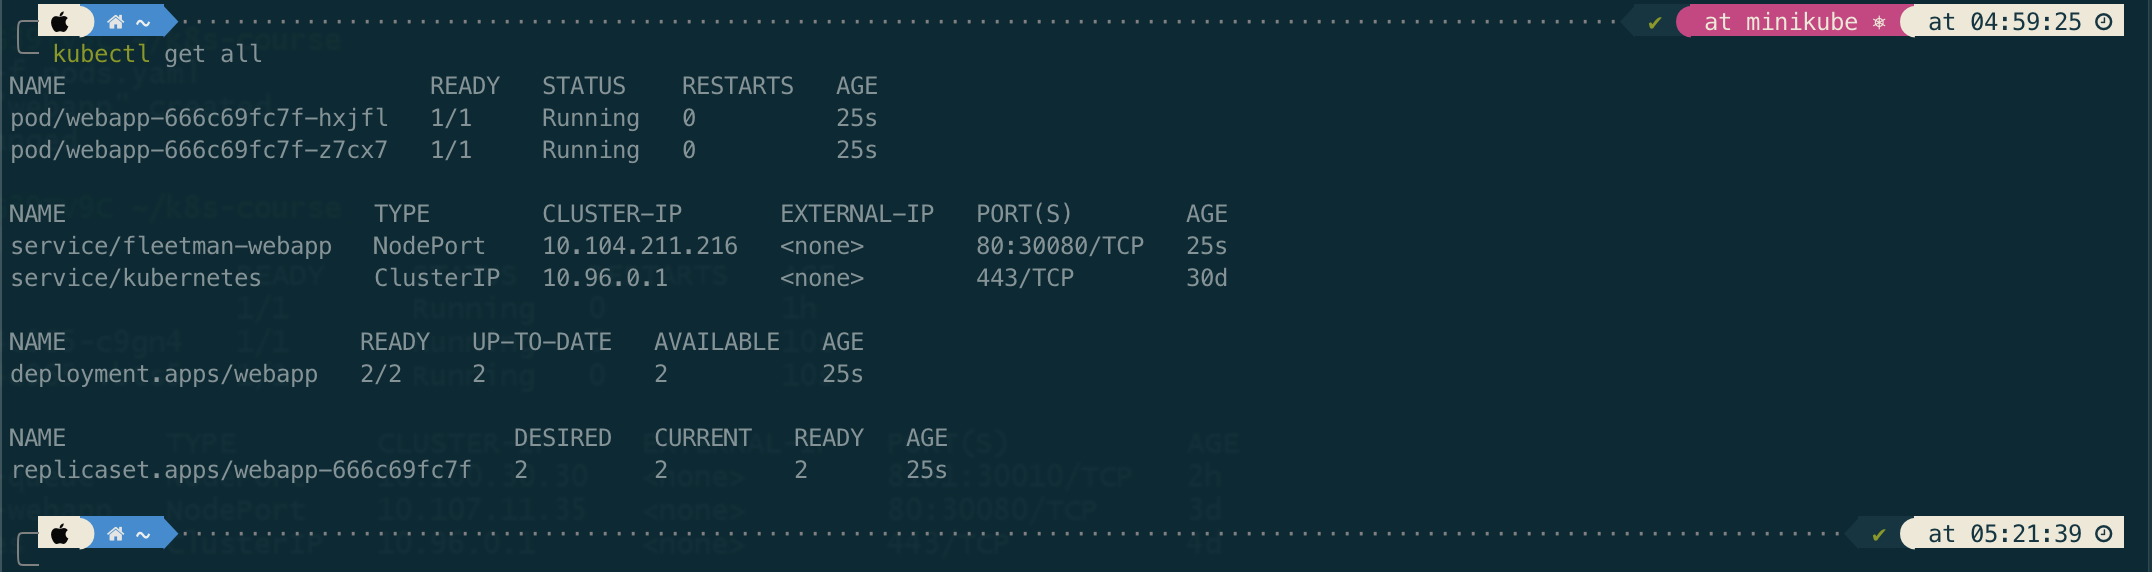
If we notice, a Deployment will create a corresponding a ReplicaSet. Meanwhile, the ReplicaSet will create corresponding Pods.
We can think that a Deployment is an entity in Kubernetes that manages the ReplicaSet for us. So from now we don’t need to work with the ReplicaSet directly, but we just need to work with Deployment instead.
Now, lets check and open in browser http://192.168.59.100:30080.
Rolling Deployment
In this section we will simulate how we do a rolling deployment without needing to fiddle around with lables like we did before.
To demonstrate it, let’s we update the tag of docker image to a new version release0-5.
apiVersion: apps/v1
kind: Deployment
metadata:
  name: webapp
spec:
  replicas: 2
  selector:
    matchLabels:
      app: webapp
  template: # template for the pod
    metadata:
      labels:
        app: webapp
    spec:
      containers:
      - name: webapp
        image: richardchesterwood/k8s-fleetman-webapp-angular:release0-5

---
apiVersion: v1
kind: Service
metadata:
  name: fleetman-webapp
  namespace: default
spec:
  # This defines which pods are going to be represented by this service
  # The service becomes a network endpoint for either other services
  # or maybe external users to connect to (browser)
  selector:
    app: webapp # can be any selector according to the label defined in pod ex: myapp:webapp
  ports:
  - name: http
    port: 80
    # the nodeport should be greater than 30000
    nodePort: 30080
  type: NodePort
Then apply the updated deployment.yaml and compare the previous entities to the updated ones.
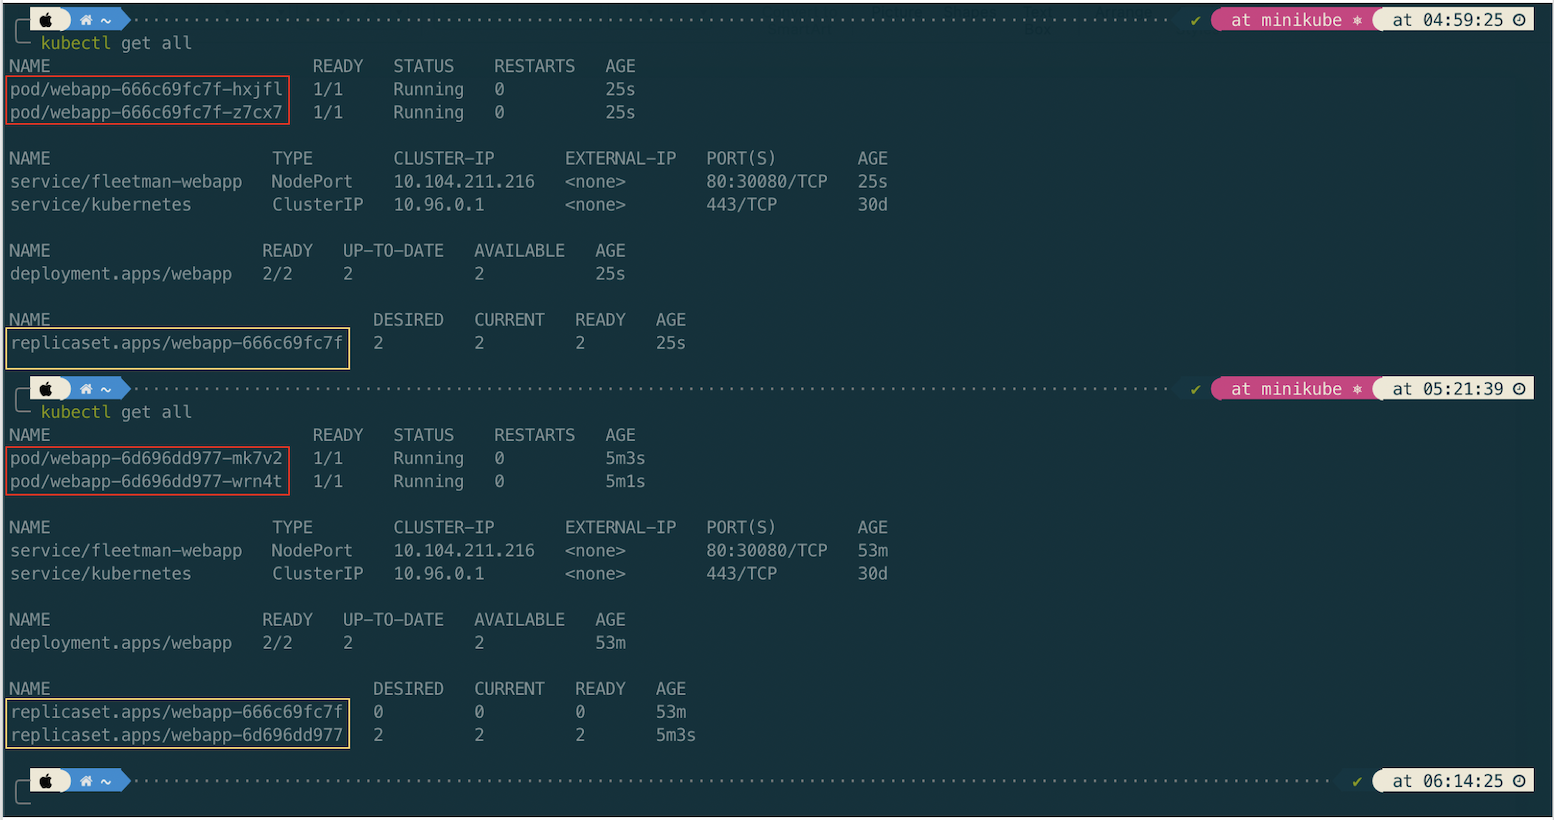
Now, lets check the updated app by opening in browser http://192.168.59.100:30080. The app should be updated.
How the Deployment does the elegant way ilustrated in the following picture.
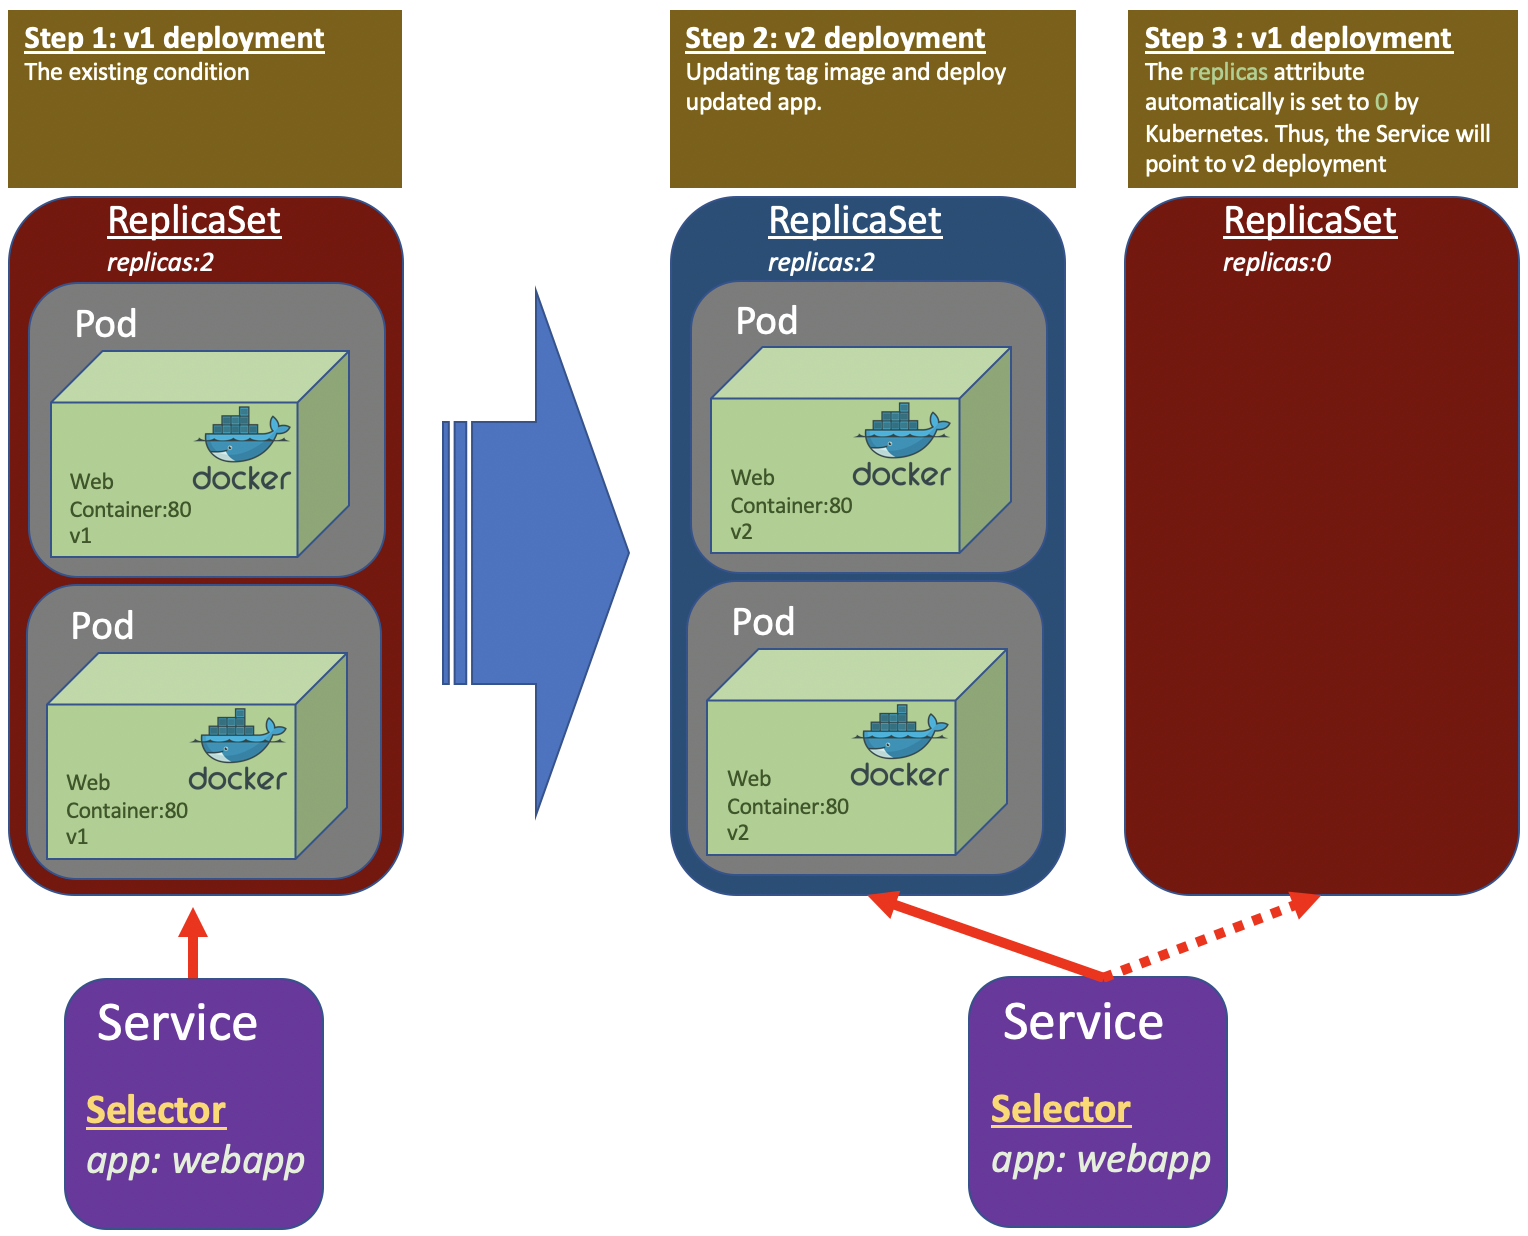
Managing Rollout
To check the rollout deployment status and history, run the commands.
# model 1
kubectl rollout status deployment webapp

# model 2
kubectl rollout status deploy webapp

kubectl rollout history deployment webapp
Rolling Back
To rollback deployment we can do with the following command
kubectl rollout undo deploy webapp --to-revision=1
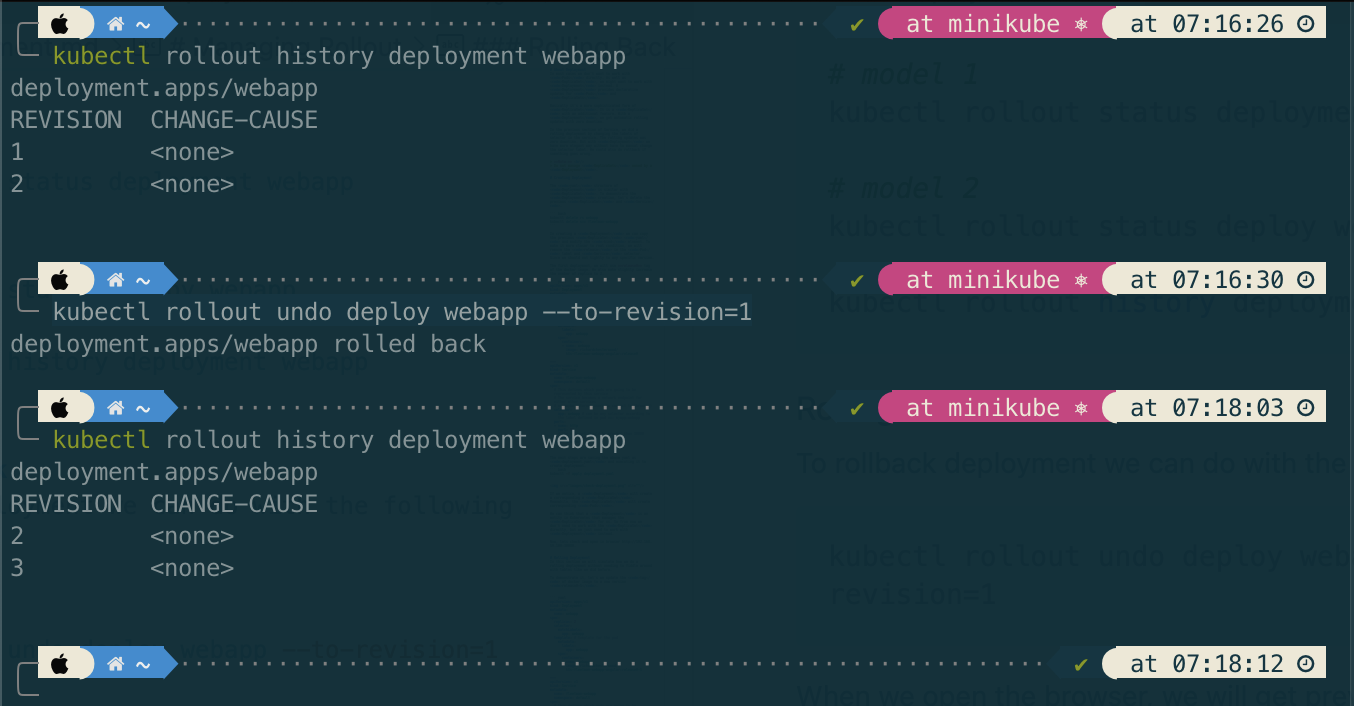
When we open the browser, we will get previous version. The revision number will keep increment as history tracking of Kubernates.
Tips
Applying annotation in deployment will fill out the column CHANGE-CAUSE which can inform us the reason on each deployment. Please see here
References:
19 Apr 2023
•
kubernetes
About ReplicaSet
A ReplicaSet’s purpose is to maintain number of Pod available at any given time. It is used to guarantee the availability of a specified number of identical Pods.
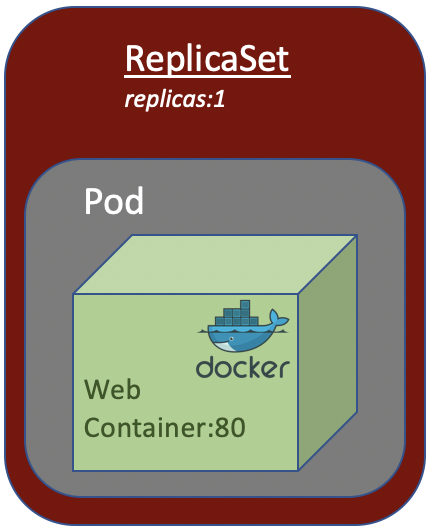
From the above picture, if the Pod die for any reason, Kubernetes will spring up a new one Pod to ensure the Pod availability.
In short, if want to deploy a Pod in Kubernates cluster, we could wrap it in a ReplicaSet to ensure its availability in the cluster in case the Pod dies for any reason.
Creating ReplicaSet
Let’s wrap the previous Pod in ReplicaSet in the following replica-set.yaml
apiVersion: apps/v1
kind: ReplicaSet
metadata:
  name: webapp
spec:
  replicas: 1
  selector:
    matchLabels:
      app: webapp
      release: "0-5"
  template: # template for the pod
    metadata:
      labels:
        app: webapp
        release: "0-5"
    spec:
      containers:
      - name: webapp
        image: richardchesterwood/k8s-fleetman-webapp-angular:release0-5

---
apiVersion: v1
kind: Service
metadata:
  name: fleetman-webapp
  namespace: default
spec:
  # This defines which pods are going to be represented by this service
  # The service becomes a network endpoint for either other services
  # or maybe external users to connect to (browser)
  selector:
    app: webapp # can be any selector according to the label defined in pod ex: myapp:webapp
    release: "0-5"
  ports:
  - name: http
    port: 80
    # the nodeport should be greater than 30000
    nodePort: 30080
  type: NodePort
Before applying the above yaml, let’s delete the previous pods to make it clean.
# deleting all pods
kubectl delete pods --all

# creating replica-set
kubectl apply -f replicaset.yaml
Before open the app through browser, we could evaluate the ReplicaSet creation and the Service.
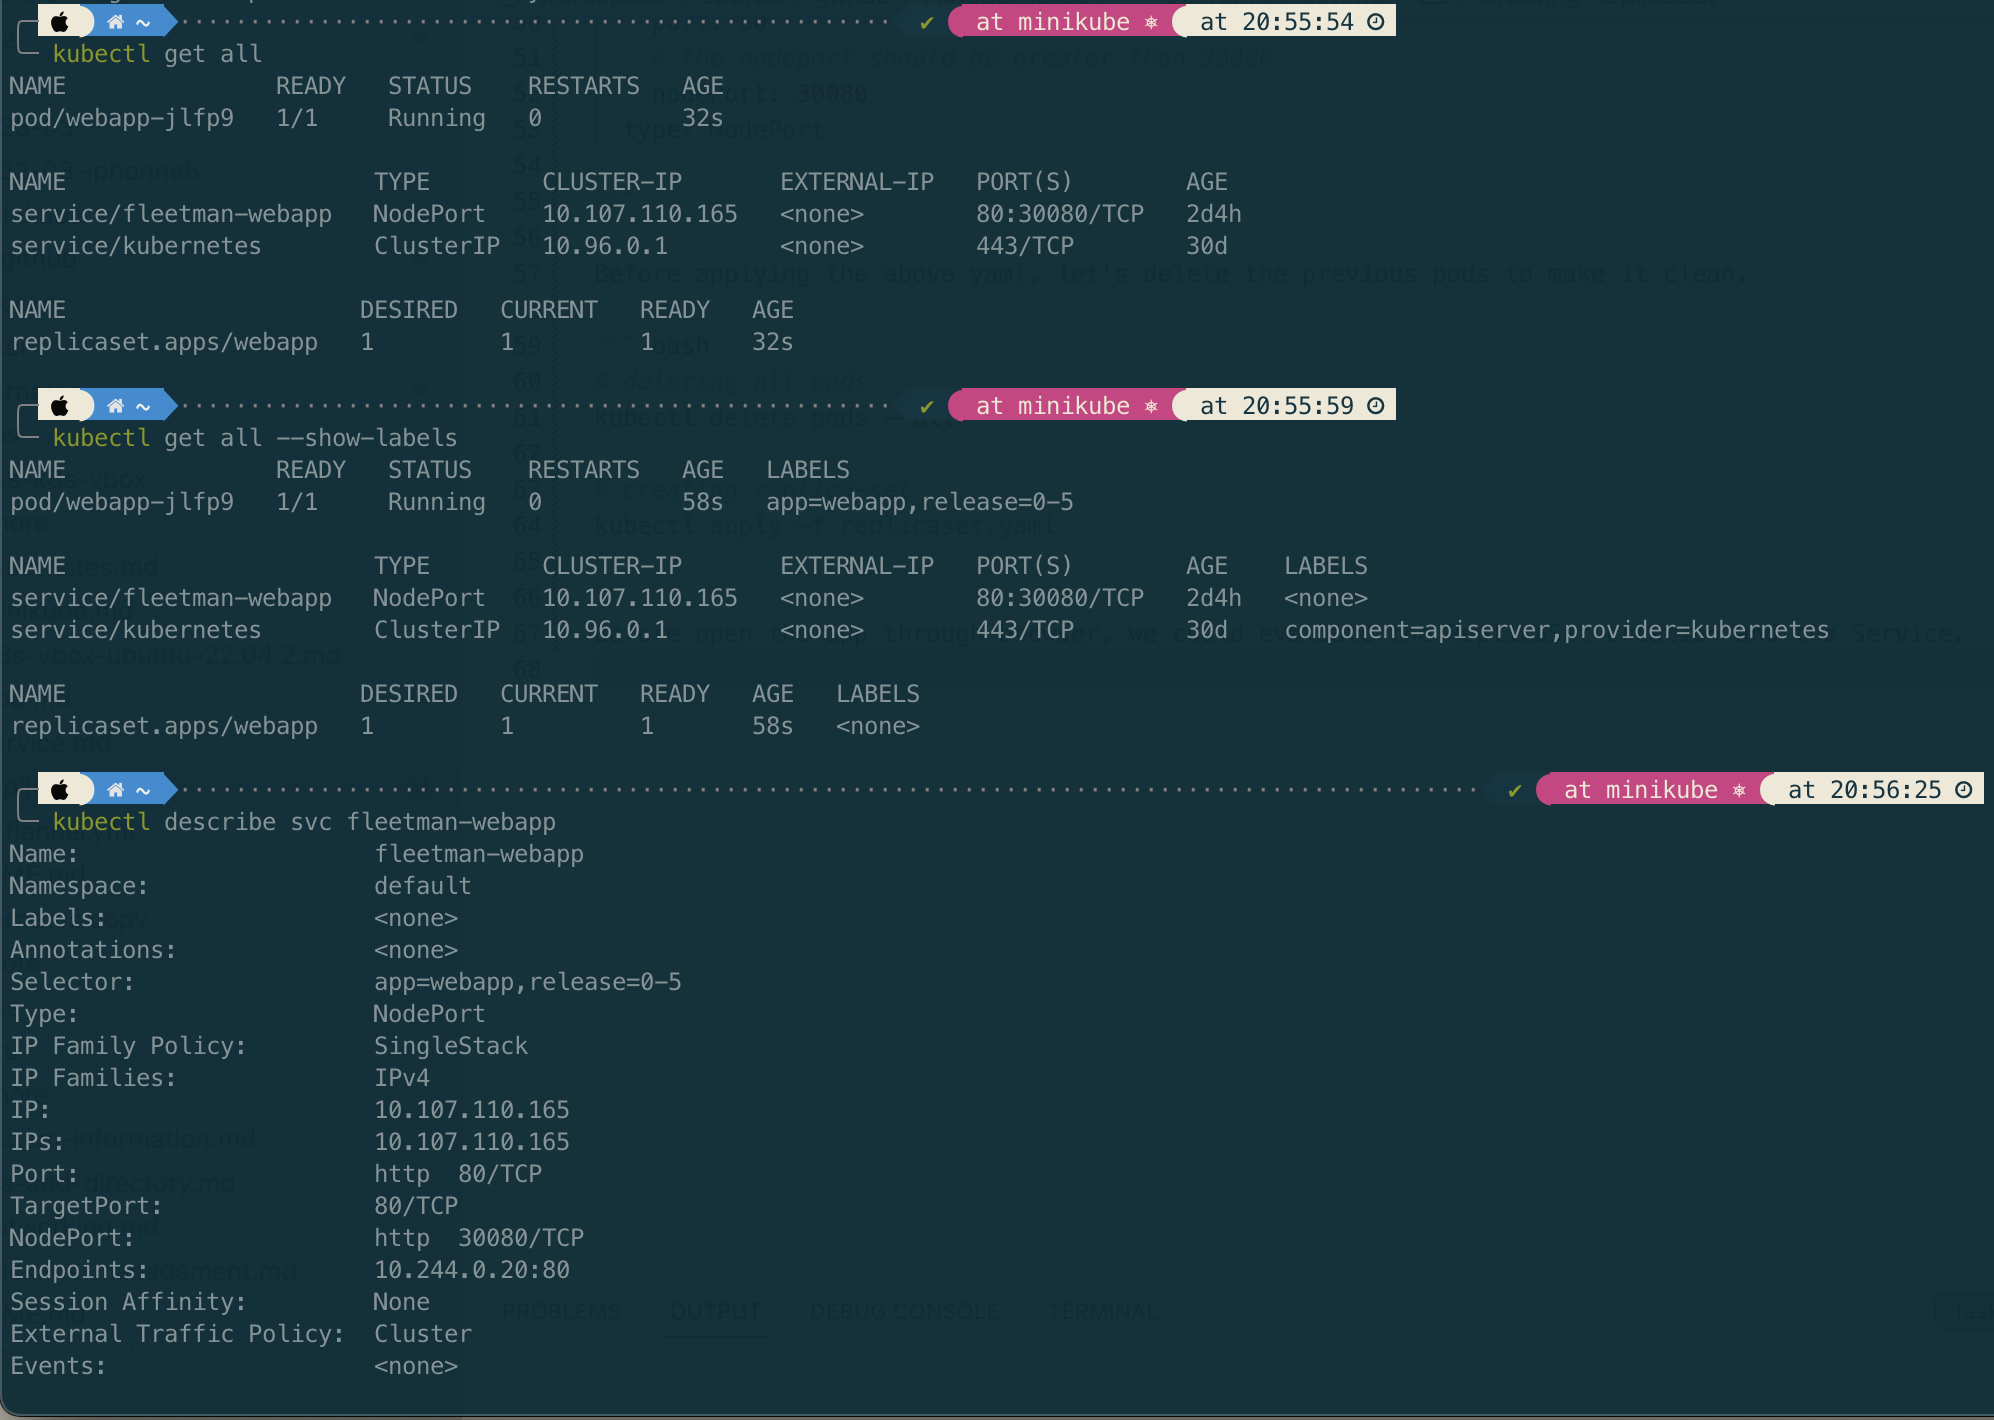
If the ReplicaSet creation as expected, then we can open the app through browser (http://192.168.59.100:30080) to ensure the service links to Pods.
Simulating Pod Crash
To simulate Pod crash, let’s delete the pod. The Kubernetes should recreated the a new similar pod for us.

On the detail checking of replica set shown that the pod recreated when it’s deleted.
kubectl describe replicaset {NAME_REPLICASET}
kubectl describe rs {NAME_REPLICASET}
Deleting Replica Set
If delete ReplicaSet, the corresponding pods will be deleted as well.
kubectl delete rs {NAME_REPLICA_SET}
18 Apr 2023
•
kubernetes
Creating a Service
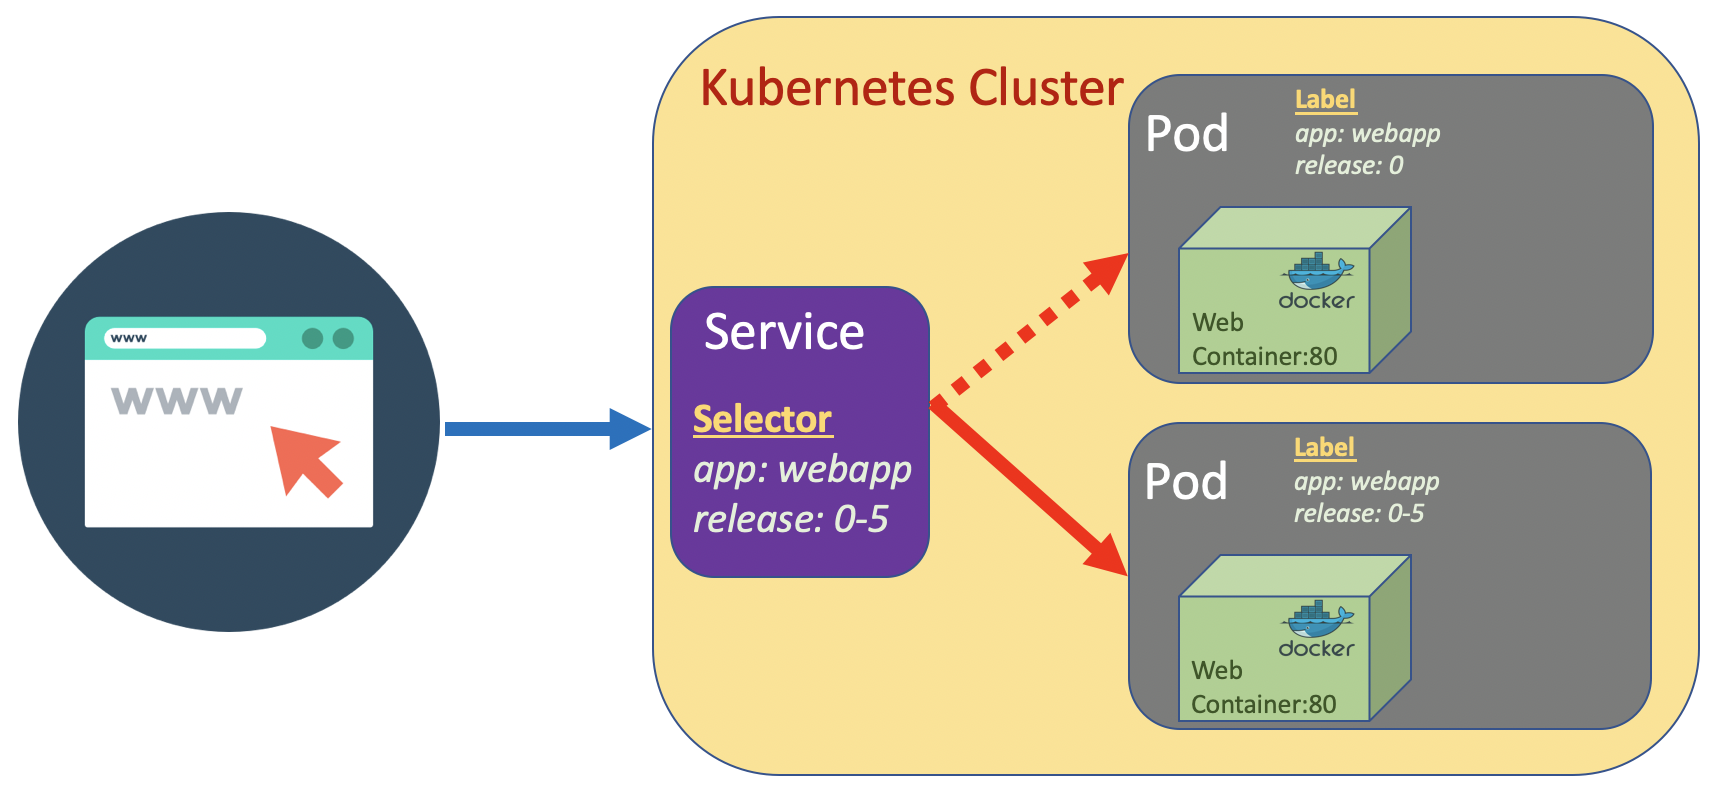
a Service is a method for exposing a network application that is running as one or more Pods in your cluster. Different from Pod, Service is a long running object. A service has an IP address and has stable fixed port. We can attach a Service to a Pod.
The Pod has a label which is a key value pair. The Service has a selector which is a key value pair to. The Service pointing to the Pod based on the match the key value pair on the selector and lable.
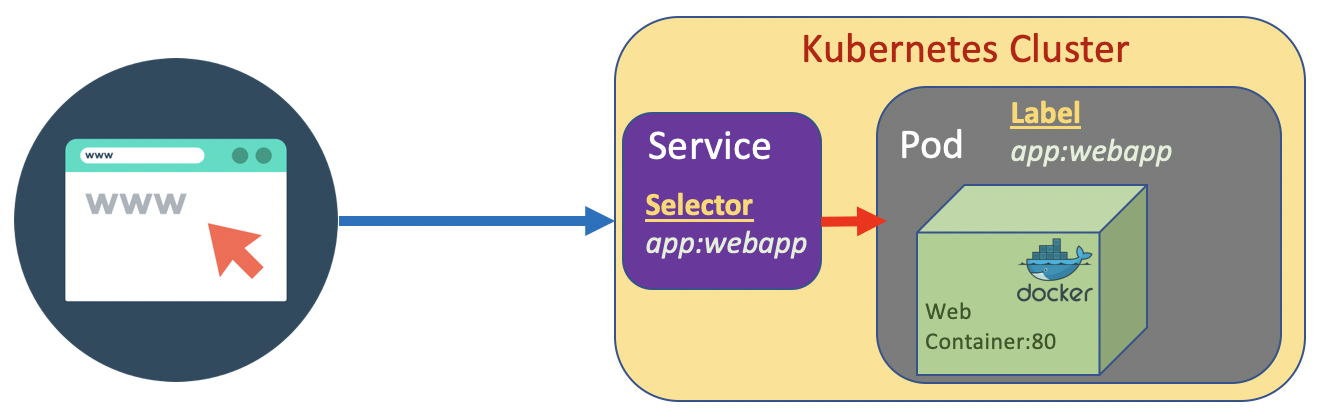
If a Service we create is designed to be access from internal cluster (such as microservice internal communication), we set the type to ClusterIP. On the other hand if we design it to be accessible from outside cluster, set the type to NodePort/.
The port that is allowed in Kubernetes cluster is greater than 30000
Let’s create a service.yaml
apiVersion: v1
kind: Service
metadata:
  name: fleetman-webapp
  namespace: default
spec:
  # This defines which pods are going to be represented by this service
  # The service becomes a network endpoint for either other services
  # or maybe external users to connect to (browser)
  selector:
    app: webapp # # can be any selector according to the label defined in pod ex: myapp:webapp
  ports:
  - name: http
    port: 80
    # the nodeport should be greater than 30000
    nodePort: 30080
  type: NodePort
kubectl apply -f service.yaml
Once the service created, check the status of serice and get ip of node (in this case we use minikube).
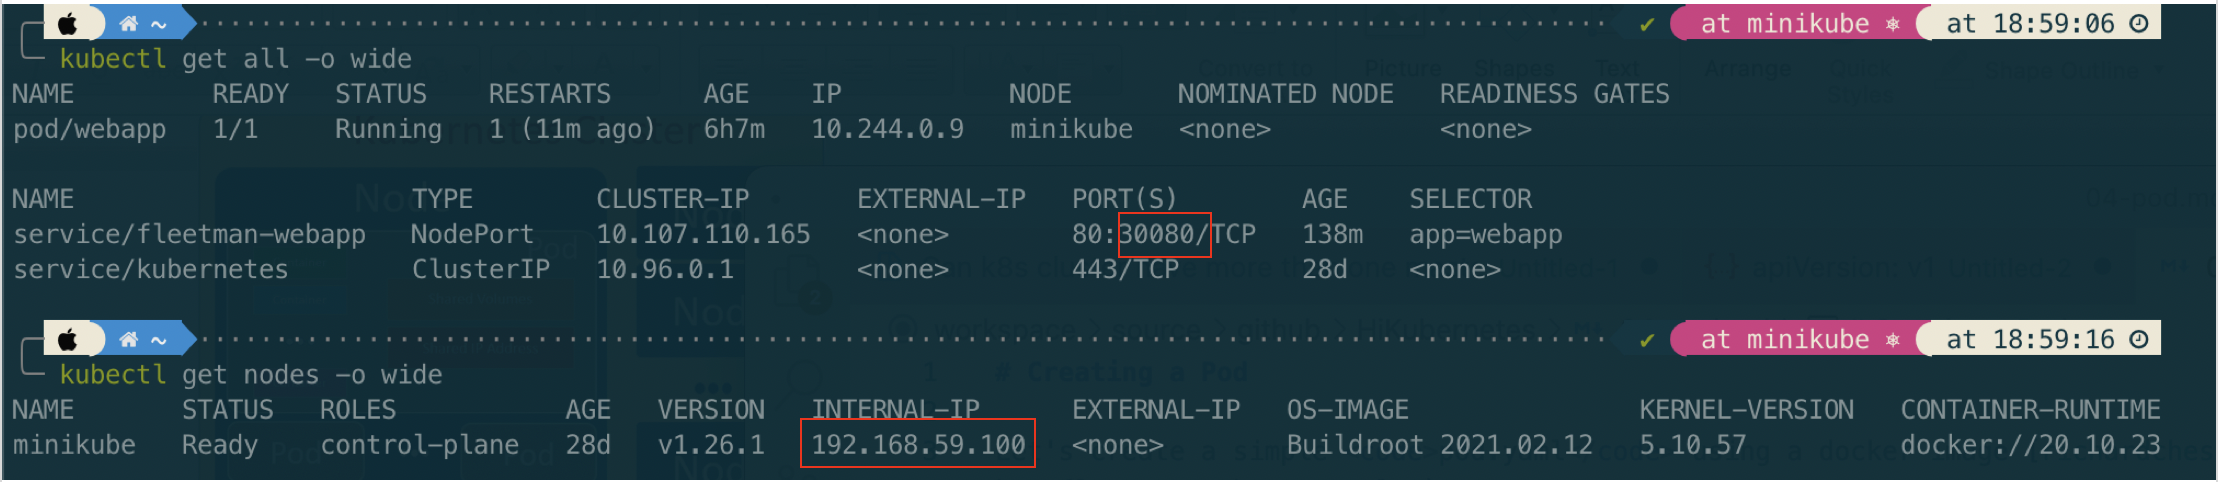
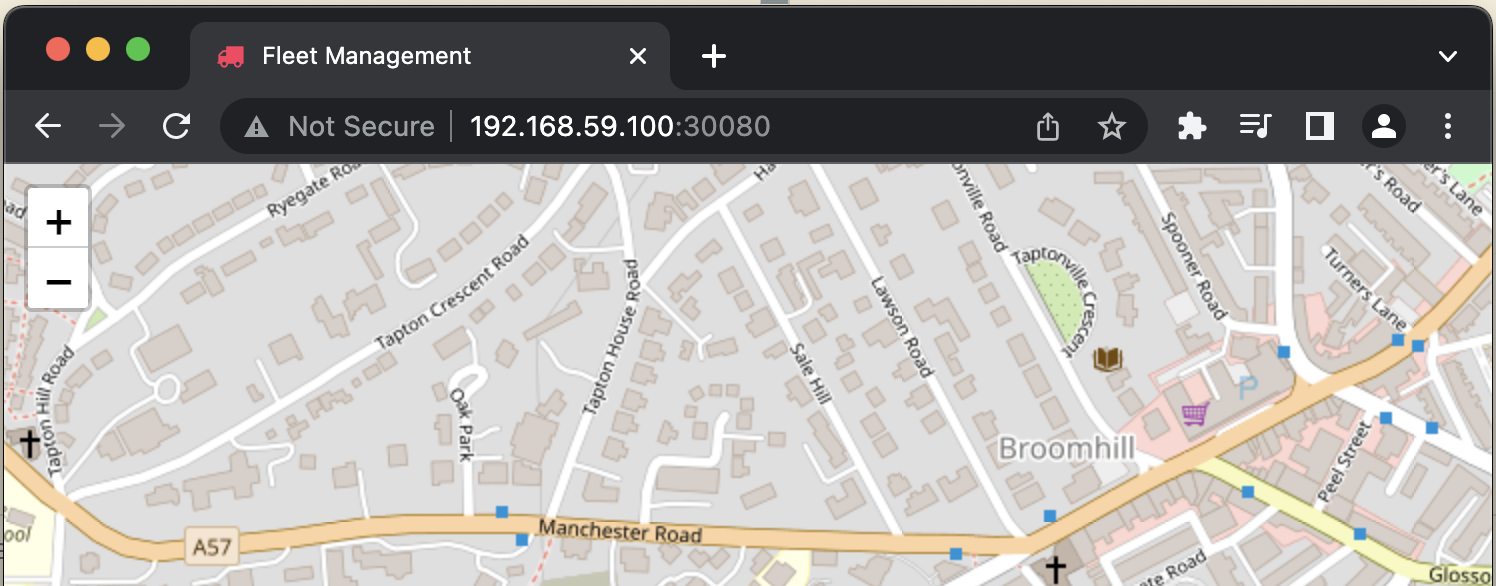
Then open browser:
http://192.168.59.100:30080
Updating Version of App
Let’s assume we want to update app to a new release, from richardchesterwood/k8s-fleetman-webapp-angular:release0 to richardchesterwood/k8s-fleetman-webapp-angular:release0-5
In this example we will add additional label called release and a new Pod named webapp-release-0-5 which represent a new release app.
apiVersion: v1
kind: Pod
metadata:
  name: webapp
  labels:
    app: webapp # can be any label ex, myapp: webapp
    release: "0" # should be a string
spec:
  containers:
  - name: webapp
    image: richardchesterwood/k8s-fleetman-webapp-angular:release0

---
apiVersion: v1
kind: Pod
metadata:
  name: webapp-release-0-5
  labels:
    app: webapp # can be any label ex, myapp: webapp
    release: "0-5" # should be a string
spec:
  containers:
  - name: webapp
    image: richardchesterwood/k8s-fleetman-webapp-angular:release0-5
For service, we also add additional selector
apiVersion: v1
kind: Service
metadata:
  name: fleetman-webapp
  namespace: default
spec:
  # This defines which pods are going to be represented by this service
  # The service becomes a network endpoint for either other services
  # or maybe external users to connect to (browser)
  selector:
    app: webapp # # can be any selector according to the label defined in pod ex: myapp:webapp
    release: "0" # if we change this to "0-5" the service will point to app version 0-5. It is very fast without downtime.
  ports:
  - name: http
    port: 80
    # the nodeport should be greater than 30000
    nodePort: 30080
  type: NodePort
Let’s apply the pod.yaml and service.yaml
kubectl apply -f pod.yaml
kubectl apply -f service.yaml
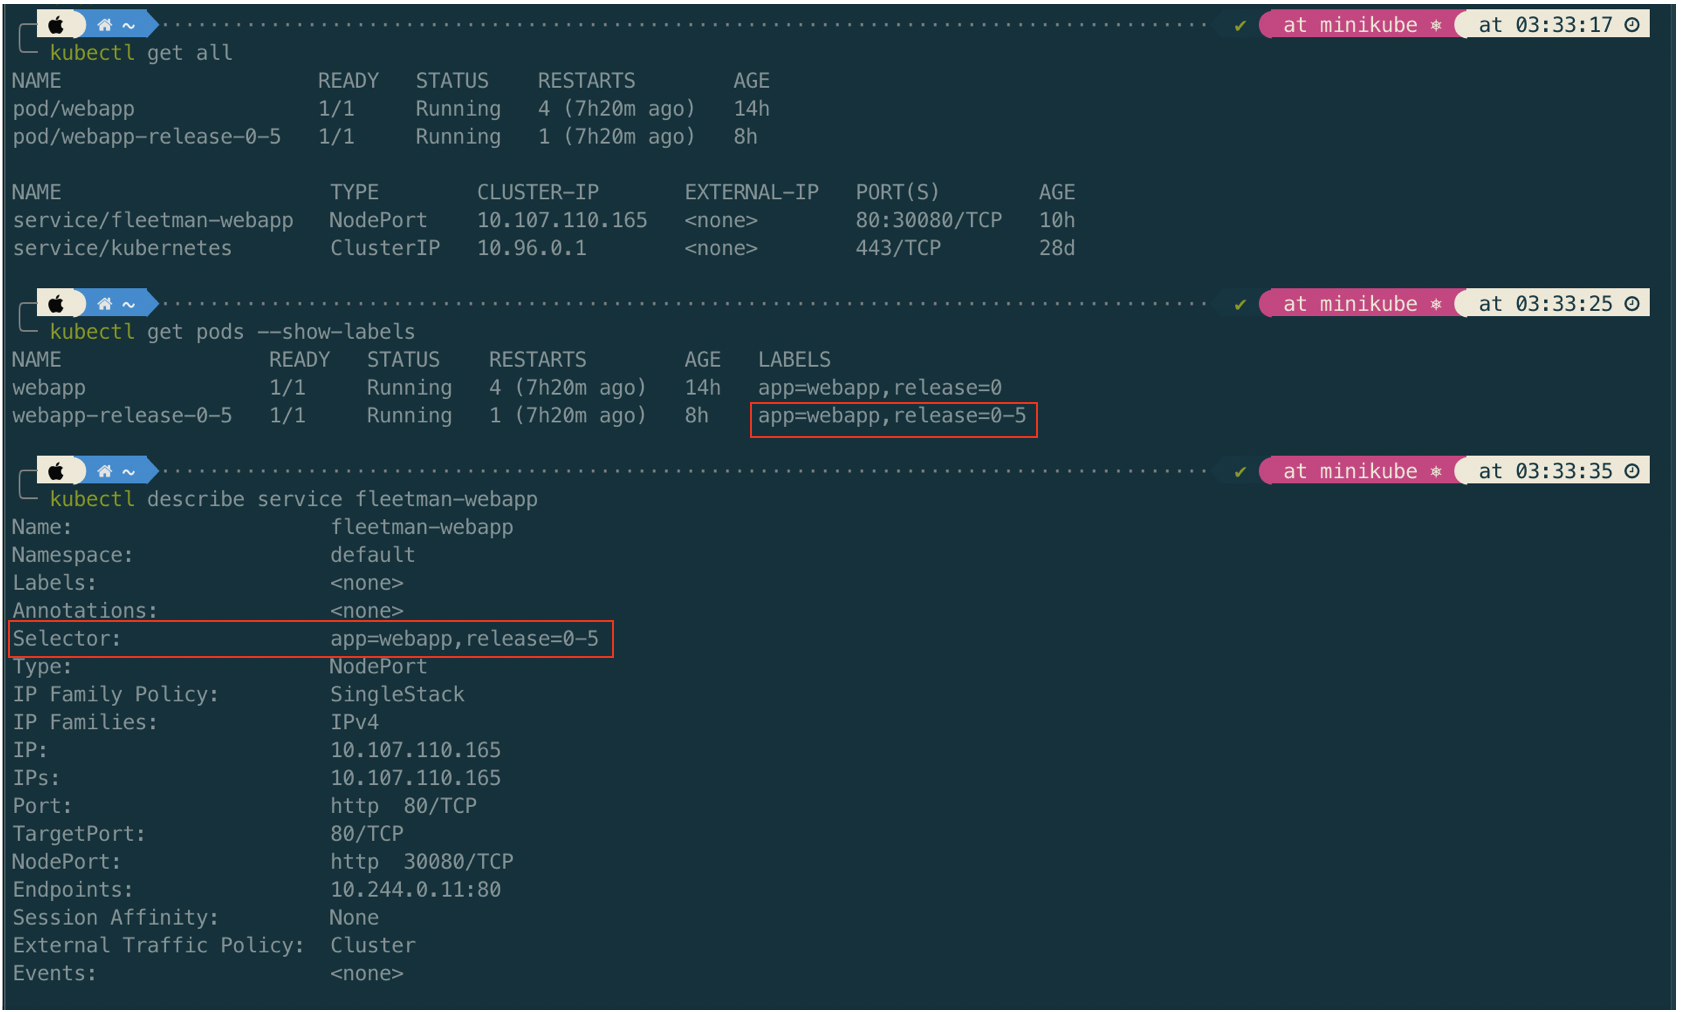
Once the second Pod webapp-release-0-5 up, we can change the release value from "0" to "0-5" in the service. The changes in release in Service will pointing it to app version 0-5. It is very fast without downtime.
We can check further in the detail service information
Tips
We can search/list Pod by filtering on the command
kubectl get pod --show-labels -l release=0-5
If we refresh/force reload browser (http://192.168.59.100:30080), it will load the new release of app (version 0-5).
Service Port, TargetPort, and NodePort
There are several different port configurations for Kubernetes services:
-
Port
The port of this service
-
TargetPort
The target port on the pod(s) to forward traffic to
-
NodePort
The port on the node where external traffic will come in on.
Beside may have the 3 kind of ports, Kubernates service may have multiple port as well. Here is an example of service which has multiple port.
kind: Service
apiVersion: v1
metadata:
  name: my-service
spec:
  selector:
    app: MyApp
  ports:
      # From inside the cluster, if you hit the my-service:8089 the traffic is routed to 8080 of the container(targetPort)
      # From outside the cluster, if you hit host_ip:30475 the traffic is routed to 8080 of the container(targetPort)
    - name: http
      protocol: TCP
      targetPort: 8080
      port: 8089
      nodePort: 30475

    - name: metrics
      protocol: TCP
      targetPort: 5555
      port: 5555
      nodePort: 31261

     # From inside the cluster, if you hit my-service:8443 then it is redirected to 8085 of the container(targetPort)
     # From outside the cluster, if you hit host_ip:30013 then it is redirected to 8085 of the container(targetPort)
    - name: health
      protocol: TCP
      targetPort: 8085
      port: 8443
      nodePort: 30013