17 Apr 2023
•
kubernetes
Creating a Pod
Let’s create a simple pod.yaml using a docker image richardchesterwood/k8s-fleetman-position-tracker
apiVersion: v1
kind: Pod
metadata:
  name: webapp
  labels:
    app: webapp # can be any label ex, myapp: webapp
spec:
  containers:
  - name: webapp
    image: richardchesterwood/k8s-fleetman-webapp-angular:release0
To create a Pod, run the following command
# apply will create if it does not exist, and update if it exists
kubectl apply -f pod.yaml
Operating to Pods can be done with the following command
# get all pods
kubectl get pods

# get the namespaces
kubectl get namespaces

# get pods with namespace
kubectl get pods --all-namespaces
kubectl get pods -A

# We can also check all resources at once
kubectl get all

# Deleting Pod. The actual pod.yaml on your local working directory will not be deleted
kubectl delete -f pod.yaml

# delete using pod name
kubectl delete pod {POD_NAME}
kubectl delete po {POD_NAME}

# delete all pods
kubectl delete pods --all

# delete all pods in specfific namespace
kubectl delete pods --all --namespace {NAMESPACE_NAME}
If we got status ContainerCreating for long time, we can consider doing a full reboot of VMs that are running the Kubernetes master node and Kubernetes worker nodes.
If we get an error while creating Pod, we can check the detail with describe command.
kubectl describe pod {POD_NAME}
we can also check the log
kubectl logs --tail=[number] -p {POD_NAME}
Interacting with Container
Pod is not visible from outside the cluster.
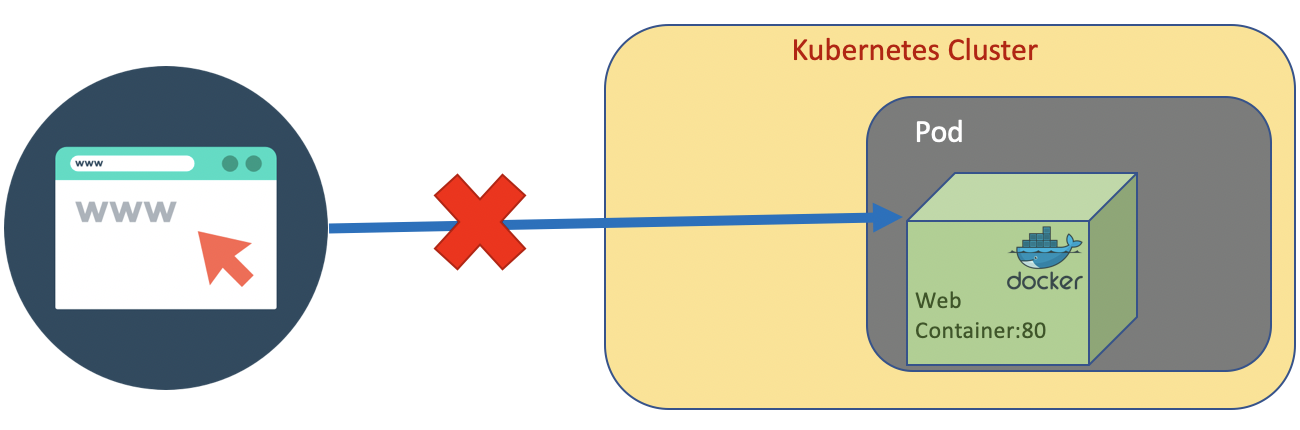
But we still able to connect and execute command inside the pod.
kubectl exec {POD_NAME} {COMMAND}
kubectl exec webapp ls
We could also get a shell interraction inside the container in the pod.
# execute shell command
kubectl -it exec {POD_NAME} sh
kubectl -it exec webapp sh
Inside the container we can do
# for the example
wget http://localhost:80
The other port characteristics are having shot lifetime, regularly die, and regularly recreated.
References
- https://kubernetes.io/docs/concepts/workloads/pods/
- https://signoz.io/blog/kubectl-logs-tail/
16 Apr 2023
•
kubernetes
•
virtualbox
In this post we would like to elaborate the steps of setting up Kuberrnetes cluster using virtual box and Ubuntu 22.04.2 LTS.
1. Configuring Virtual Box VMs
The configuration step of Virtual Box are as follow:
- Installing a VM
k8s using Ubuntu Linux 22.04.2 LTS as a VM reference.
- Copying disk of the VM as
k8s-master.vdi, k8s-worker1.vdi, k8s-worker2.vdi.
- Using Windows Command Prompt, change the hardisk UUID of each hdd on step
1.2 with the following command
cd C:\Program Files\Oracle\VirtualBox
C:\..\VirtualBox>VBoxManage.exe internalcommands sethduuid "D:\VMs\disk\k8s-master.vdi"

 UUID changed to: 91ebaec7-c113-4bb0-bc12-baa557f0574e
-
Applying the step 1.3 for the k8s-worker1.vdi, k8s-worker2.vdi.
-
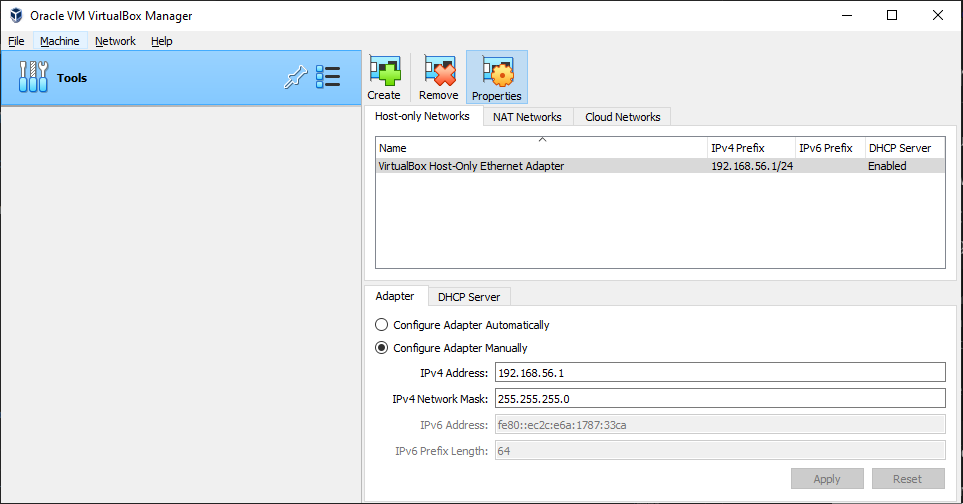
Configuring Network Adapter.
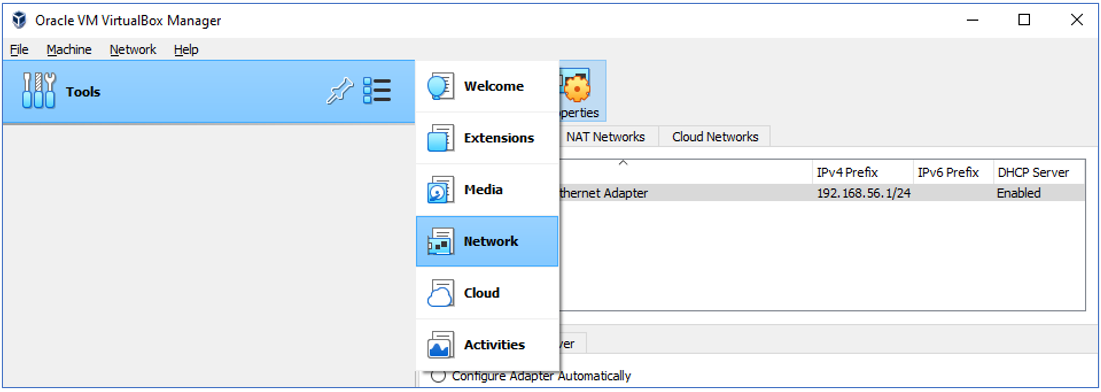 The Host Only Adapter network configuration as follow
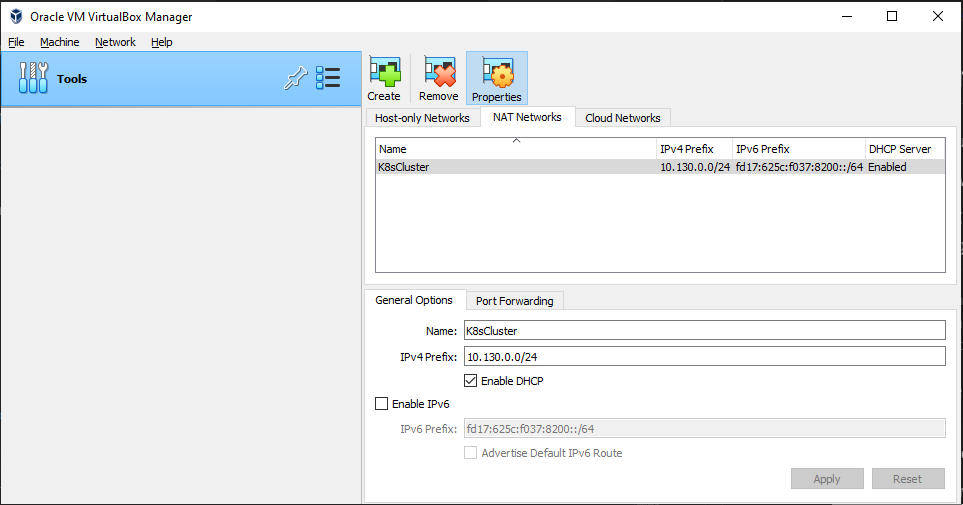
 In the NAT Adapter network configuration, create a NAT Network named K8sCluster
-
Creating three VMs k8s-master, k8s-worker1, k8s-worker2 using the existing disks namely k8s-master.vdi, k8s-worker1.vdi, k8s-worker2.vdi. Makesure the network of NAT, Host Only Adapter, Bridge and NAT Network enabled.
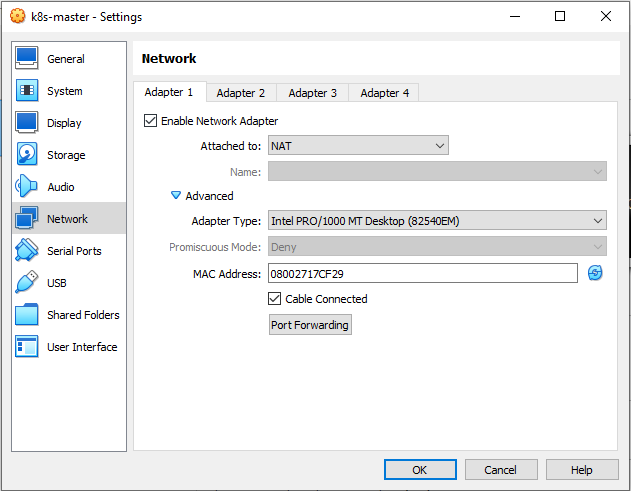

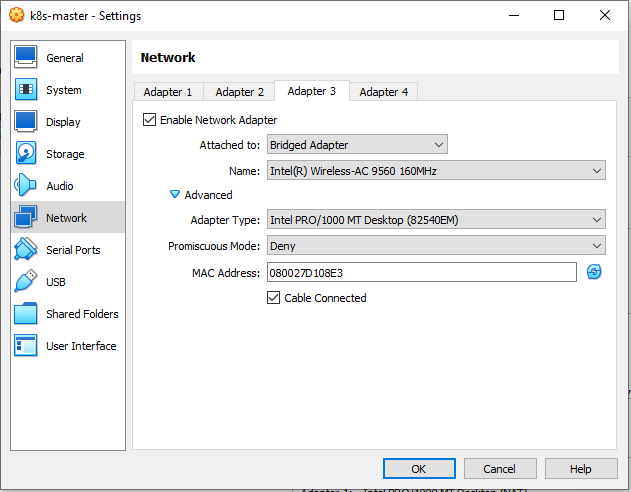
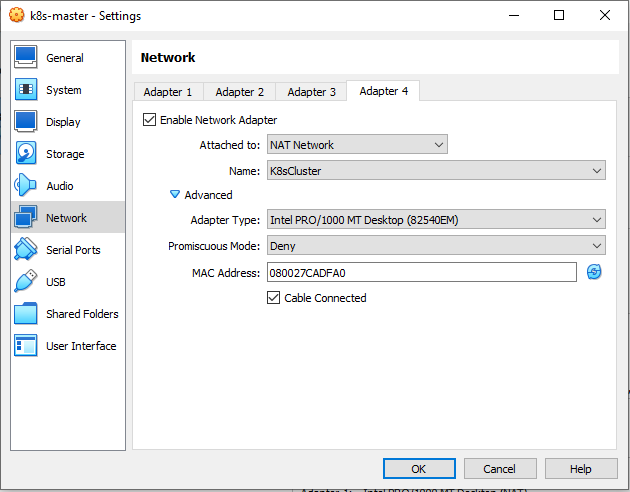
Don’t forget to refresh the MAC address on each adapter.
- To ensure the network adapter work well, check using ip check
Table 1: Node, IP and Hostname
| Node |
IP Host Only |
Host Name |
| master |
192.168.56.110 |
master.neutro.io |
| worker1 |
192.168.56.111 |
worker-node-1.neutro.io |
| worker2 |
192.168.56.112 |
worker-node-2.neutro.io |
Set the ip of host only adapter of master according Table 1 by editing the /etc/netplan/00-installer-config.yaml
vi /etc/netplan/00-installer-config.yaml
 # This is the network config written by 'subiquity'
 network:
   ethernets:
     enp0s10:
       dhcp4: true
     enp0s3:
       dhcp4: true
     enp0s8:
       dhcp4: false
       addresses:
           - 192.168.56.110/24
     enp0s9:
       dhcp4: true
   version: 2
sudo netplan apply

# check ip
#ip addr
ip --brief addr show
Set the hostname for master with the following command.
# host name for master
sudo hostnamectl set-hostname master.neutro.io
exec bash
Apply the same things to the worker1 node and worker2 node by refering to the Table 1.
Updating the apt package index and installing the followingpackages that are needed in Kubernates and container installation.
sudo -i
apt-get update && apt-get upgrade -y
apt-get install -y vim git curl wget apt-transport-https gnupg gnupg2 software-properties-common ca-certificates lsb-release

exit
Repeat on all the other nodes.
3. Docker Installation
The Docker installation steps are as follow:
-
Installing Docker
# https://docs.docker.com/engine/install/ubuntu/

# 1. Adding Docker official GPG key
sudo mkdir -m 0755 -p /etc/apt/keyrings
curl -fsSL https://download.docker.com/linux/ubuntu/gpg | sudo gpg --dearmor -o /etc/apt/keyrings/docker.gpg

# 2. Setting up the repository
echo \
"deb [arch=$(dpkg --print-architecture) signed-by=/etc/apt/keyrings/docker.gpg] https://download.docker.com/linux/ubuntu \
$(lsb_release -cs) stable" | sudo tee /etc/apt/sources.list.d/docker.list > /dev/null

# 3. Updating package apt package index
sudo apt-get update

# NOTE: if receiving a GPG error when running apt-get update?
sudo chmod a+r /etc/apt/keyrings/docker.gpg
sudo apt-get update

# 4. Installing Docker Engine, containerd, and Docker Compose.
sudo apt-get install docker-ce docker-ce-cli containerd.io docker-buildx-plugin docker-compose-plugin
- Checking the docker version
- Enabling and starting docker
sudo systemctl enable docker
# sudo systemctl start docker
sudo systemctl daemon-reload
sudo systemctl restart docker
Verifying the docker status
sudo systemctl status docker
Repeat on all the other nodes.
4. Kubernates Installation
The Kubernates installation steps are described in the following steps:
-
Adding kubernates repository
sudo -i
sudo curl -s https://packages.cloud.google.com/apt/doc/apt-key.gpg | apt-key add
sudo apt-add-repository "deb http://apt.kubernetes.io/ kubernetes-xenial main"

exit
- Installing
kubeadm, kubelet, kubectl
sudo apt install -y kubeadm kubelet kubectl
sudo apt-mark hold kubeadm kubelet kubectl
Verifying the installation
kubectl version --output=yaml
kubeadm version
-
Disabling the swap memory
Turn off swap
sudo sed -i '/ swap / s/^\(.*\)$/#\1/g' /etc/fstab
To ensure we disable Linux swap space permanently, edit the /etc/fstab then remark the swap line by adding # (hashtag/comment) sign in front of the line.
sudo vim /etc/fstab

# remark the following line
#/swap.img	none	swap	sw	0	0
To confirm the setting is correct, run the following command.
# swapoff disables swapping on the specified devices and files.
# -a flag is given, swapping is disabled on all known swap devices and files (as found in /proc/swaps or /etc/fstab)

sudo swapoff -a
sudo mount -a
free -h
- Enabling kernel modules and configuring sysctl.
# Enable kernel modules
sudo modprobe overlay
sudo modprobe br_netfilter

# Add some settings to sysctl
sudo vim /etc/sysctl.d/kubernetes.conf

net.bridge.bridge-nf-call-ip6tables = 1
net.bridge.bridge-nf-call-iptables = 1
net.ipv4.ip_forward = 1

# Reload sysctl
sudo sysctl --system
Repeat steps 4.1 - 4.4 on each server node.
5. Kubernetes Cluster Configuration
For building Kubernetes cluster, in this lab we use kubeadm. The steps are:
- Configuring container runtime (Docker CE runtime)
# Create required directories
sudo mkdir -p /etc/systemd/system/docker.service.d

# Create daemon json config file
sudo vim /etc/docker/daemon.json


{
    "exec-opts":["native.cgroupdriver=systemd"],
    "log-driver":"json-file",
    "log-opts":{
        "max-size":"100m"
    },
    "storage-driver":"overlay2"
}

# Start and enable Services
sudo systemctl daemon-reload
sudo systemctl restart docker
sudo systemctl enable docker
-
Installing Mirantis cri-dockerd as Docker Engine shim for Kubernetes
For Docker Engine you need a shim interface. The Mirantis cri-dockerd CRI socket file path is /run/cri-dockerd.sock. This is what will be used when configuring Kubernetes cluster.
VER=$(curl -s https://api.github.com/repos/Mirantis/cri-dockerd/releases/latest|grep tag_name | cut -d '"' -f 4|sed 's/v//g')

echo $VER

### For Intel 64-bit CPU ###
wget https://github.com/Mirantis/cri-dockerd/releases/download/v${VER}/cri-dockerd-${VER}.amd64.tgz
tar xvf cri-dockerd-${VER}.amd64.tgz

### For ARM 64-bit CPU ###
wget https://github.com/Mirantis/cri-dockerd/releases/download/v${VER}/cri-dockerd-${VER}.arm64.tgz
cri-dockerd-${VER}.arm64.tgz
tar xvf cri-dockerd-${VER}.arm64.tgz
Move the cri-dockerd binary package to /usr/local/bin directory
sudo mv cri-dockerd/cri-dockerd /usr/local/bin/
To validate the successful installation, check the cri-dockerd version.
The next step is configuring systemd units for cri-dockerd
wget https://raw.githubusercontent.com/Mirantis/cri-dockerd/master/packaging/systemd/cri-docker.service
wget https://raw.githubusercontent.com/Mirantis/cri-dockerd/master/packaging/systemd/cri-docker.socket

sudo mv cri-docker.socket cri-docker.service /etc/systemd/system/
sudo sed -i -e 's,/usr/bin/cri-dockerd,/usr/local/bin/cri-dockerd,' /etc/systemd/system/cri-docker.service
Reload and enable the services
sudo systemctl daemon-reload
sudo systemctl enable cri-docker.service
sudo systemctl enable --now cri-docker.socket
To ensure the service is running, check the status of cri-docker
systemctl status cri-docker.socket
-
Initializing master node
In the master node, make sure that the br_netfilter module is loaded:
lsmod | grep br_netfilter
Enable kubelet service.
sudo systemctl enable kubelet
We now want to initialize the machine that will run the control plane components which includes etcd (the cluster database) and the API Server.
# sudo kubeadm config images pull
sudo kubeadm config images pull --cri-socket /run/cri-dockerd.sock
Repeat steps 5.1 - 5.3 on each server node.
-
Initializing Clustering
On master node, run the following command to initialize cluster.
# without specifing control plane IP
sudo kubeadm init --cri-socket /run/cri-dockerd.sock --pod-network-cidr=10.244.0.0/16 --ignore-preflight-errors=NumCPU

# init with specific ip of control plane IP
sudo kubeadm init --cri-socket /run/cri-dockerd.sock --control-plane-endpoint=192.168.56.110 --apiserver-advertise-address=192.168.56.110 --pod-network-cidr=10.244.0.0/16 --ignore-preflight-errors=NumCPU
| Node |
IP Host Only |
--cri-socket |
use if have more than one container runtime to set runtime socket path |
--control-plane-endpoint |
set the shared endpoint for all control-plane nodes. Can be DNS/IP |
--apiserver-advertise-address |
set advertise address for this particular control-plane node’s API server |
--pod-network-cidr |
set a Pod network add-on CIDR |
In the log of kubeadm init, we see an instruction to add kube configuration in home directory.
mkdir -p $HOME/.kube
sudo cp -i /etc/kubernetes/admin.conf $HOME/.kube/config
sudo chown $(id -u):$(id -g) $HOME/.kube/config
Install flunnel as Kubernates network add on
curl -LO https://github.com/flannel-io/flannel/releases/latest/download/kube-flannel.yml
vi kube-flannel.yml
Makesure IP in the kube-flannel.yml is the same as --pod-network-cidr
kubectl apply -f kube-flannel.yml
Check the all pods running or not
kubectl get pods --all-namespaces

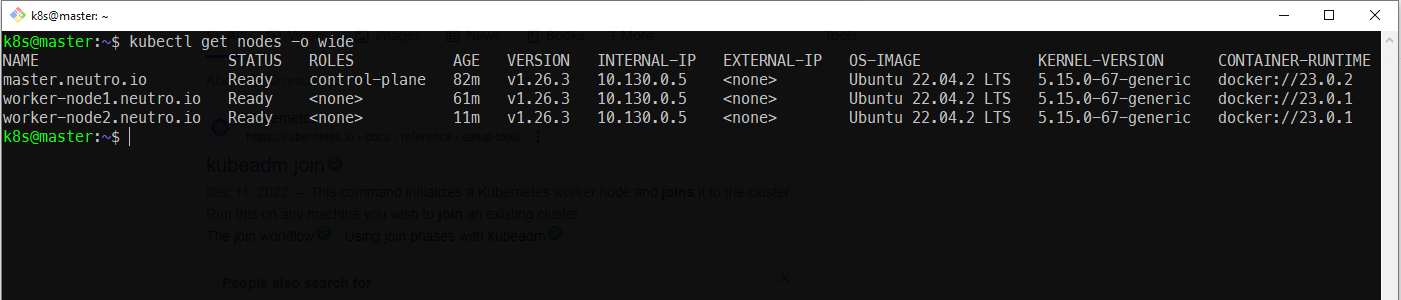
Finally we can check the master node is ready or not using the following command.
kubectl get nodes -o wide
6. Joining Worker Node to The Cluster
- On the master node, generate joined token to join to the cluster
sudo kubeadm token create --print-join-command
-
On each worker node, run the following command to join to the cluster
sudo kubeadm join 192.168.56.110:6443 --token 4bz2jr.r7a0fhemw4rrx9uz \
     --discovery-token-ca-cert-hash sha256:493dd20563876610d54a27f959ca31520c7a6cc4d24529bc03b5202d2d9c29ea \
     --cri-socket unix:///var/run/cri-dockerd.sock
we can also generate the token
- On the master node, check the nodes which join to the cluster
kubectl get nodes -o wide
References
15 Apr 2023
•
kubernetes
Installing kubectl
Installation steps of kubectl can be found here
# install with brew
brew install kubectl

# check the version
kubectl version --client

# or the new command check version
kubectl version --output=json
Installing minikube
Installation steps of minikube can be found here
# install with brew
brew install minikube

# check the installation
minikube version
minikube version: v1.29.0
commit: ddac20b4b34a9c8c857fc602203b6ba2679794d3
Starting the minikube
# starting minikube (can be with not default parameter)
# minikube start --driver=virtualbox --container-runtime=cri-o
minikube start

# starting minikube on windows with hyperv
minikube start --driver=hyperv
The environtiment machine I use:
- Macos Monterey 12.6.3
- VirtualBox-6.1.42 for Macos (intel)
- Microsoft Windows 10 Pro
On Macos, I got an issue when using version 7.0 of virtual box. The issue was ["The host-only adapter we just created is not visible"]( https://github.com/kubernetes/minikube/issues/15377). It is solved by downgrading the VirtualBox version to 6.1.42.
Meanwhile, on Windows 10 Pro no issue I got by using parameter --driver=hyperv. Don’t forget to run the terminal as Administrator otherwise it may get permission issue.
When we successfully starting minikube, checking the version will give us server and client information
kubectl version --output=json
{
  "clientVersion": {
    "major": "1",
    "minor": "25",
    "gitVersion": "v1.25.2",
    "gitCommit": "5835544ca568b757a8ecae5c153f317e5736700e",
    "gitTreeState": "clean",
    "buildDate": "2022-09-21T14:33:49Z",
    "goVersion": "go1.19.1",
    "compiler": "gc",
    "platform": "darwin/amd64"
  },
  "kustomizeVersion": "v4.5.7",
  "serverVersion": {
    "major": "1",
    "minor": "26",
    "gitVersion": "v1.26.1",
    "gitCommit": "8f94681cd294aa8cfd3407b8191f6c70214973a4",
    "gitTreeState": "clean",
    "buildDate": "2023-01-18T15:51:25Z",
    "goVersion": "go1.19.5",
    "compiler": "gc",
    "platform": "linux/amd64"
  }
}
If we want to access app deployed in the minikube cluster, we use the IP of minikube which can be checked using:
Making Minikube connect to a local Docker image
-
Start Minikube
-
Set the Docker Environment for Minikube
Minikube has its own Docker daemon, and you need to point your local shell to it. You can do this with the following command:
eval $(minikube docker-env)
-
Build Your Docker Image
Now, build your Docker image using the local Docker client (which is now connected to the Minikube Docker daemon). For example:
docker build -t your-image-name .
-
Verify the Image in Minikube
To make sure your image is available in Minikube, you can list the images in Minikube’s Docker daemon:
-
Use the Image in Kubernetes
Now, you can use your image in Kubernetes deployments or pods as you normally would. Here’s an example of a deployment YAML that uses the local image:
 apiVersion: apps/v1
 kind: Deployment
 metadata:
   name: my-deployment
 spec:
   replicas: 1
   selector:
     matchLabels:
       app: my-app
   template:
     metadata:
       labels:
         app: my-app
     spec:
       containers:
       - name: my-container
         image: your-image-name
         ports:
         - containerPort: 8080
-
To revert the Docker environment back to your local Docker daemon, you can run:
eval $(minikube docker-env -u)
14 Apr 2023
•
kubernetes
Kubernetes is a container orchestration system. Kubernetes allows us to create containers on multiple servers (physical or virtual). It is done automatically by telling the Kubernetes how many container will be created based on specific image. Kubernetes takes care of the:
- Automatic deployment of the containerized applications across different servers.
- Distribution of the load across multiple server. This will avoid under/over utilization our servers.
- Auto-scaling of the deployed applications
- Monitoring and health check of the containers
- Replacement of the failed containers.
Kubernates supports some container runtimes:
- Docker
- CRI-O
- Containerd (pronounced: Container-dee)
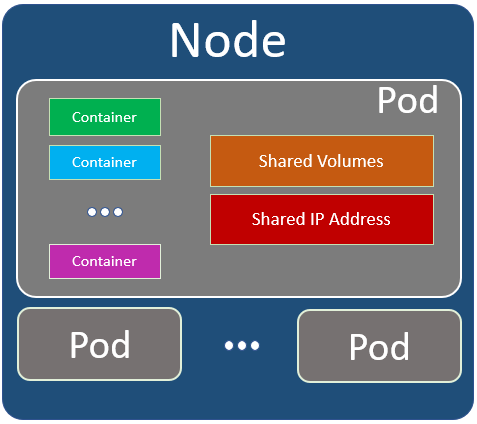
Pod
In Docker, Container is the smallest unit. Meanwhile in Kubernetes the smallest unit is Pod.
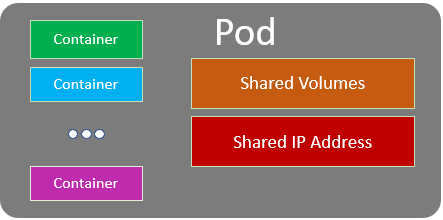
A pod can be contain one or more containers. There are also shared volumes and network resources (for example ip address) among containers in the same Pod.
In most common use case there is only a single container in a Pod. However sometime if some containers have to be tighten one another it can be serveral containers in a Pod. Please keep in mind that one Pod should be in one Server
Node
A Node is a Server. It can contain one or more Pods.
Kubernetes Cluster
Kubernetes Cluster contains serveral Nodes. The nodes can be located in different location. Usually the nodes in a Kubernetes Cluster close to each other in order to perform jobs more efficiently.
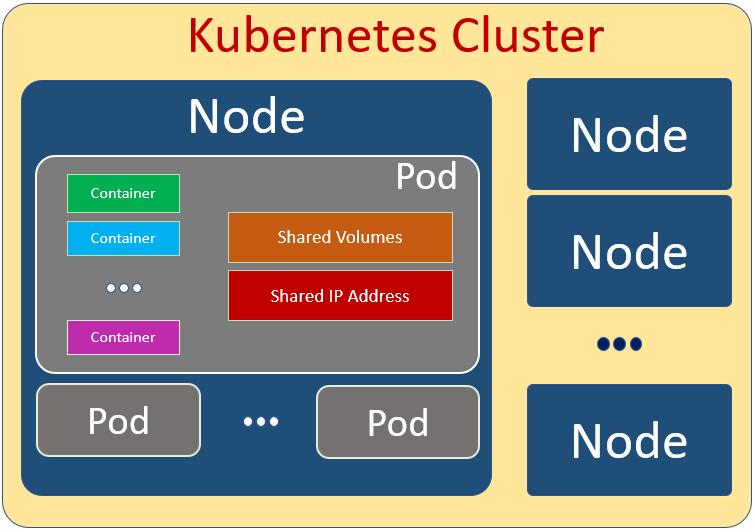
In Kubernetes Cluster there is a Master Node. Other Nodes in the cluster are called Worker Node.
The Master Node manages the Worker Nodes. It’s the Master Node jobs to distribute load across other Woker Nodes. All Pods related to our applications are deployed in the Worker Nodes. The Master Node runs only System Pods which are reponsible for the Kubernetes Cluster jobs in general. In short, the Master Node is the control of the Worker Nodes in Kubernetes Cluster and does not run our applications.
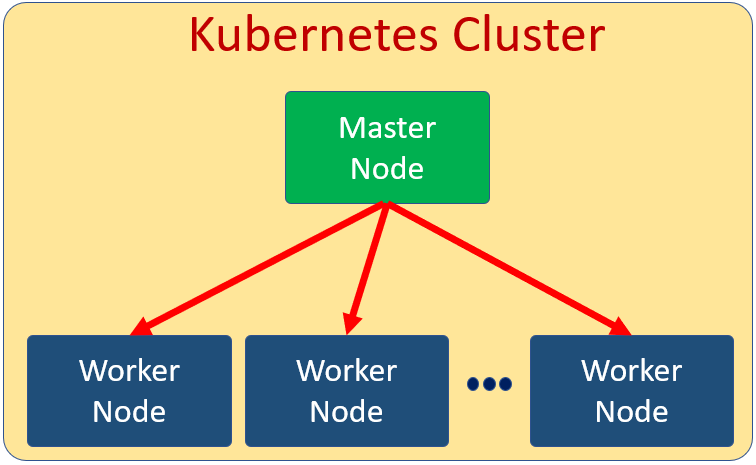
Every cluster has at least one worker node. In a Node there are several components or services. Roughly it’s shown in the following pictures.
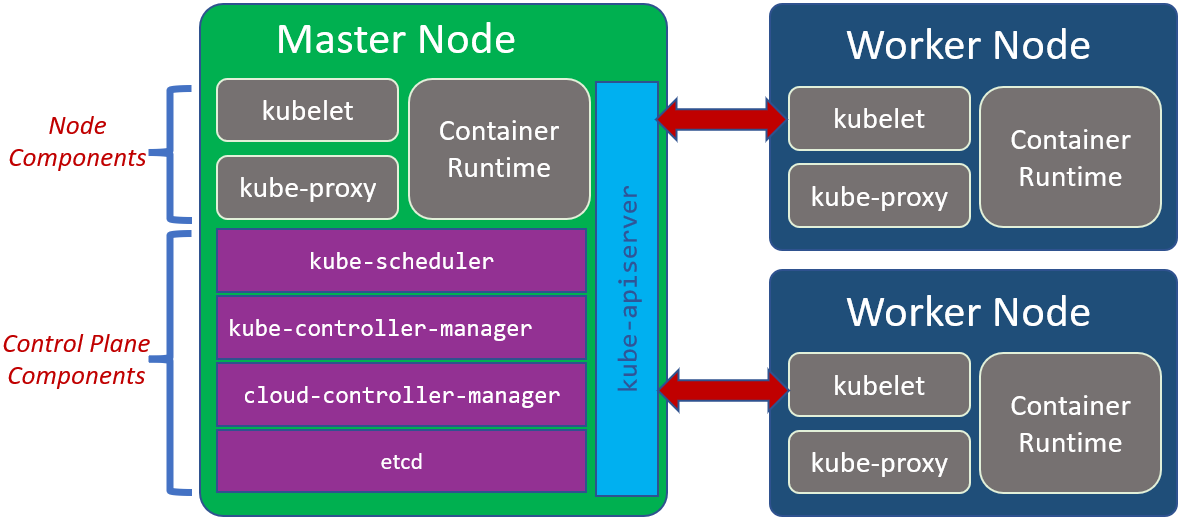
Node Components:
Node components run on every node, maintaining running pods and providing the Kubernetes runtime environment.
-
Contriner Runtime
The container runtime is the software that is responsible for running containers.
-
kubelet
The kubelet is an agent that runs on each node in the cluster. It makes sure that containers are running in a Pod.
-
kube-proxy
The kube-proxy is a network proxy that runs on each node in your cluster, implementing part of the Kubernetes Service concept. It is reponsible for network communication inside on each Node and between Nodes
Control Plane Component
The control plane’s components make global decisions about the cluster (for example, scheduling), as well as detecting and responding to cluster events (for example, starting up a new pod when a deployment’s replicas field is unsatisfied).
-
kube-apiserver
The kube-apiserver is a component of the Kubernetes control plane that exposes the Kubernetes API. The API Service is the main communication between different Node.
-
kube-scheduler
The kube-scheduler is responsible for planning and distribution load in the cluster. It watches for newly created Pods with no assigned node, and selects a node for them to run on.
-
kube-controller-manager
The kube-controller-manager runs controller processes. It controls each Node in the Cluster.
-
cloud-controller-manager
The cloud-controller-manager embeds cloud-specific control logic. The cloud controller manager lets you link your cluster into your cloud provider’s API. If we are running Kubernetes on our own premises, or in a learning environment inside our own PC, the cluster does not have a cloud controller manager.
-
etcd
The etcd stores all cluster data in key value format.
23 Mar 2023
•
docker
About Docker
# show docker version
docker version

# show detail docker engine (configuration, images, containers etc)
docker info

# old docker command format is: docker <COMMAND> (options)
# new docker command format is: docker <COMMAND> <SUB_COMMAND> (options)
# example:
# OLD: docker run
# NEW: docker container run

# show list command
docker
Docker Hub
# login
docker login
winpty docker login

# logout
docker logout
To check whether we have logged or not.
cd ~
cat .docker/config.json
If we have logged in, the response will be:
{
        "auths": {
            "https://index.docker.io/v1/":{}
        },
        "credsStore": "desktop"
}
if not or logged out
{
        "auths":{},
        "credsStore": "desktop"
}
To create private repository, create repository first, then uploaded.
Docker Image
- An image is app binaries and the app’s dependencies. It’s an ordered collection of root filesystem changes and the corresponding execution parameters for use within a container runtime. Inside the image there is not a complete OS. No Kernel, no kernel modules (e.g: drivers). It is just binaries that our application needed, because the host provide the kernel. It is characteristic that differentiate from the VM.
- Docker’s default image “registry” is called Docker Hub (hub.docker.com)
- Show list of sub command of image
- New Command Format is
docker image <SUB_COMMAND> (options)
# Build docker image from a docker file
docker image build -t hello-docker .

# -t  => tag
# hello-docker => image name
# . => current dic of docker file.